The Comments App is a Gluon code sample. For a full list of Gluon code samples, refer to the Gluon website.
In this tutorial, we’ll explain how to create the Comments application that can be deployed on desktop, Android and iOS devices.
Before you start, make sure to check the list of prerequisites for each platform.
Note: This tutorial will use the plugin for NetBeans, but it works as well on Eclipse and IntelliJ.
Code: The code for this project can be found in the samples repository at GitHub.
The sample is located under the directory comments. The reader can clone this repository or create the entire project from scratch, based on the following steps.
Creating the project
Please check this tutorial to learn how to create a new Gluon project in NetBeans.
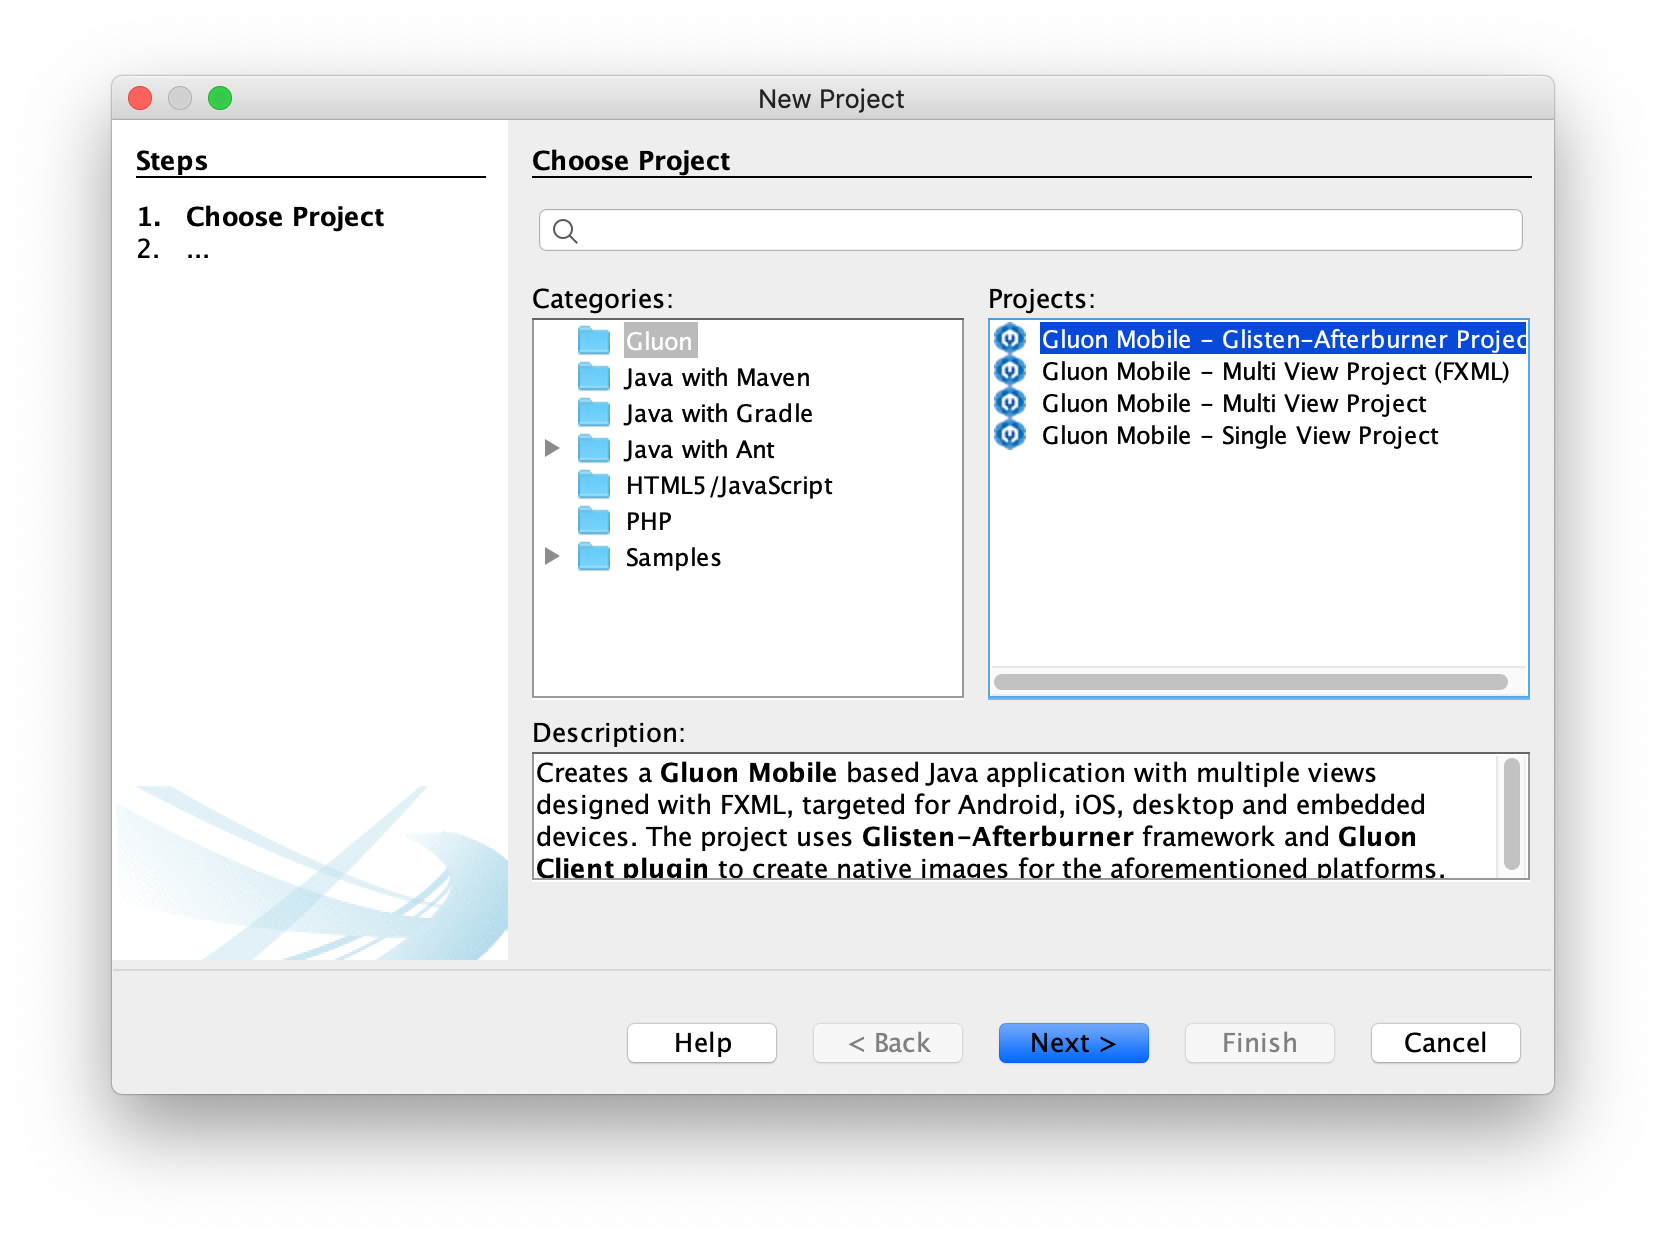
In NetBeans, click File→New Project… and select Gluon on the left. Select Gluon Mobile - Glisten-Afterburner Project from the list of available Projects:
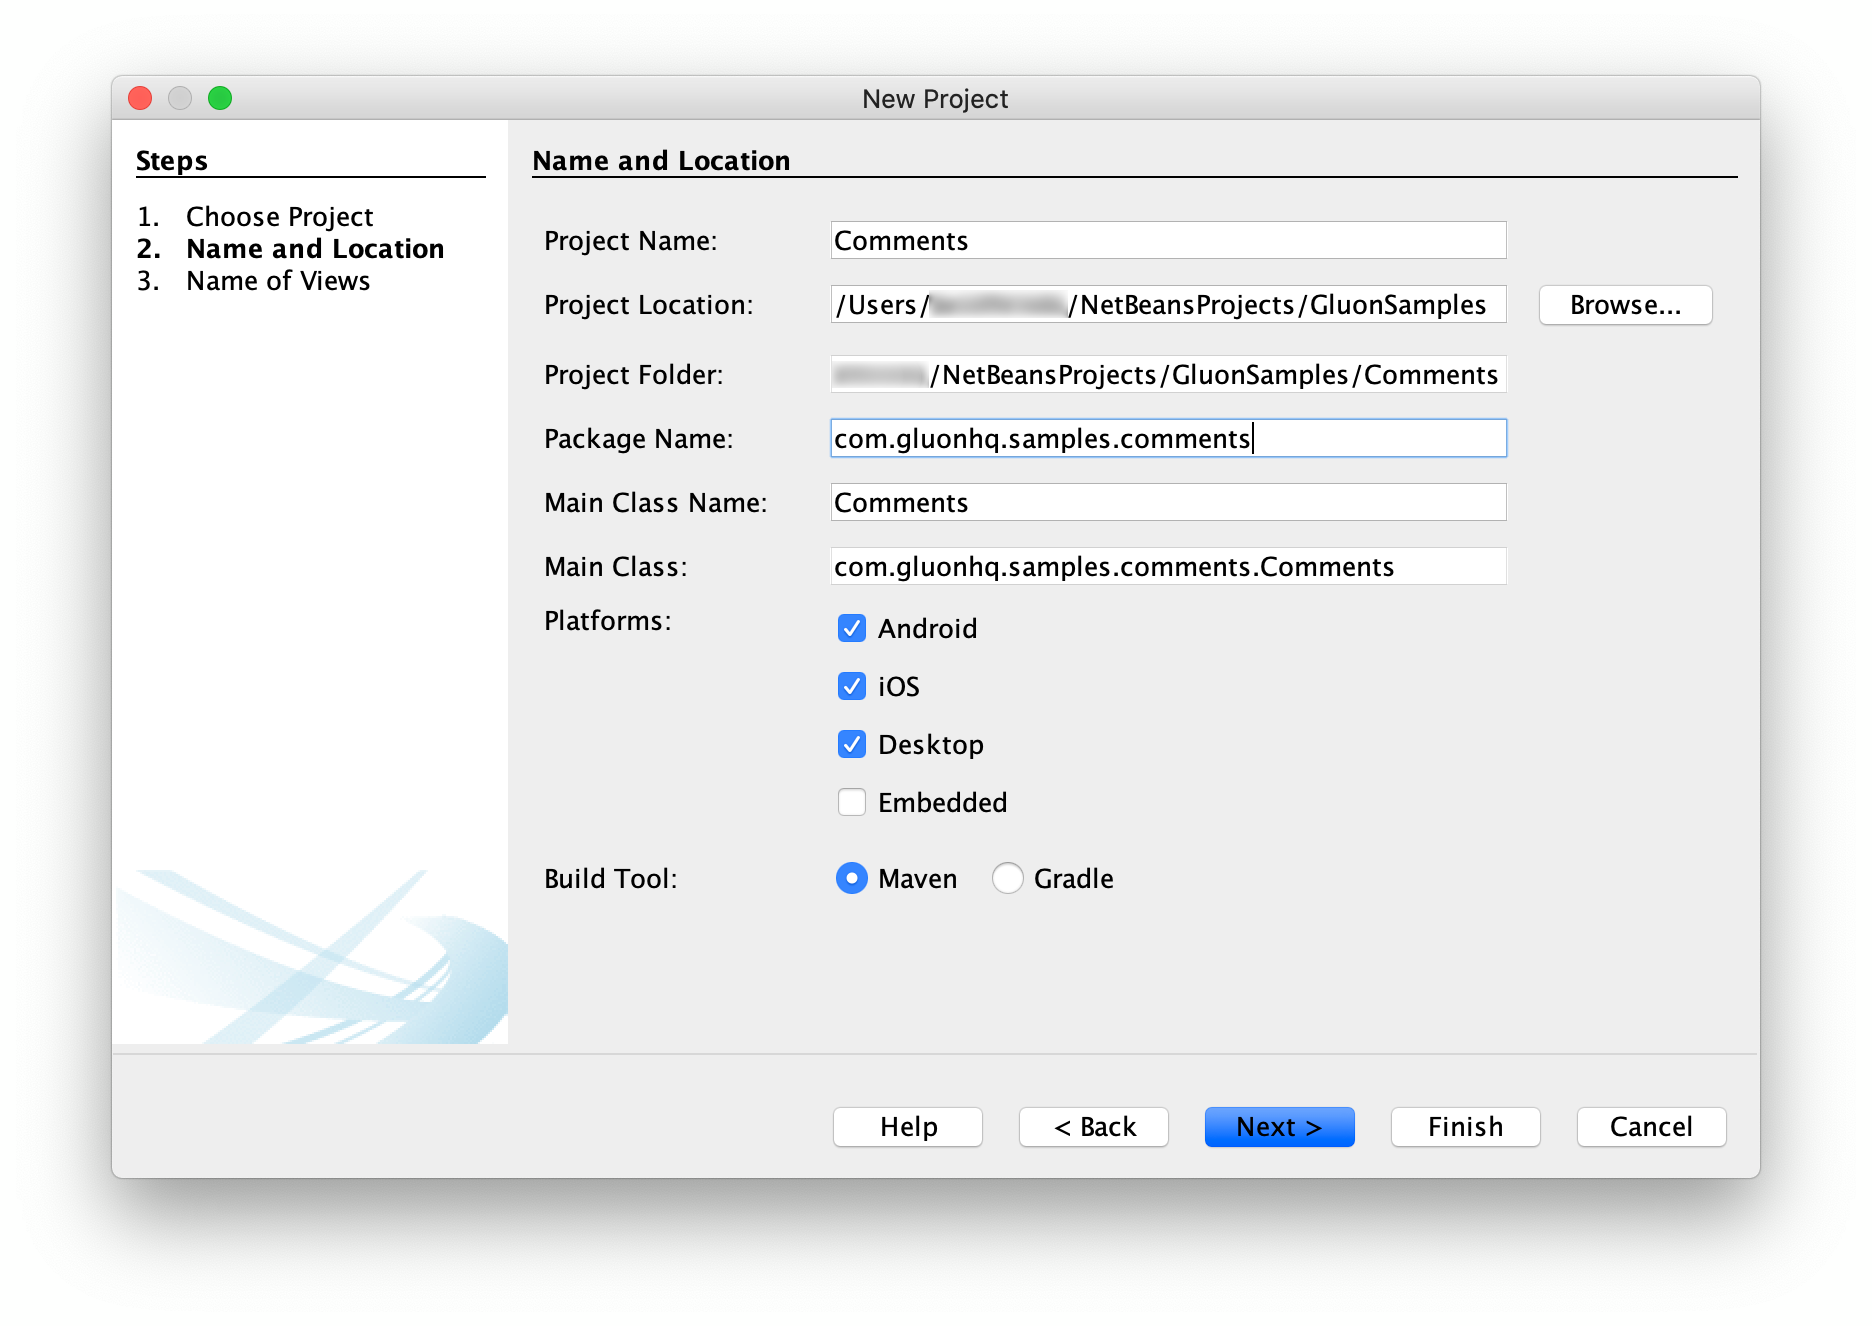
Add a proper name to the application (Comments), find a proper location, add the package name and change the main class name if required.
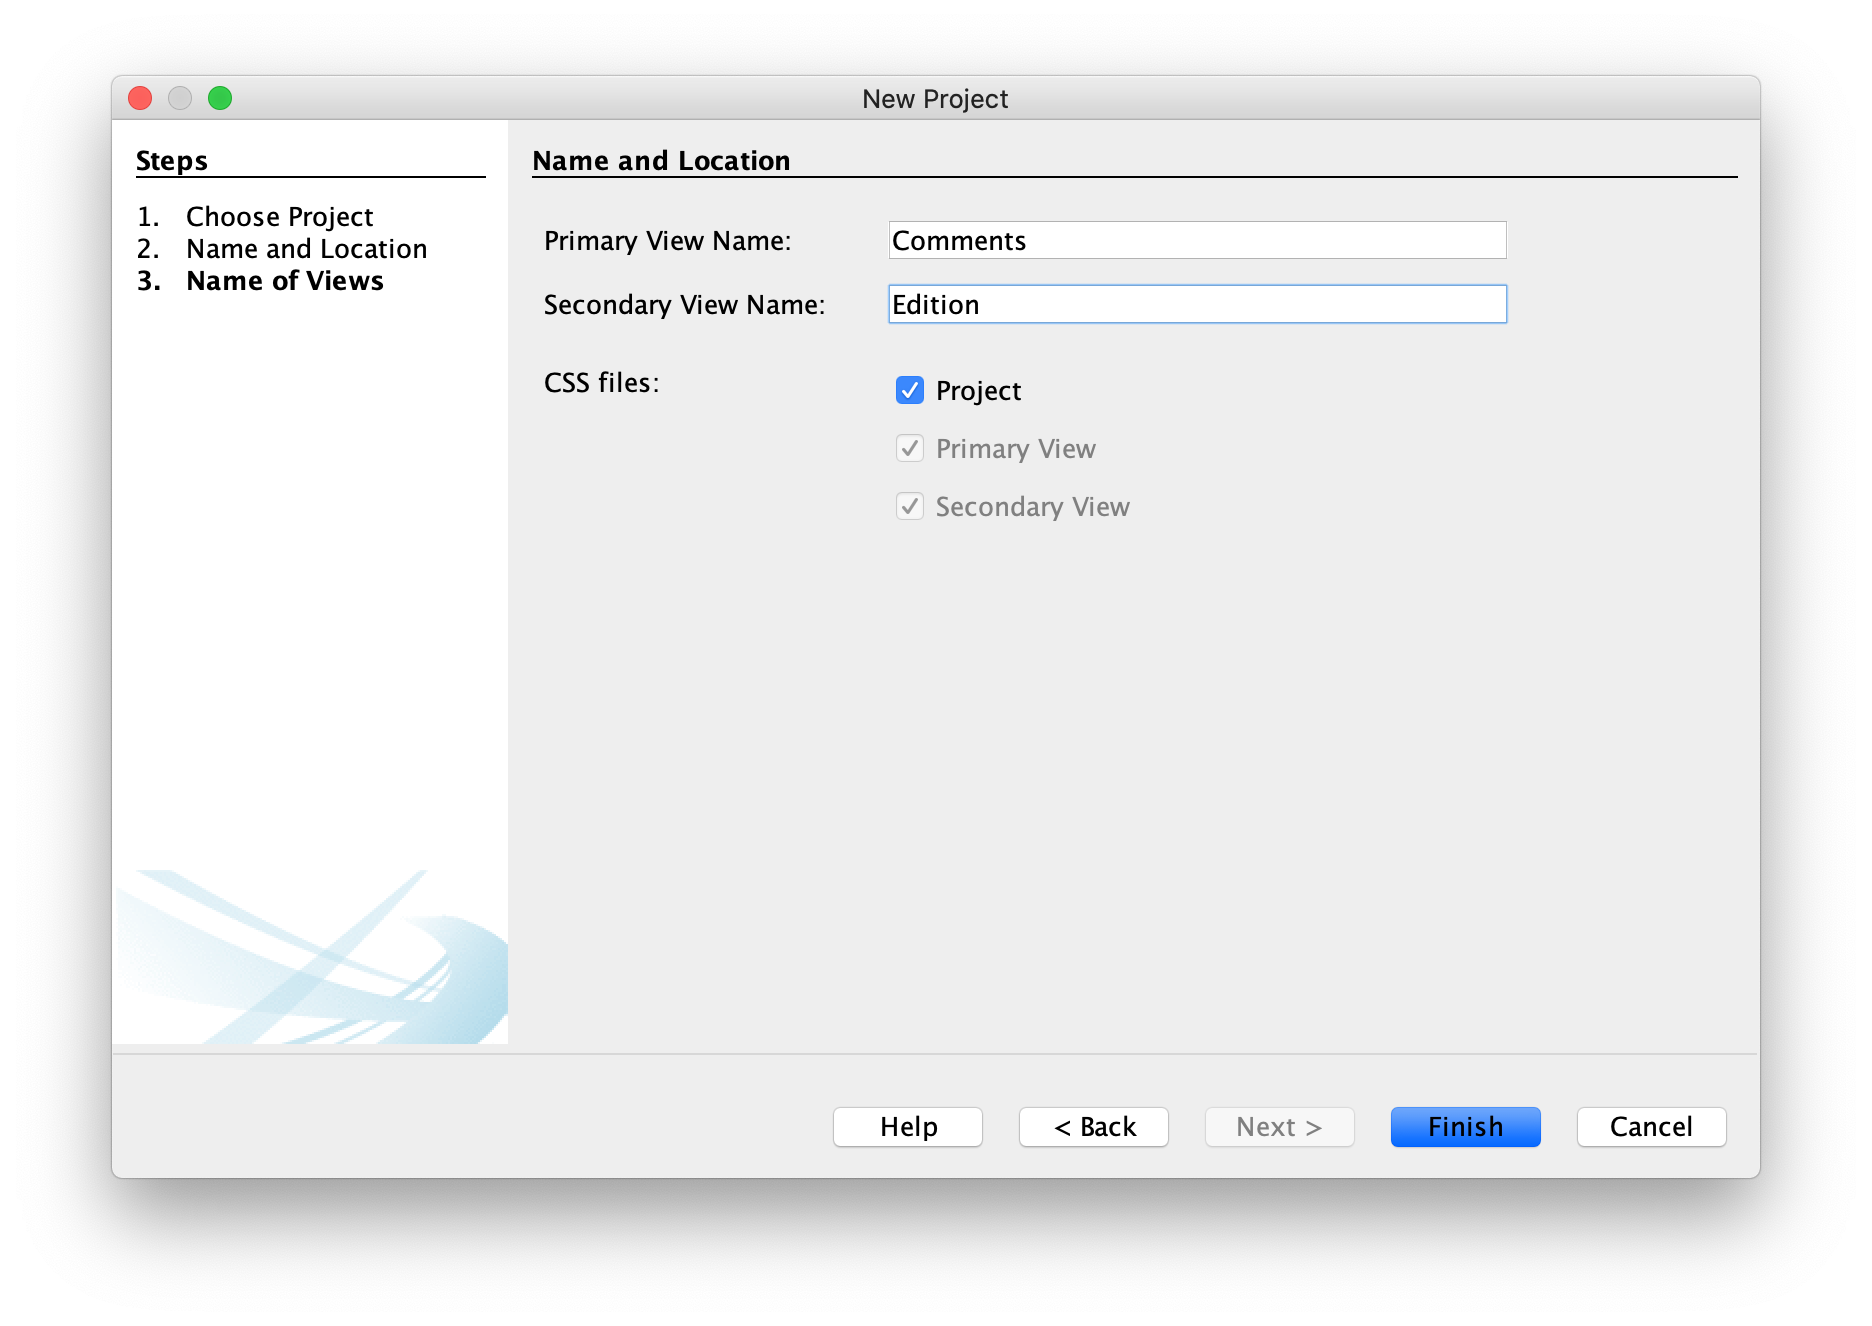
Press Next and change the name of the primary and secondary views, to Comments for the former and Edition for the
latter.
Press Finish and the project will be created and opened.
Reviewing the default project
The main class Comments contains the call to instantiate the views CommentsView and EditionView, and the navigation drawer.
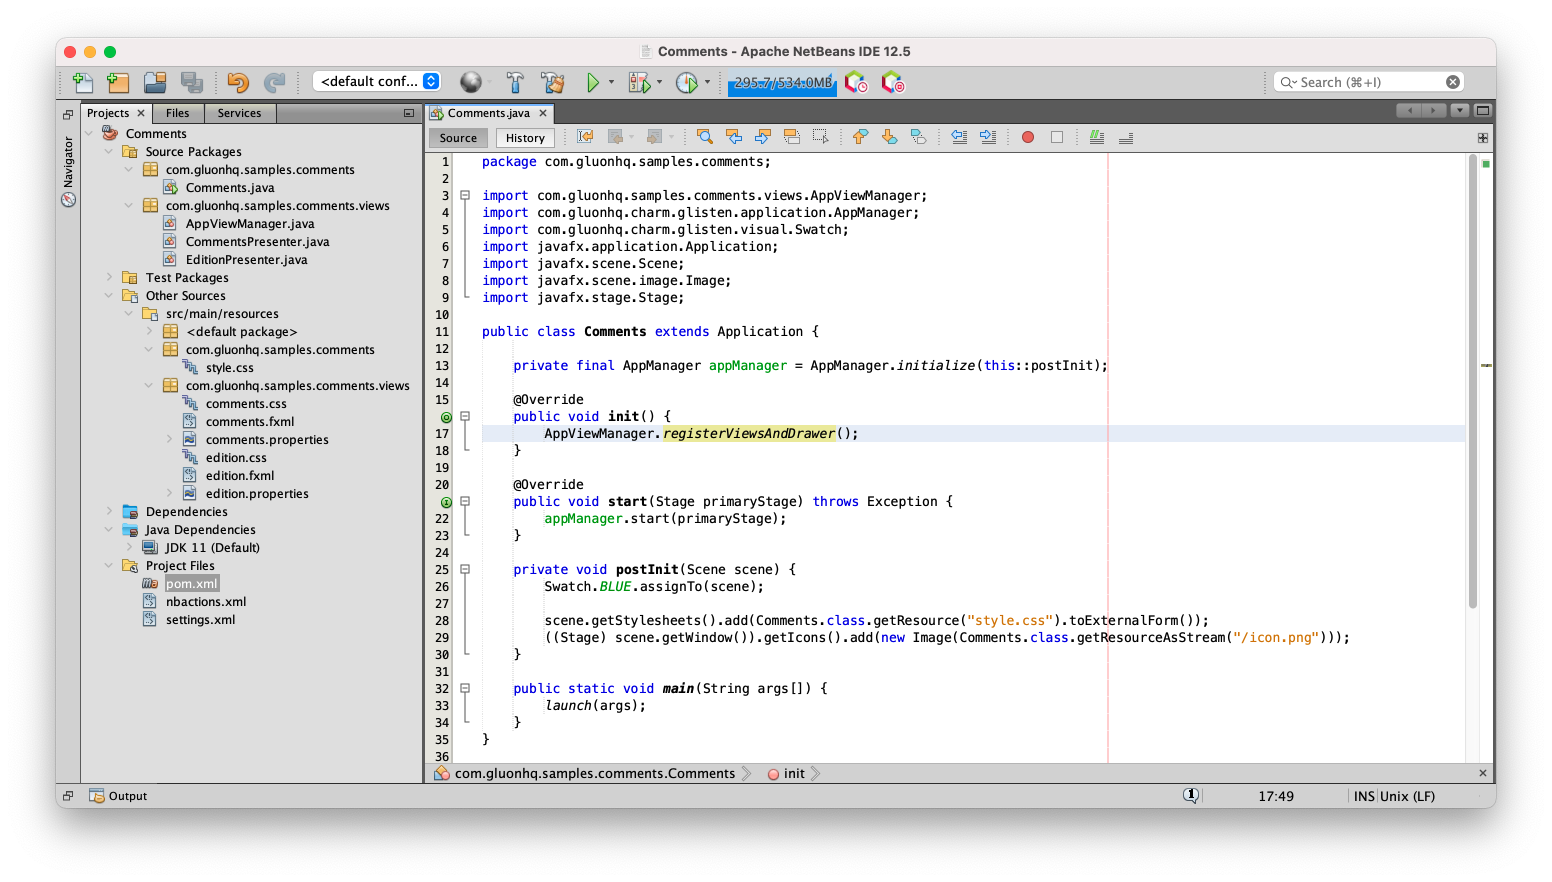
The views are created with FXML with the AppView class, making use of the Afterburner framework. The AppViewManager class takes care of adding the views to an AppViewRegistry instance.
When registerViewsAndDrawer is called, the views in AppViewRegistry are registered. These views are then passed to the NavigationDrawer
fetched from the AppManager instance.
Modifying the project
Let’s start modifying the default project to create our Comments application.
Note class
Our model will be a Comment class, with two String fields holding the author and content of the comment.
public class Comment {

    private String author;
    private String content;

    public Comment() {
    }

    public Comment(String author, String content) {
        this.author = author;
        this.content = content;
    }

    // getters and setters

}
Comments View
The FXML files can be edited with Scene Builder, that includes the Gluon Charm dependencies, and you can easily design Gluon Mobile views.
For starters, let’s add a ListView to the main view, that will contain each and every comment we create.
So let’s edit comments.fxml, remove the content, and add a ListView control in the center.
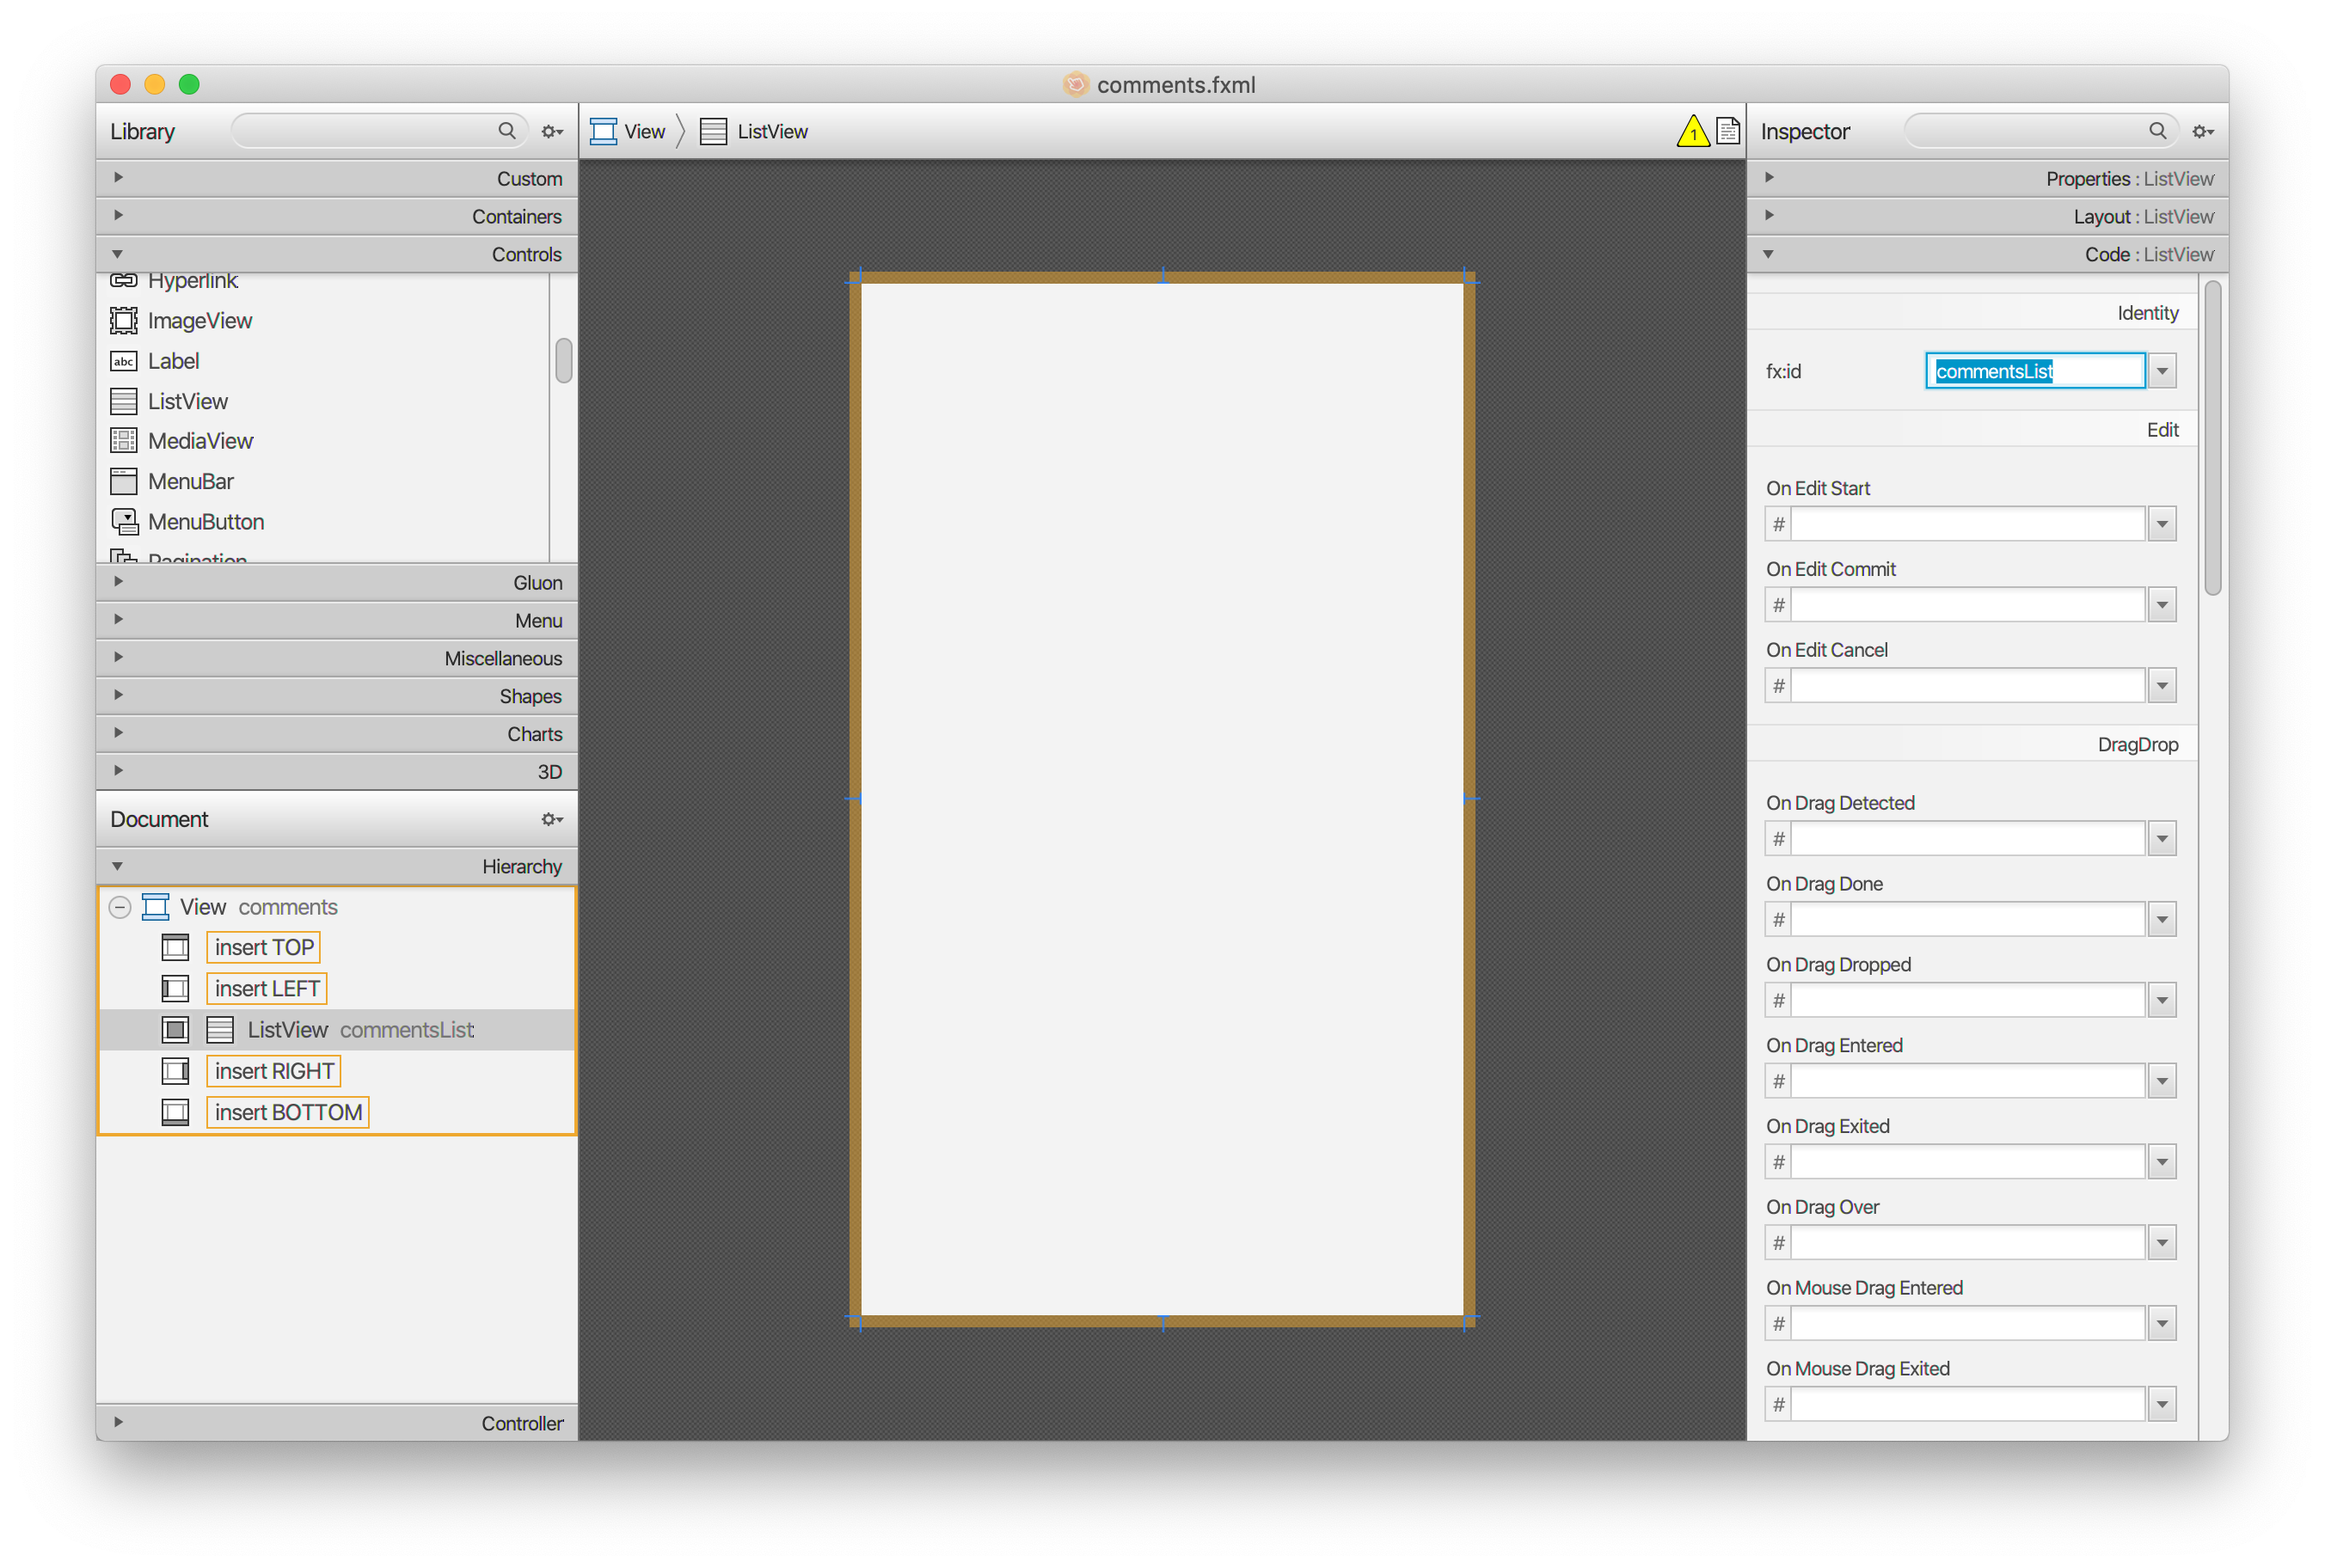
Back to the CommentsPresenter add the list and a FloatingActionButton that allows switching to the edit view to add comments:
public class CommentsPresenter {

    @FXML
    private View comments;

    @FXML
    private ListView<Comment> commentsList;

    public void initialize() {
        comments.showingProperty().addListener((obs, oldValue, newValue) -> {
            if (newValue) {
                AppBar appBar = AppManager.getInstance().getAppBar();
                appBar.setNavIcon(MaterialDesignIcon.MENU.button(e ->
                        AppManager.getInstance().getDrawer().open()));
                appBar.setTitleText("Comments");
            }
        });

        final FloatingActionButton floatingActionButton = new FloatingActionButton(MaterialDesignIcon.ADD.text,
                        e -> AppViewManager.EDITION_VIEW.switchView());
        floatingActionButton.showOn(comments);
    }
}
Now, let’s create a custom cell factory for commentsList, using a ListTile control to wrap the text for the comment in the center, and a button as graphic on the right.
public class CommentListCell extends ListCell<Comment> {

    private final ListTile tile = new ListTile();
    private Comment comment;

    {
        final Button button = MaterialDesignIcon.DELETE.button();
        tile.setSecondaryGraphic(new VBox(button));
    }

    @Override
    protected void updateItem(Comment item, boolean empty) {
        super.updateItem(item, empty);
        comment = item;
        if (!empty && item != null) {
            tile.textProperty().setAll(item.getAuthor(), item.getContent());
            setGraphic(tile);
        } else {
            setGraphic(null);
        }
    }
}
Since the button will use a light color (under a dark swatch) over a white cell, we have to change it to a dark color to make it more visible:
.button.icon-toggle {
    -fx-text-fill: -primary-swatch-900;
}
Now we add the cell factory to commentsList:
public class CommentsPresenter {
public void initialize() {
...
commentsList.setCellFactory(p -> new CommentListCell());
commentsList.setPlaceholder(new Label("There are no comments"));
// for testing only:
commentsList.getItems().add(new Comment("Comments", "This is a comment!"));
}
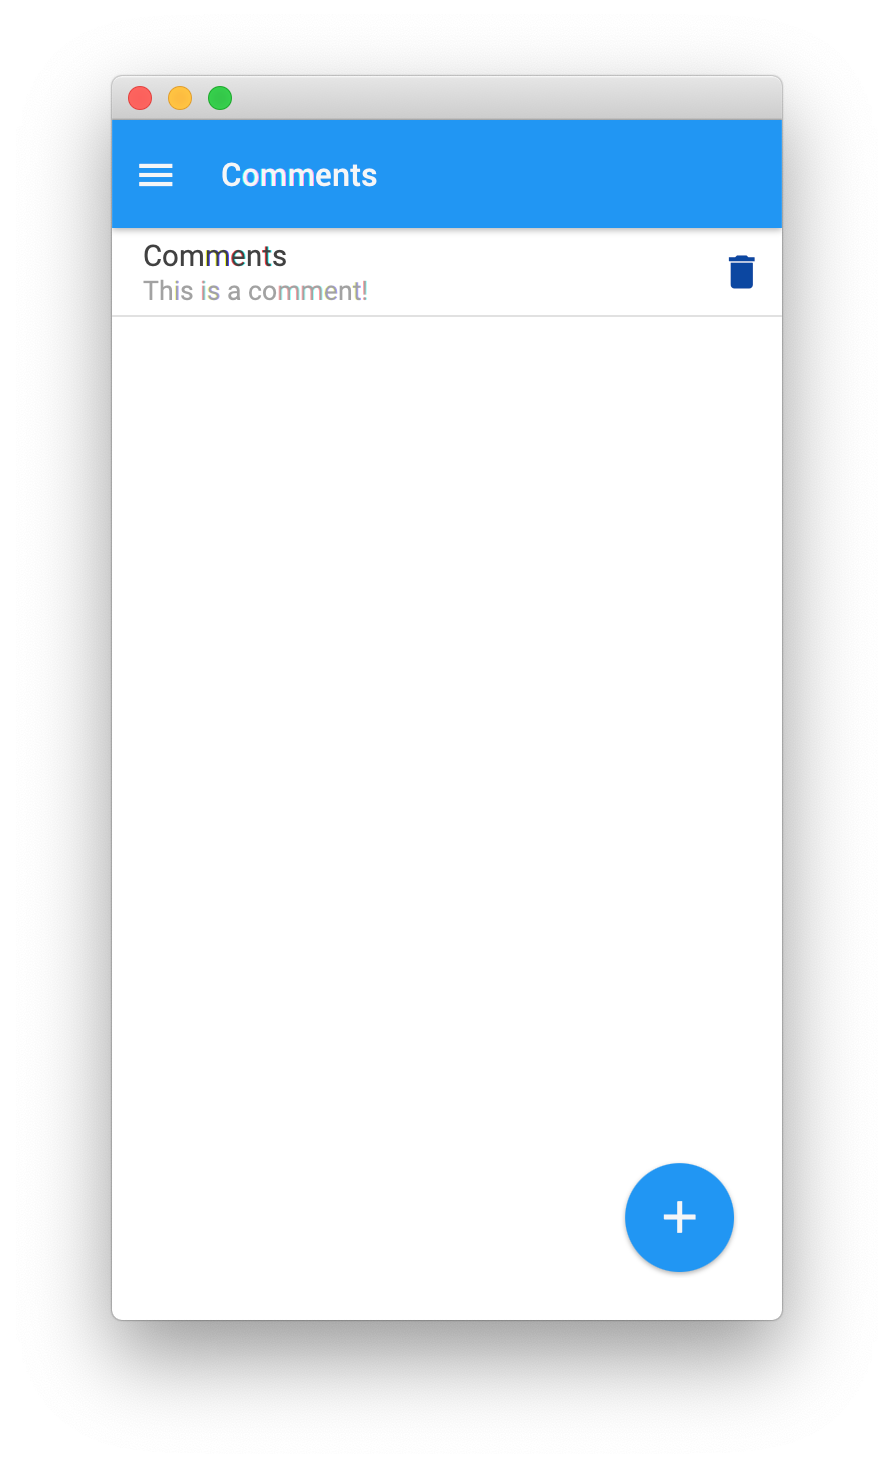
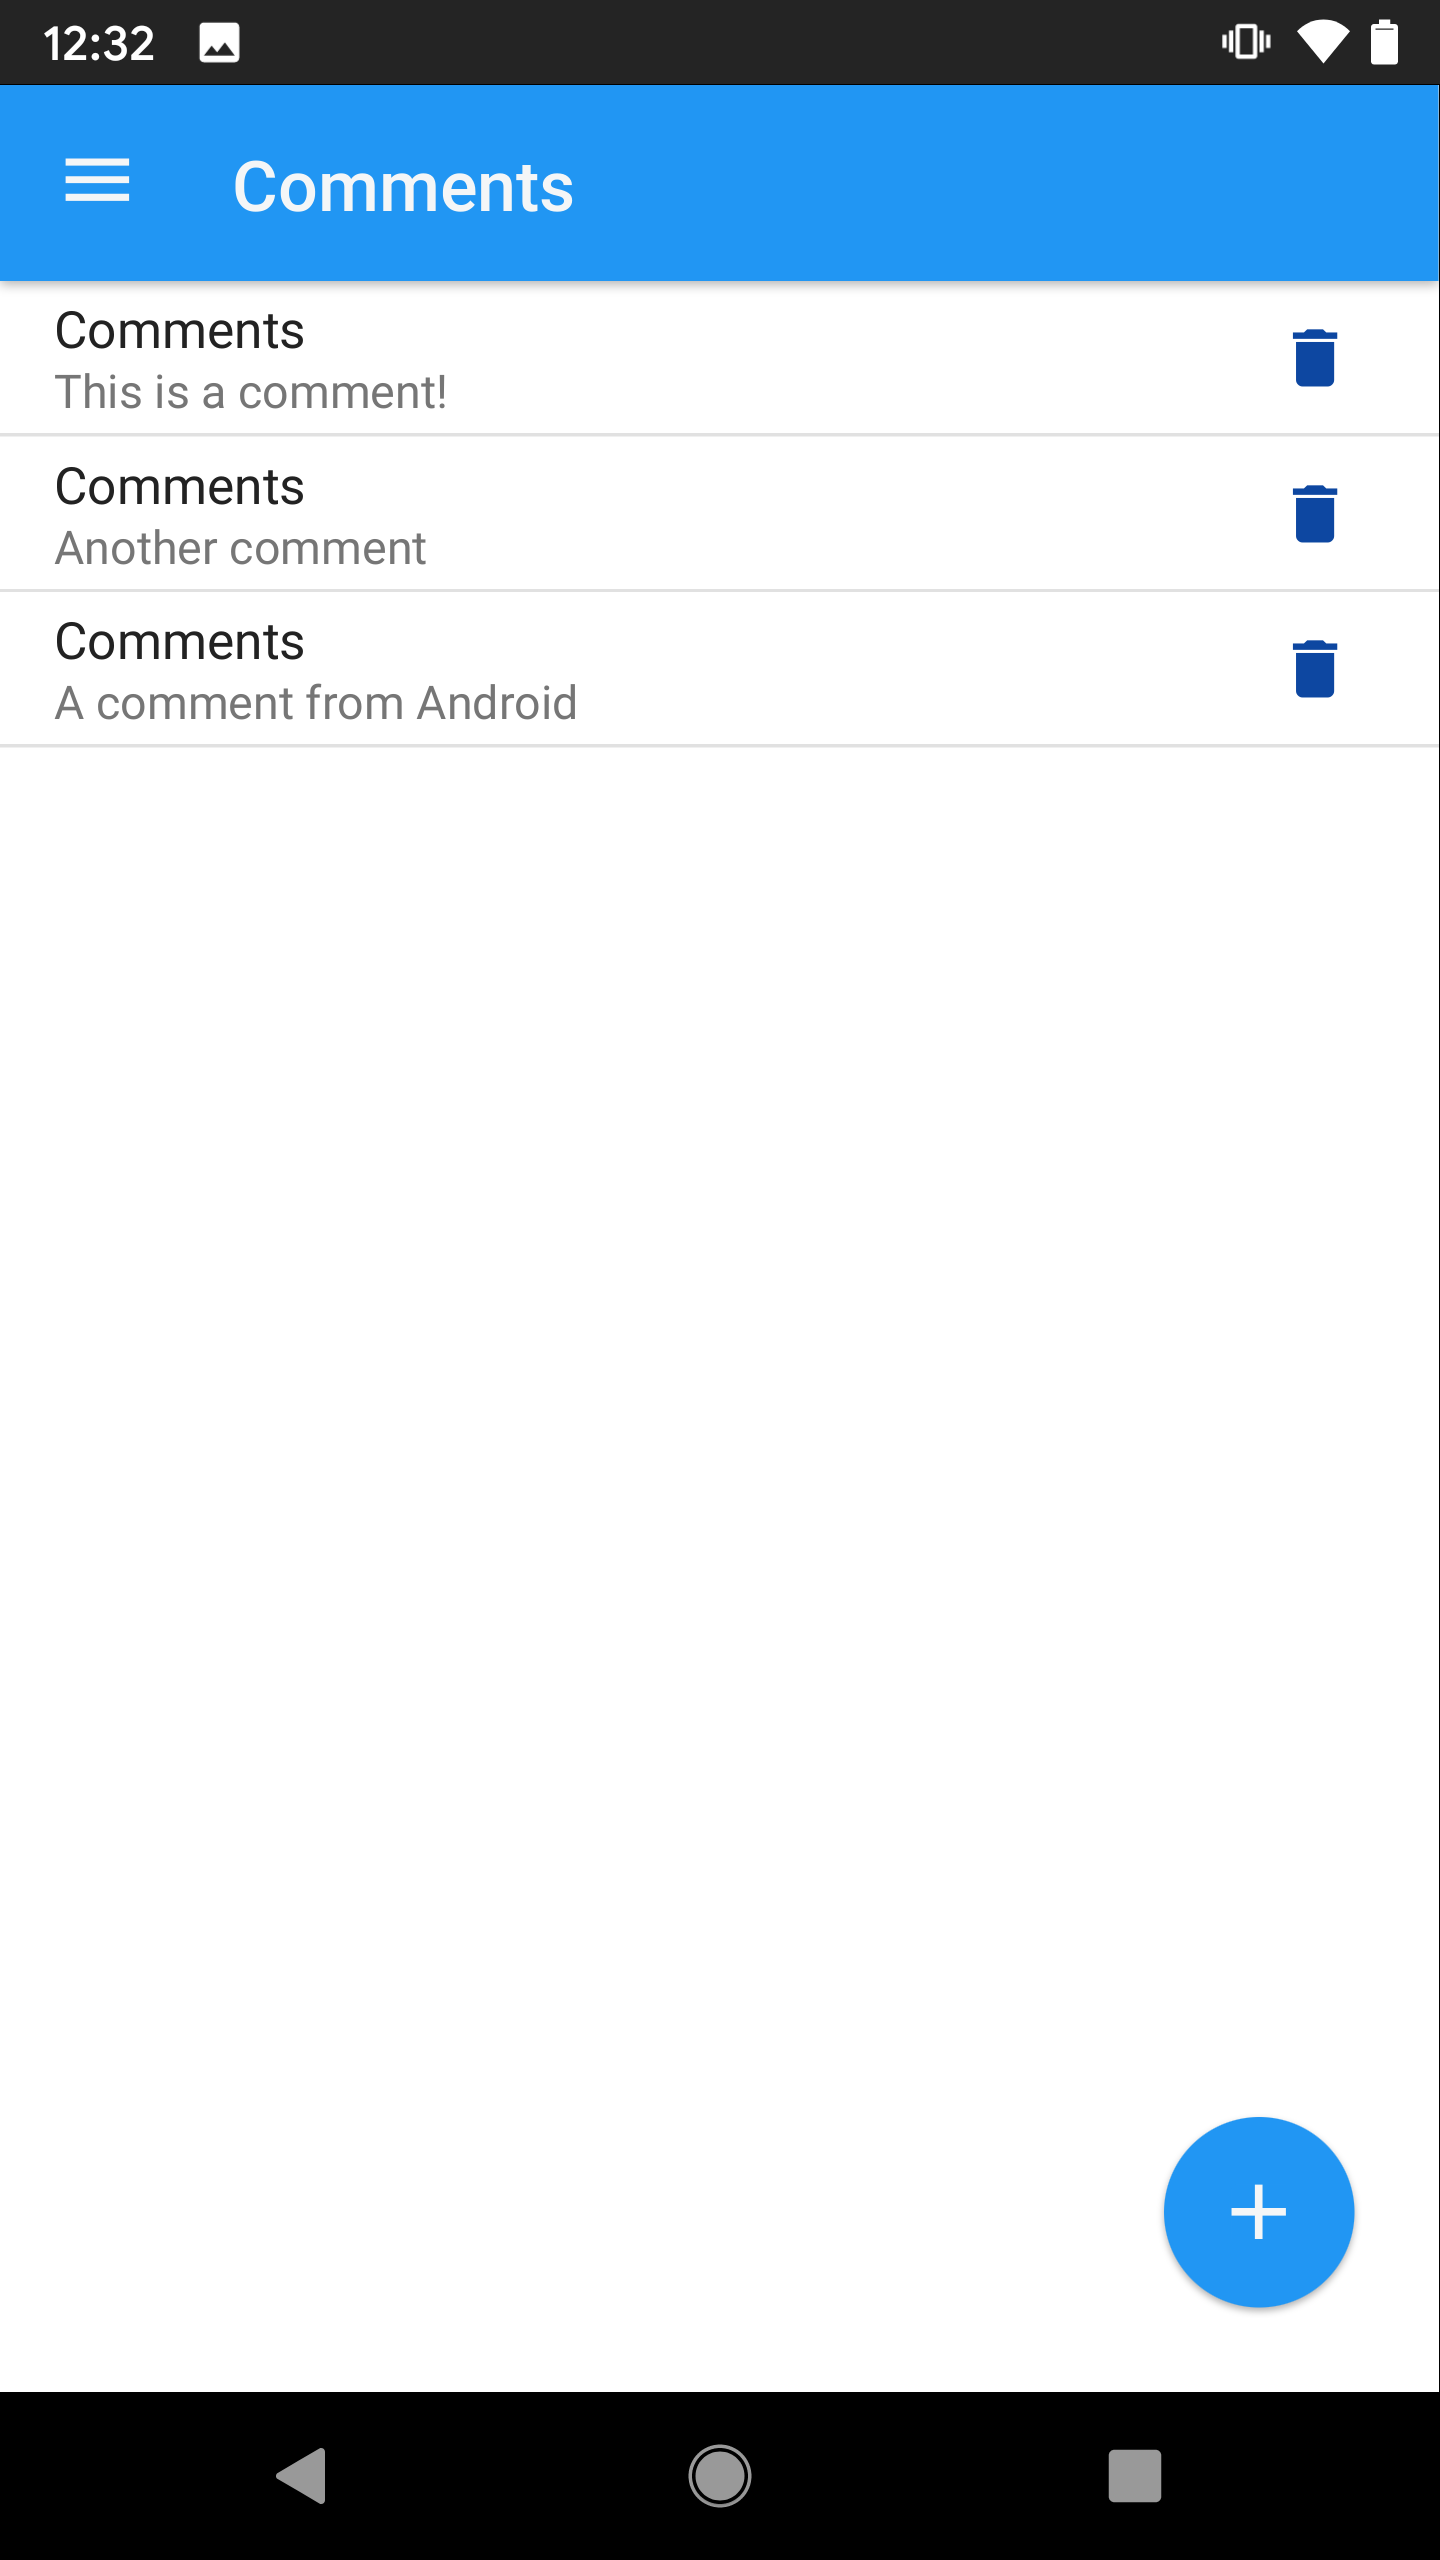
}We have included manually a comment to the list in order to test what we have so far.
Running the project on HotSpot (via Run Project button or from a terminal with mvn gluonfx:run) shows:
Edit View
In order to create and edit the comments, let’s add now to the Edition view a TextField for the author and a TextArea for the content of the comment. Also, a pair of Button controls to cancel or submit the comment.
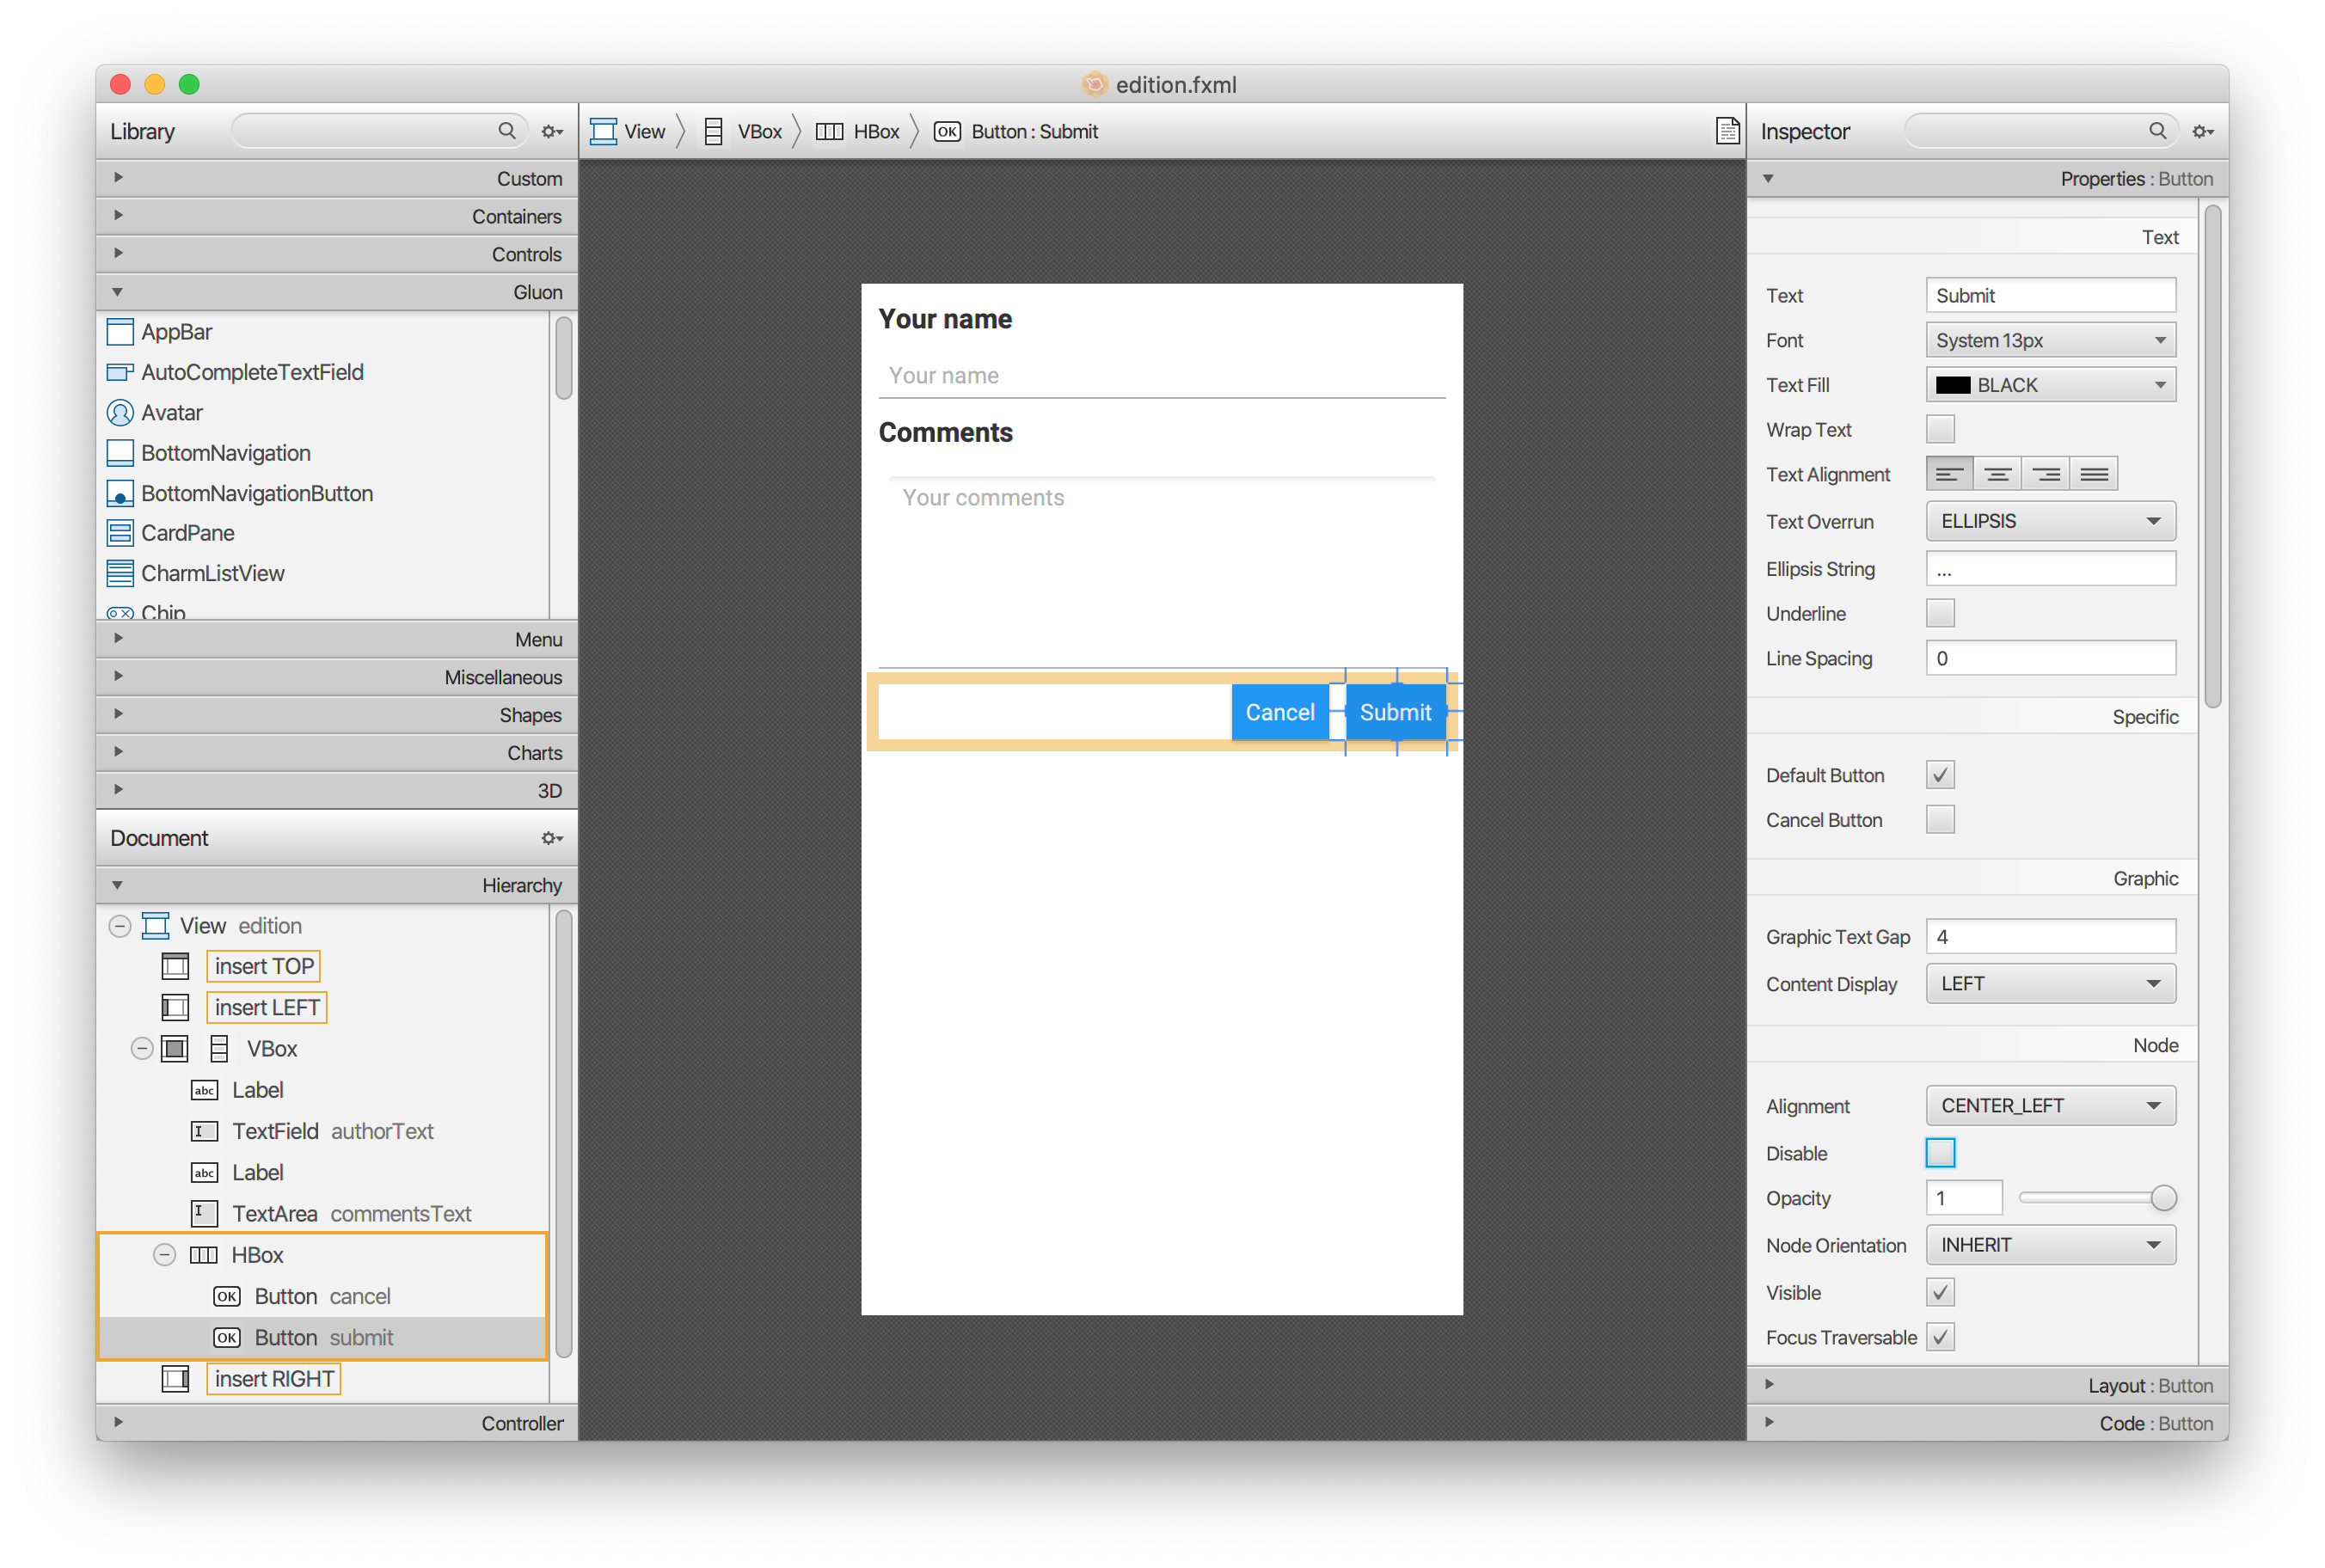
Once-the fx:id tags have been added to each control, select View→Show sample Controller Skeleton from Scene Builder, copy the content and paste it in the EditionPresenter.
public class EditionPresenter {
@FXML
private View edition;
@FXML
private TextField authorText;
@FXML
private TextArea commentsText;
@FXML
private Button submit;
public void initialize() {
edition.setShowTransitionFactory(BounceInRightTransition::new);
edition.showingProperty().addListener((obs, oldValue, newValue) -> {
if (newValue) {
AppBar appBar = AppManager.getInstance().getAppBar();
appBar.setNavIcon(MaterialDesignIcon.MENU.button(e ->
AppManager.getInstance().getDrawer().open()));
appBar.setTitleText("Edition");
}
});
submit.disableProperty().bind(Bindings.createBooleanBinding(() -> {
return authorText.textProperty().isEmpty()
.or(commentsText.textProperty().isEmpty()).get();
}, authorText.textProperty(), commentsText.textProperty()));
}
@FXML
void onCancel(ActionEvent event) {
}
@FXML
void onSubmit(ActionEvent event) {
}
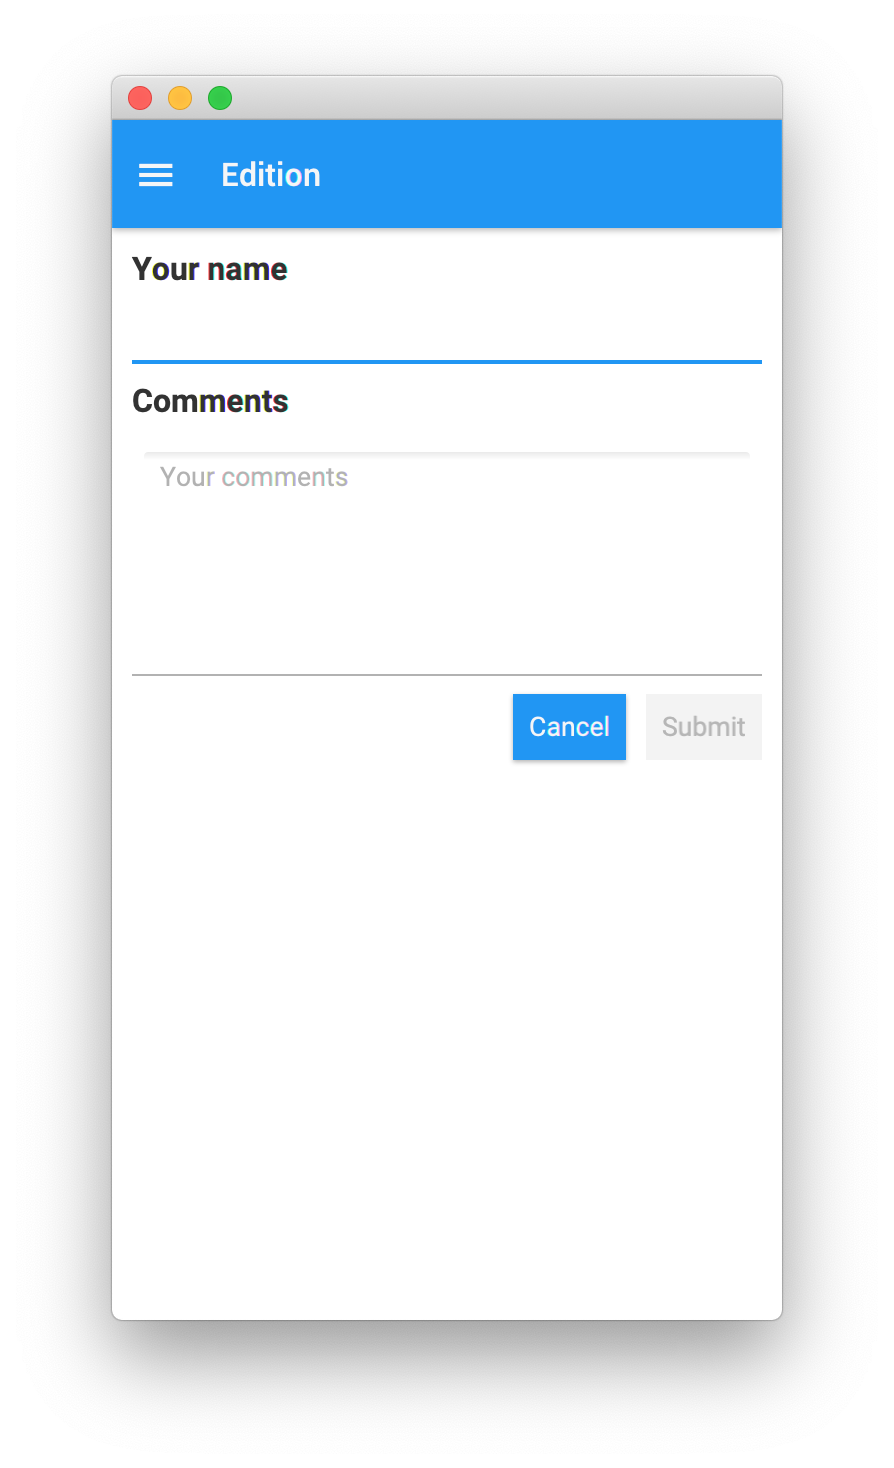
}Running the application again, we can access the edit view either through the floating action button or via the navigation drawer:
Gluon CloudLink
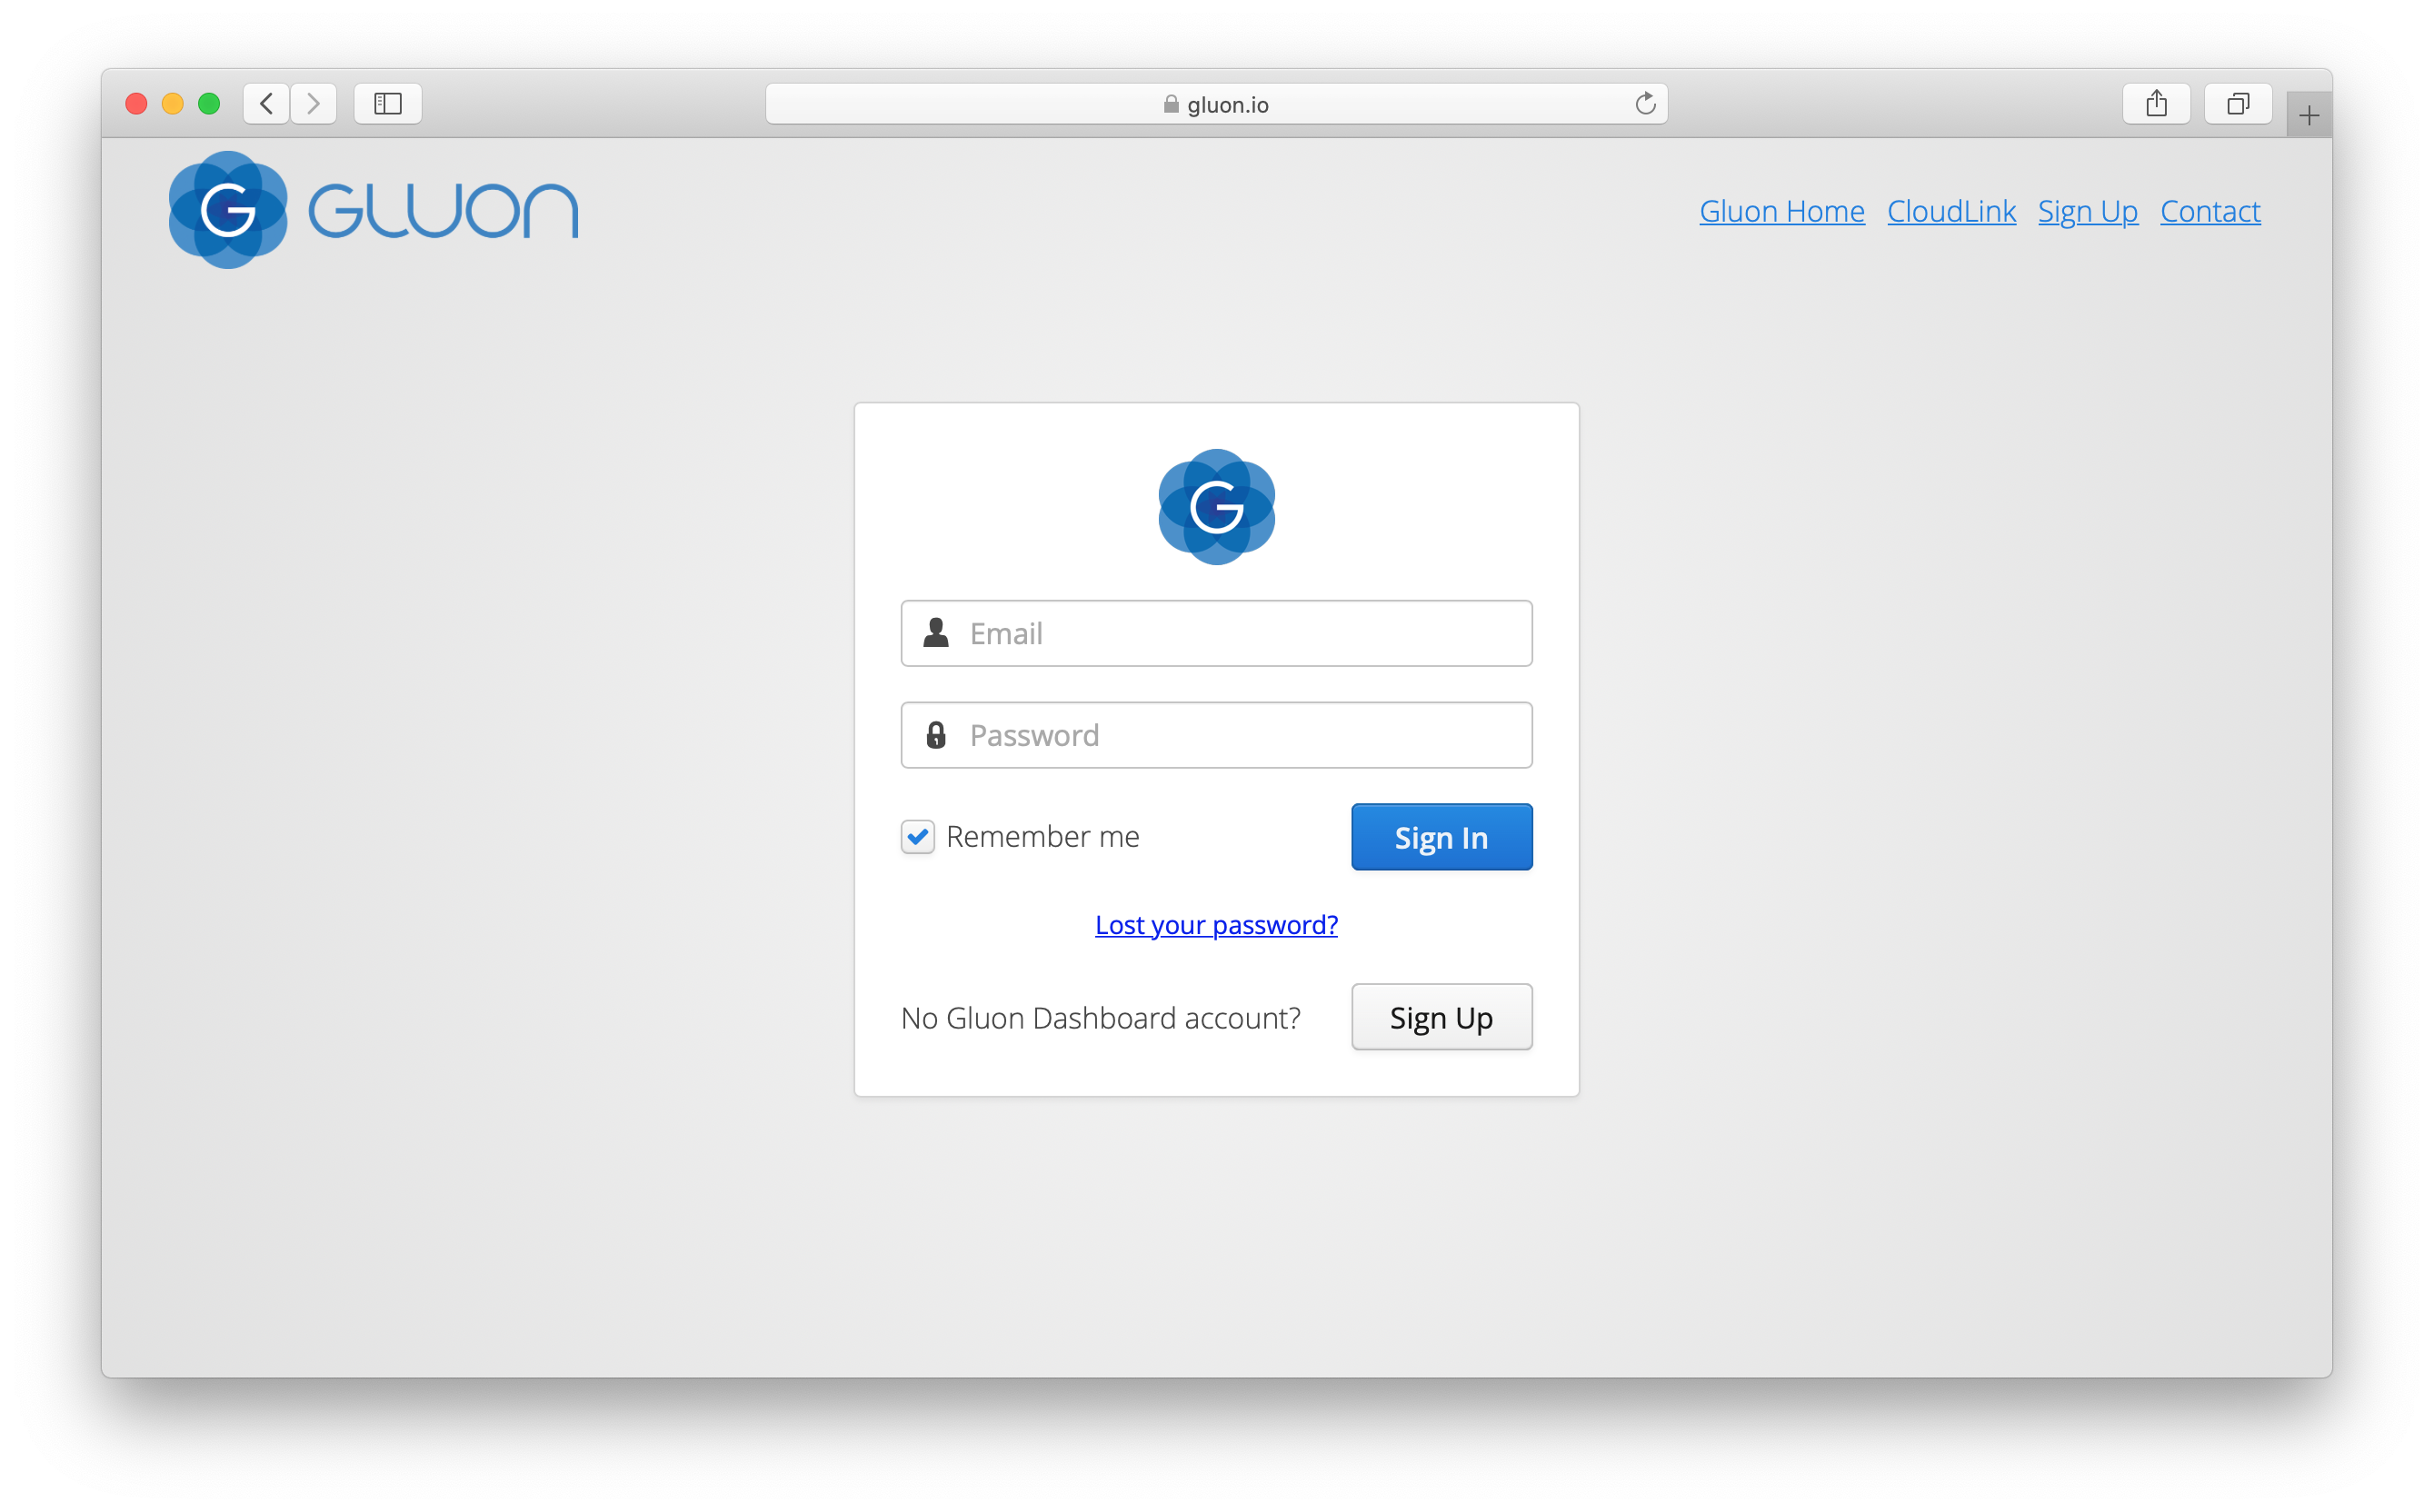
This sample uses Gluon CloudLink to store and synchronize data in the cloud. A pair of key and secret tokens, specific for the application, are used for signing the requests that are made to Gluon CloudLink.
To obtain a key and secret, you need a valid subscription to Gluon CloudLink. You can get it here (there is also a 30-day free trial). Sign up and get a valid account on Gluon CloudLink and a link to access the Gluon Dashboard.
Open the Dashboard in your browser, and sign in using the Gluon account credentials provided to create the account.
Go to the App Management link, and you will
find a pair of key/secret tokens. Click on the download button to download the file gluoncloudlink_config.json, and then store it under your project src/main/resources/ folder.

The content of the file is a JSON object with the key and secret that will grant access to Gluon CloudLink:
{
  "gluonCredentials": {
    "applicationKey" : "f88XXXXX-XXXX-XXXX-XXXX-XXXXXXXXXXXX",
    "applicationSecret": "7fbXXXXX-XXXX-XXXX-XXXX-XXXXXXXXXXXX"
  }
}
Service class
Let’s create a service that uses Gluon CloudLink to store the comments we create and/or edit in the cloud.
You can check the Data Storage section of the Gluon CloudLink
documentation to find out about DataClient and GluonObservableList concepts in more detail.
Let’s add first the following dependencies to the pom:
<dependencies>
    ...
    <dependency>
        <groupId>com.gluonhq</groupId>
        <artifactId>charm-cloudlink-client</artifactId>
        <version>6.0.7</version>
    </dependency>
    <dependency>
        <groupId>com.gluonhq</groupId>
        <artifactId>connect</artifactId>
        <version>2.0.1</version>
    </dependency>
    <dependency>
        <groupId>org.glassfish</groupId>
        <artifactId>jakarta.json</artifactId>
        <version>1.1.6</version>
        <classifier>module</classifier>
        <scope>runtime</scope>
    </dependency>
    <dependency>
        <groupId>org.glassfish.jaxb</groupId>
        <artifactId>jaxb-runtime</artifactId>
        <version>2.3.1</version>
        <scope>runtime</scope>
    </dependency>
</dependencies>
We can now build a new DataClient, which is the access point to the Data Storage service of Gluon CloudLink. We use the @PostContruct annotation on the method that will be called by the Afterburner framework, once the service is instanced, but before it can be used.
public class Service {

    private DataClient dataClient;

    @PostConstruct
    public void postConstruct() {
        dataClient = DataClientBuilder.create().build();
    }
}
Once we have a DataClient reference, we can retrieve data from and store data to Gluon CloudLink. In this case, the
data will be a list with comments.
Using a DataProvider as an entry point to retrieve a GluonObservableList, we need to supply a proper
ListDataReader, a valid entity with the ability to read a list of objects. For that, the DataClient instance already
has a method: createListDataReader(). All it needs is an identifier (CLOUD_LIST_ID), and the object class to be read
(Comment.class).
By default, it will also apply the following data synchronization flags:
-
LIST_WRITE_THROUGH, means that changes in the local list are reflected to the remote copy of that list on Gluon CloudLink. -
LIST_READ_THROUGH, means that changes in the remote list on Gluon CloudLink are reflected to the local copy of that list: Any change done in any client app will be reflected in the cloud, and immediately broadcast to all the listening applications.
public class Service {

    private static final String CLOUD_LIST_ID = "comments";

    private DataClient dataClient;

    private final ListProperty<Comment> commentsList =
            new SimpleListProperty<>(FXCollections.<Comment>observableArrayList());

    @PostConstruct
    public void postConstruct() {
        dataClient = DataClientBuilder.create().build();
    }

    public void retrieveComments() {
        GluonObservableList<Comment> retrieveList = DataProvider.<Comment>retrieveList(
                dataClient.createListDataReader(CLOUD_LIST_ID, Comment.class));

        retrieveList.stateProperty().addListener((obs, ov, nv) -> {
            if (ConnectState.SUCCEEDED.equals(nv)) {
                commentsList.set(retrieveList);
            }
        });

    }

    public void addComment(Comment comment) {
        commentsList.get().add(comment);
    }

    public ListProperty<Comment> commentsProperty() {
        return commentsList;
    }
}
We’ll wrap this remote observable list into an ListProperty in order to expose it to the view and bind it with the
ListView content. We also create an addComment() method, that will be used to add comments from the Edition view.
Since Comment will be used reflectively by DataProvider, we need to add it to the reflection list. The same goes for the Service class that will be injected in the presenters:
<reflectionList>
    <list>com.gluonhq.samples.comments.views.CommentsPresenter</list>
    <list>com.gluonhq.samples.comments.views.EditionPresenter</list>
    <list>com.gluonhq.samples.comments.model.Comment</list>
    <list>com.gluonhq.samples.comments.cloud.Service</list>
</reflectionList>
Injecting the Service
Back to CommentsPresenter, we can inject a singleton instance of the Service by using the @Inject annotation, and then add the list of comments to the ListView, and call service.retrieveComments() to initially retrieve the list from the cloud.
public class CommentsPresenter {

    @Inject
    private Service service;

    public void initialize() {
        ...
        commentsList.setItems(service.commentsProperty());

        service.retrieveComments();
    }
}
Also, on EditionPresenter, we can inject the service as well, so the user can submit new comments.
public class EditionPresenter {

    @Inject
    private Service service;

    @FXML
    void onCancel(ActionEvent event) {
        authorText.setText("");
        commentsText.setText("");
        AppManager.getInstance().goHome();
    }

    @FXML
    void onSubmit(ActionEvent event) {
        service.addComment(new Comment(authorText.getText(), commentsText.getText()));
        authorText.setText("");
        commentsText.setText("");
        AppManager.getInstance().goHome();
    }
}
Confirmation Dialog
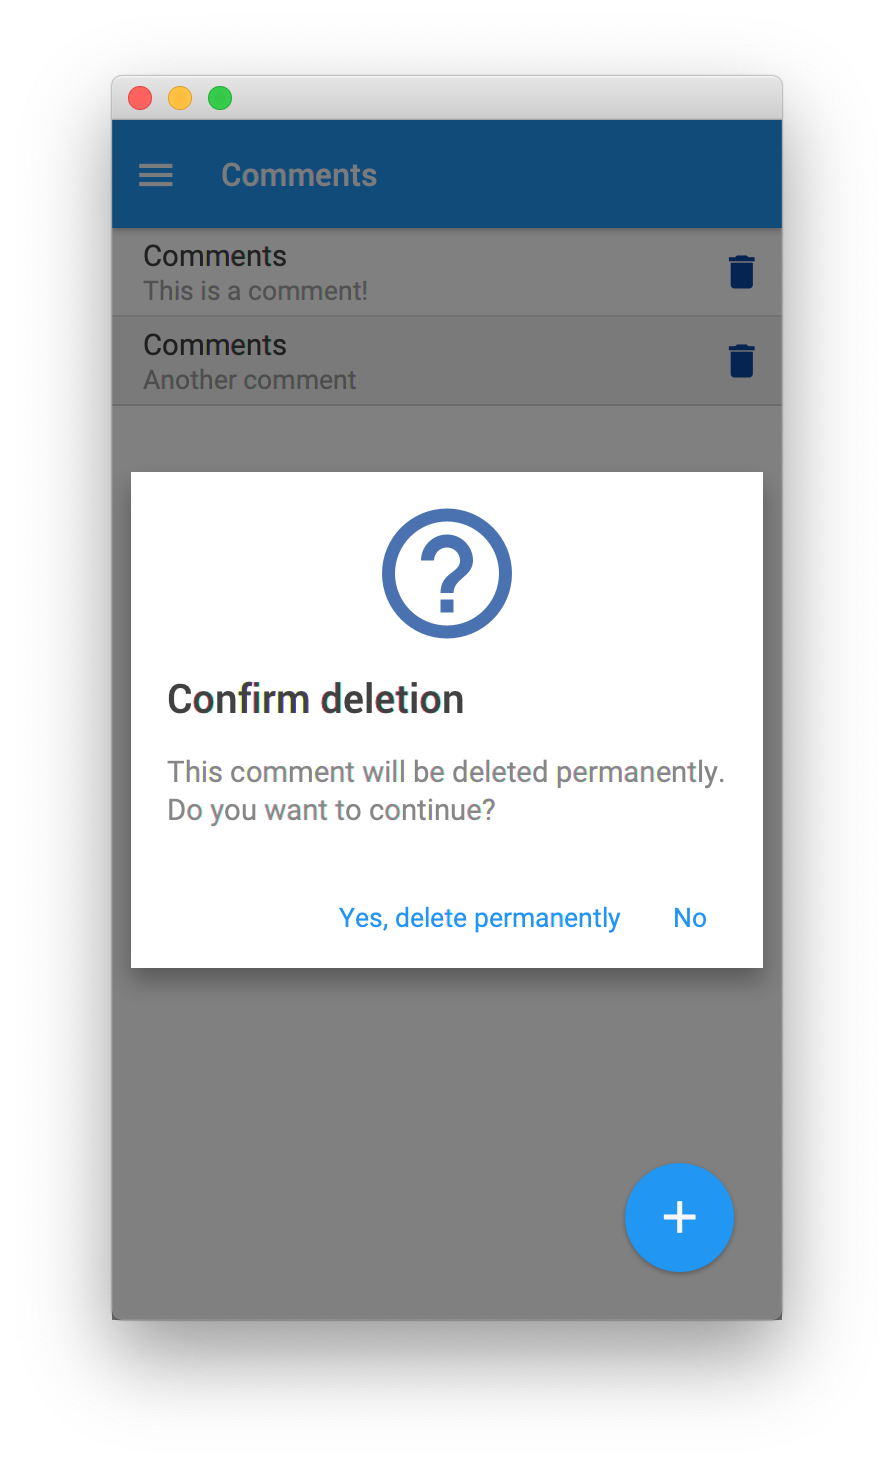
The last step to complete the app will be adding a confirmation dialog before deleting a comment. By calling from the cell listViewProperty().get().getItems().remove(item), this will be propagated to the Cloud, and from there to the rest of the clients.
public class CommentListCell extends ListCell<Comment> {

    {
        final Button button = MaterialDesignIcon.DELETE.button(e -> showDialog(comment));
        ...
    }

    private void showDialog(Comment item) {
        Alert alert = new Alert(AlertType.CONFIRMATION);
        alert.setTitleText("Confirm deletion");
        alert.setContentText("This comment will be deleted permanently.\nDo you want to continue?");

        Button yes = new Button("Yes, delete permanently");
        yes.setOnAction(e -> {
            alert.setResult(ButtonType.YES);
            alert.hide();
        });
        yes.setDefaultButton(true);

        Button no = new Button("No");
        no.setCancelButton(true);
        no.setOnAction(e -> {
            alert.setResult(ButtonType.NO);
            alert.hide();
        });
        alert.getButtons().setAll(yes,no);

        Optional result = alert.showAndWait();
        if(result.isPresent() && result.get().equals(ButtonType.YES)){
            listViewProperty().get().getItems().remove(item);
        }
    }
}
Testing the App
Build, run and test the application on desktop, both on HotSpot and creating a native image:
HotSpot
Before creating a native image, let’s run first the app on HotSpot with the regular JDK 11+, as this will be faster faster for spotting and fixing any possible issue.
Press the Run project (Comments) button or press F6, or open a terminal and run: mvn gluonfx:run.
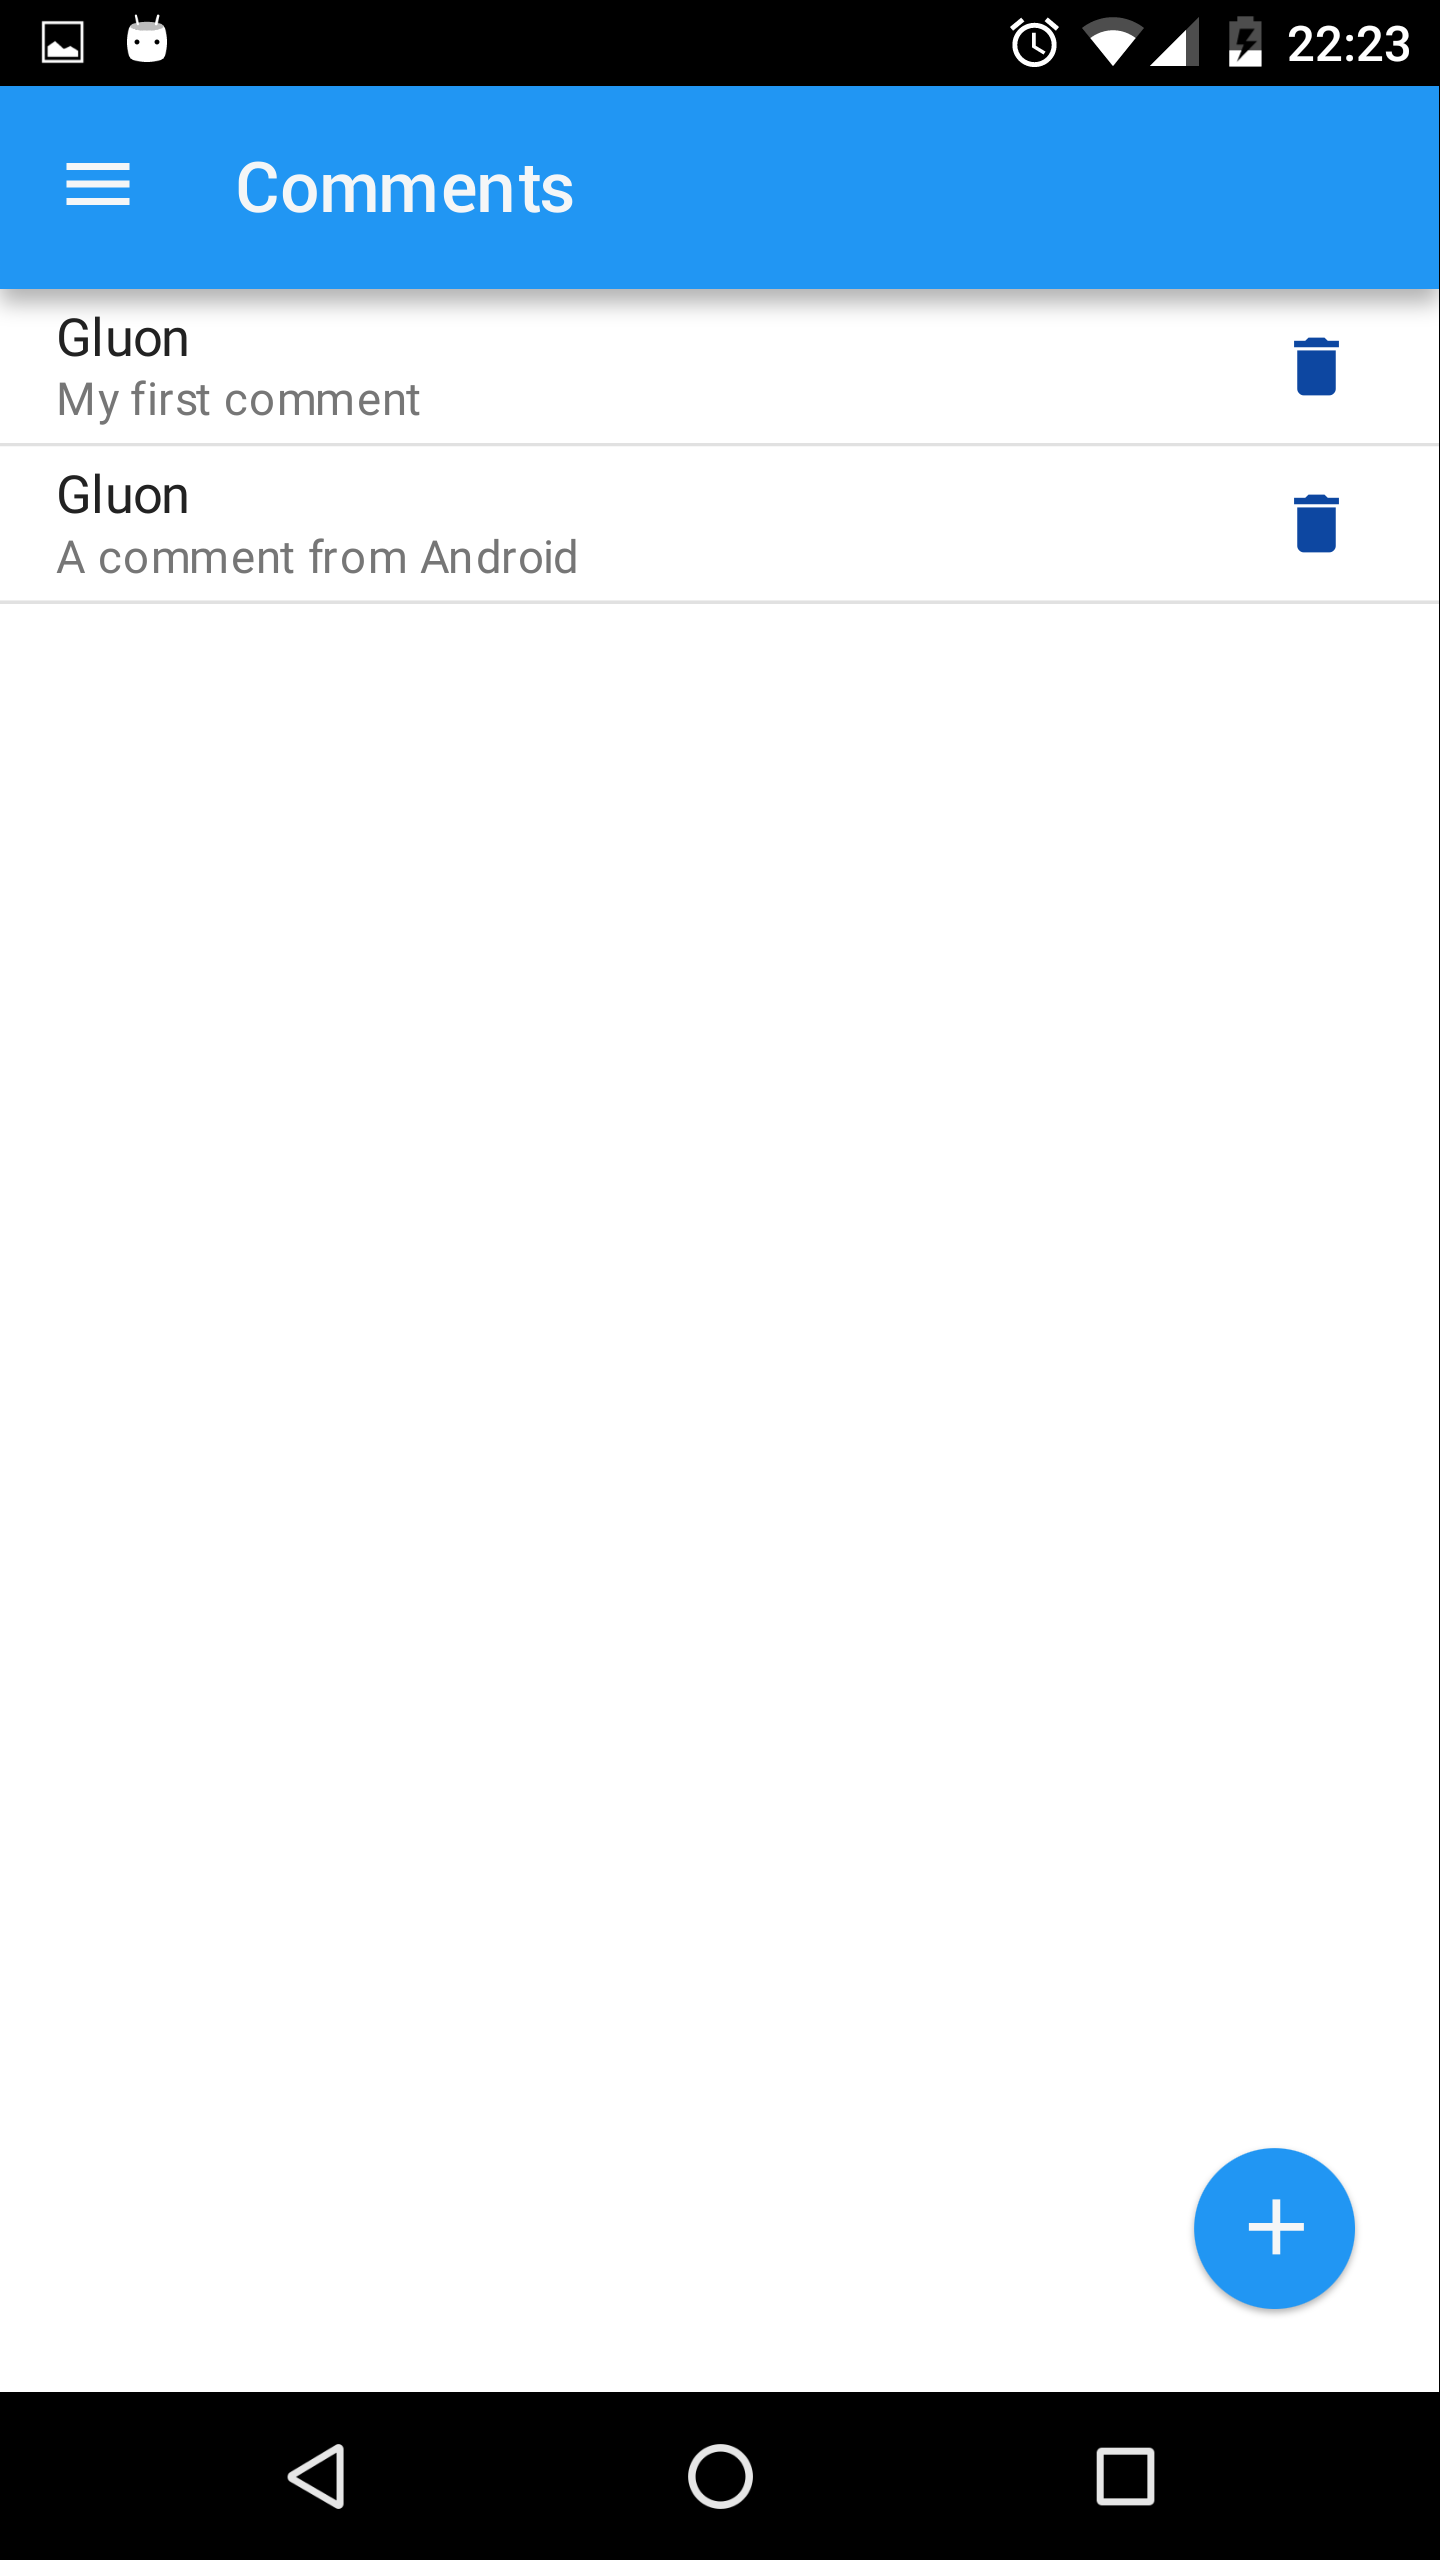
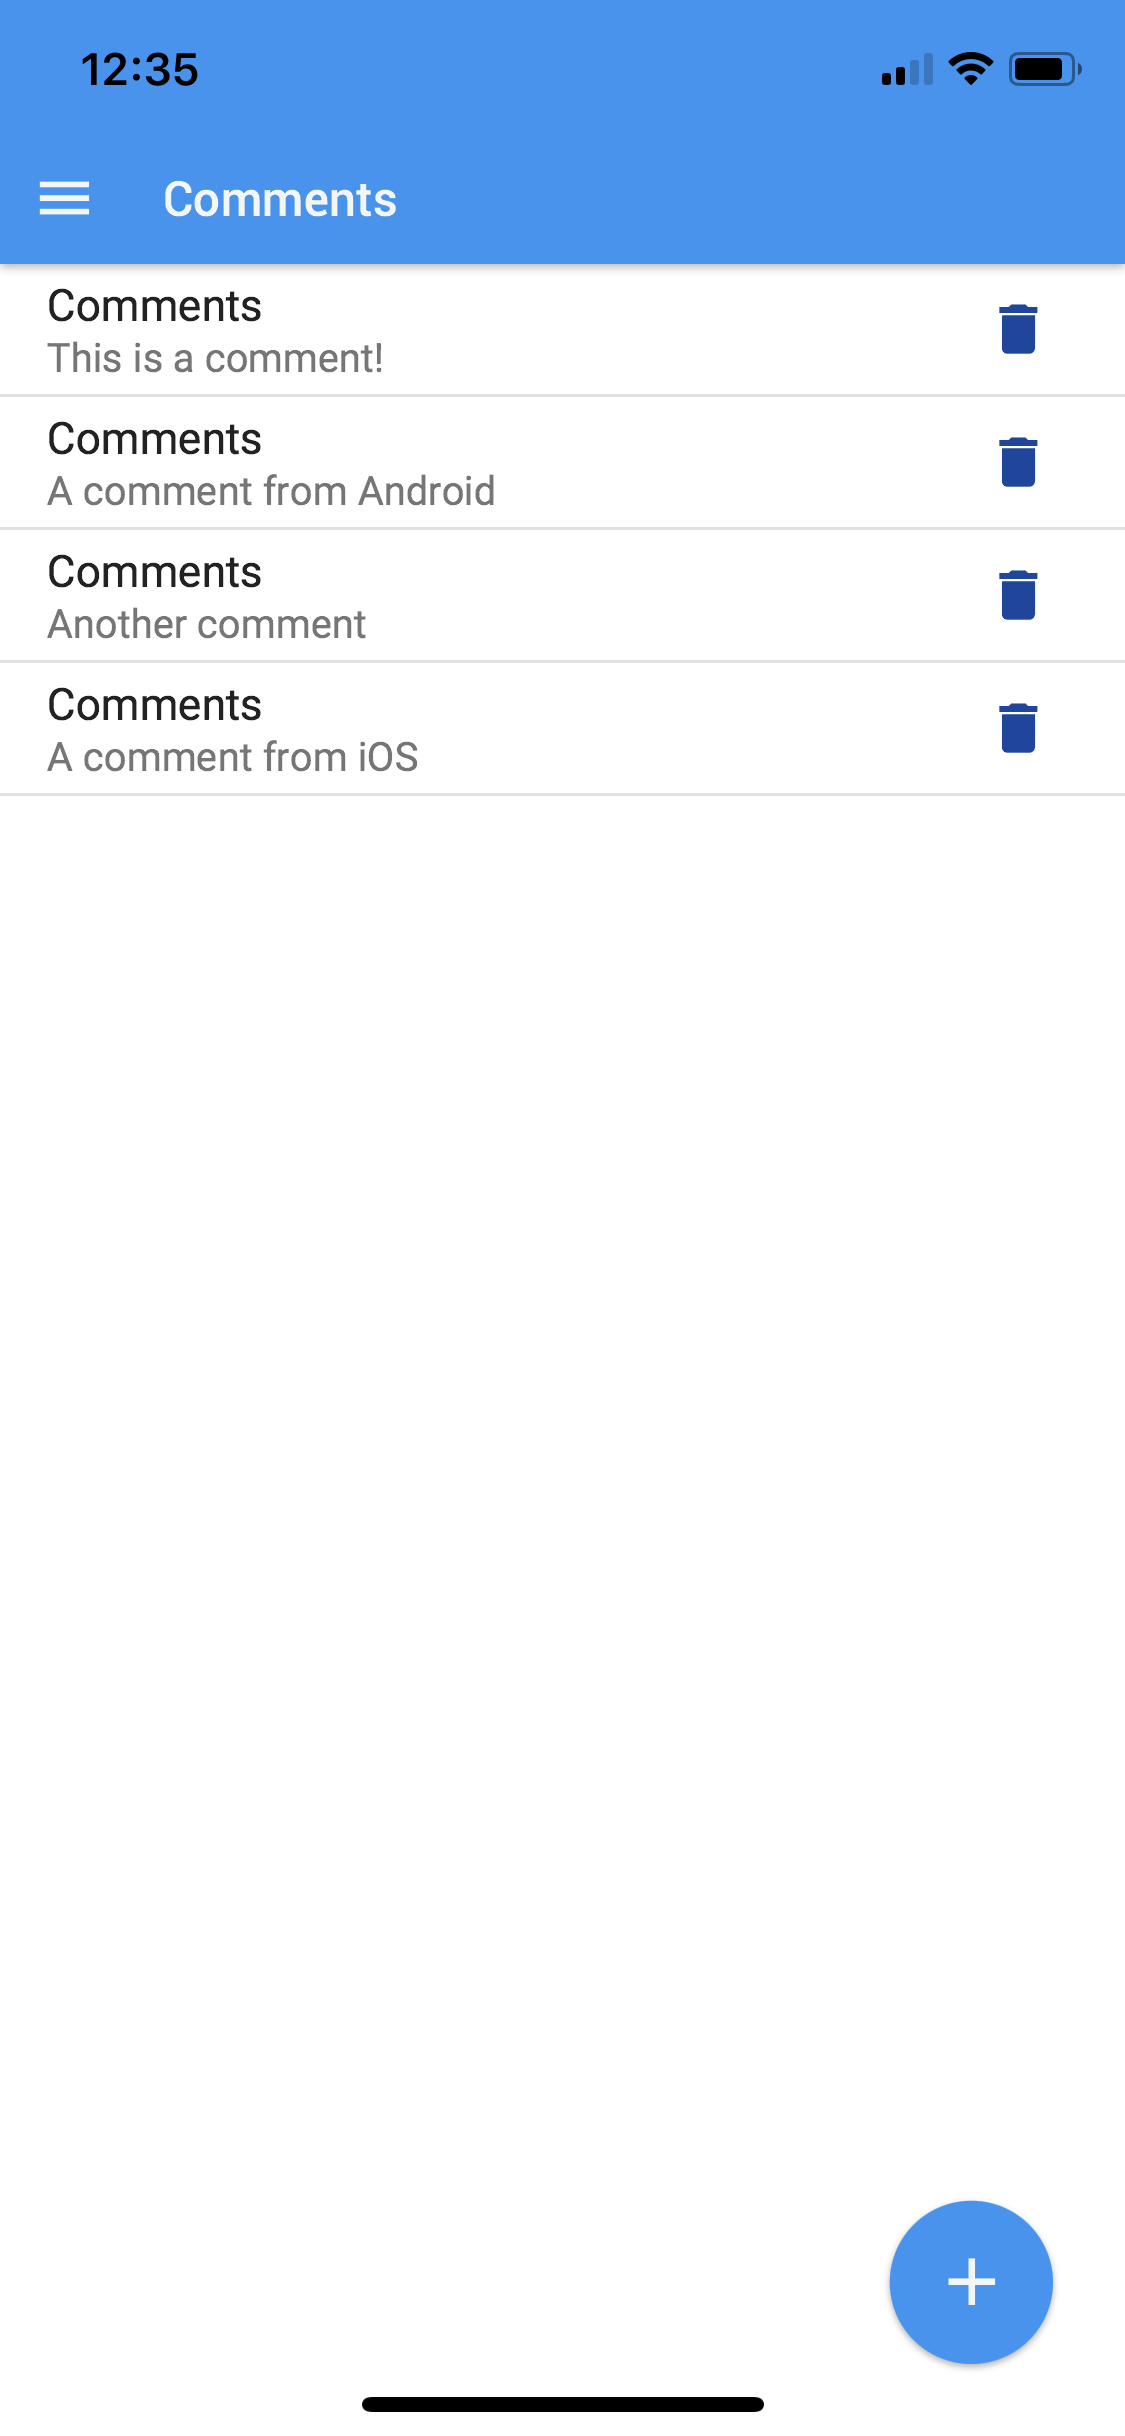
Create some comments, close the application and open it again: the list will be filled with those comments once they are retrieved from the cloud.
Try to delete one comment. Close and open the app. That comment won’t be there anymore.
Native image
Open a terminal and run: mvn gluonfx:build gluonfx:nativerun
If everything works as it should, it is time to target the application for mobile platforms like Android and iOS.
These steps are already documented in the client docs for each IDE. We will refer to the NetBeans section.
-
For Android: Create & install an Android native image
-
For iOS: Create & install an iOS native image
Android
From a Linux machine, plug an Android device and run:
mvn -Pandroid gluonfx:build gluonfx:package gluonfx:install gluonfx:nativerun
You should get the application running on the device:
Once the app is on your mobile, run it as well on desktop, and see how comments created in one client appear immediately in all the clients, and those deleted, disappear from every client.
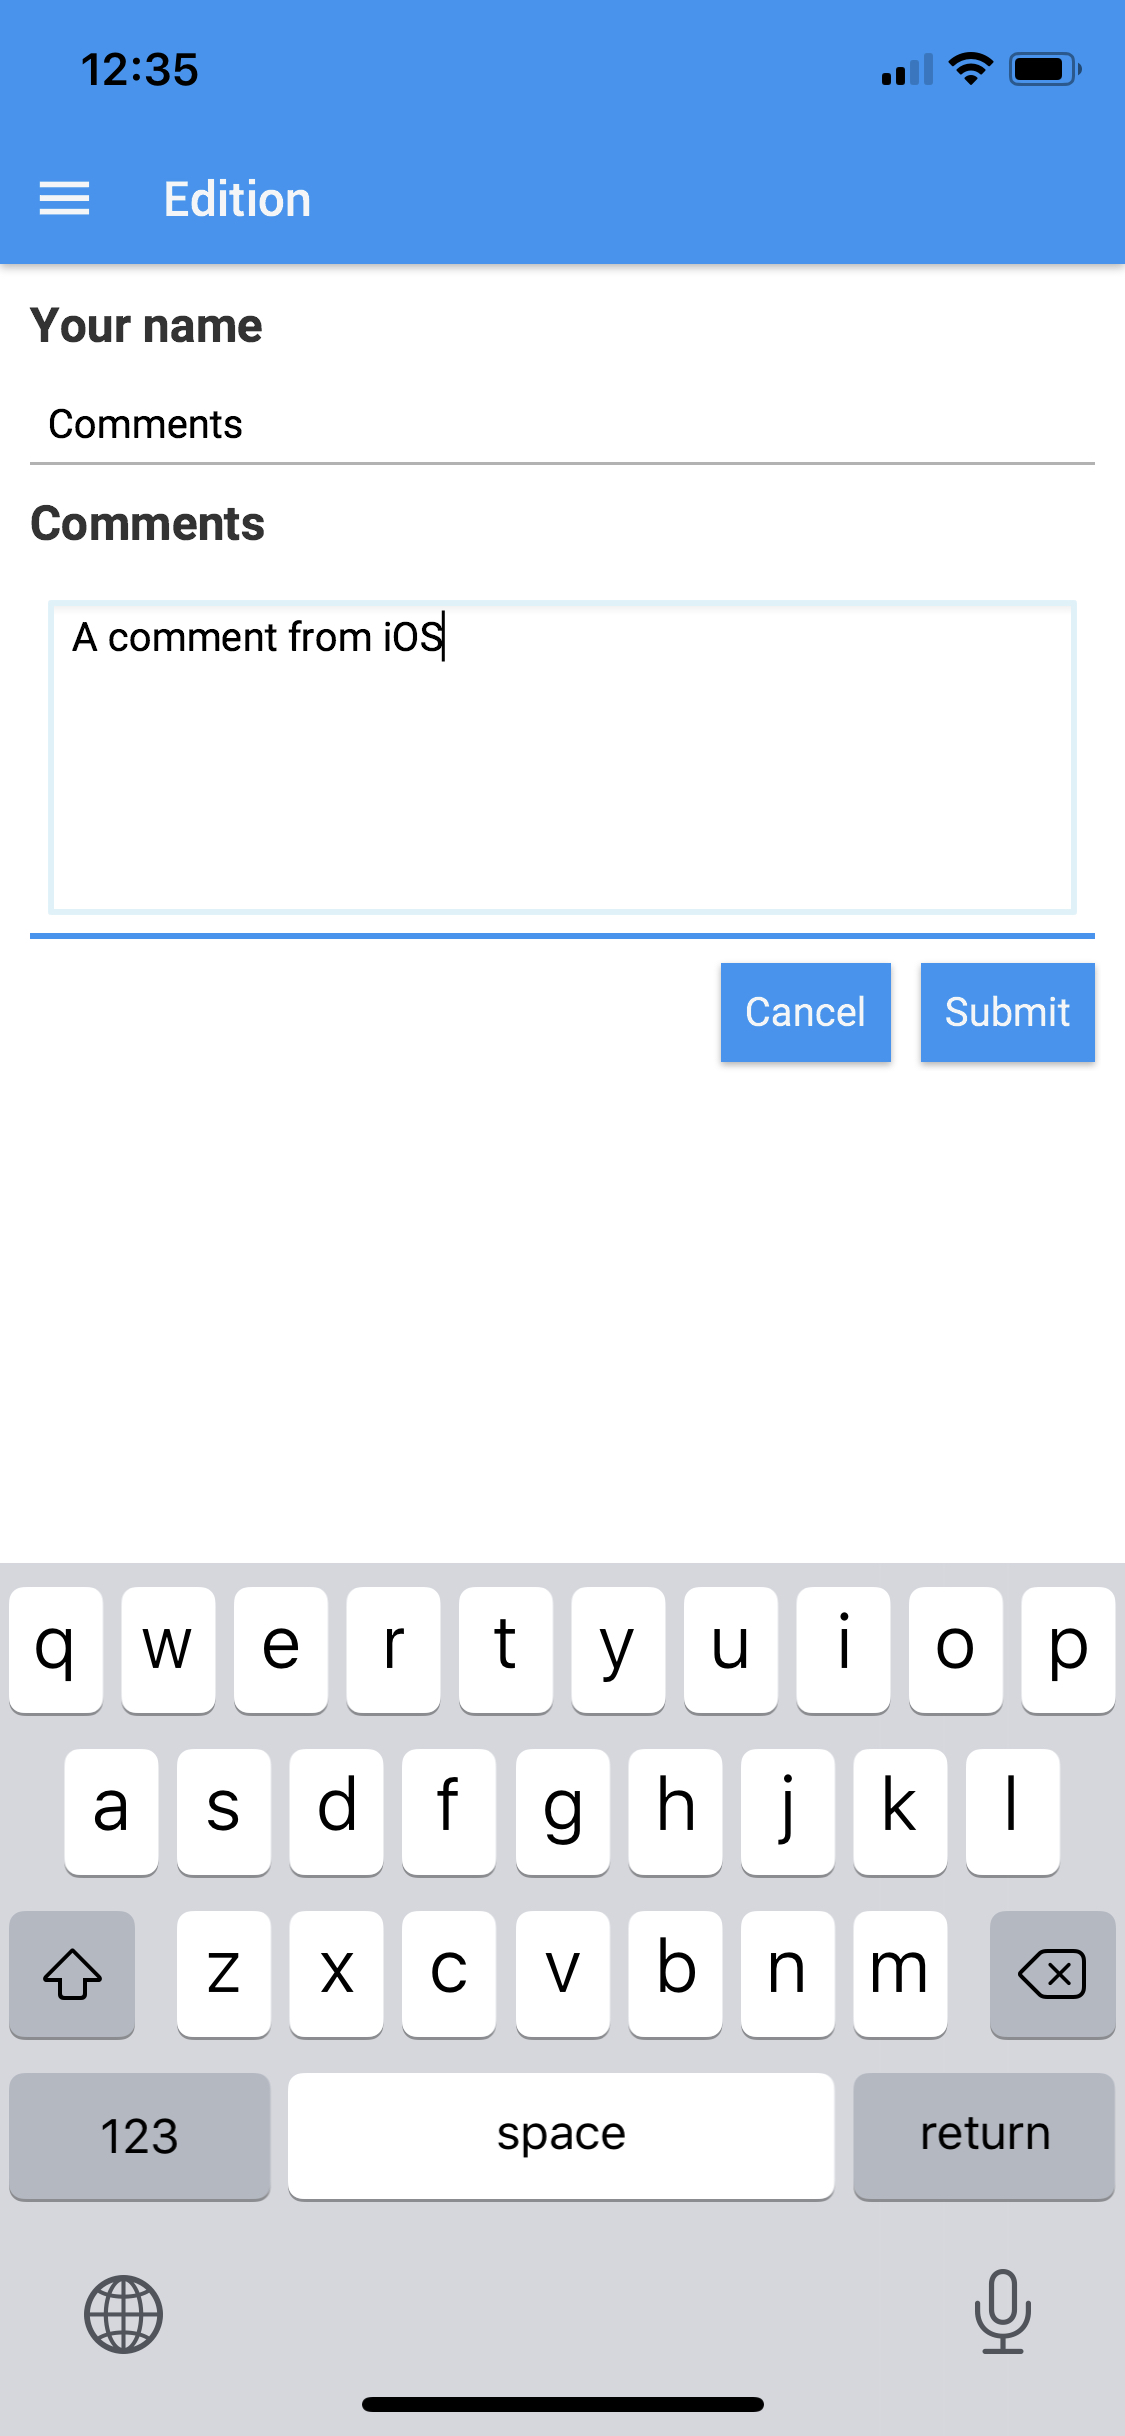
iOS
On MacOS, plug an iOS device and run:
mvn -Pios gluonfx:build gluonfx:nativerun
You should get the application running on the device:
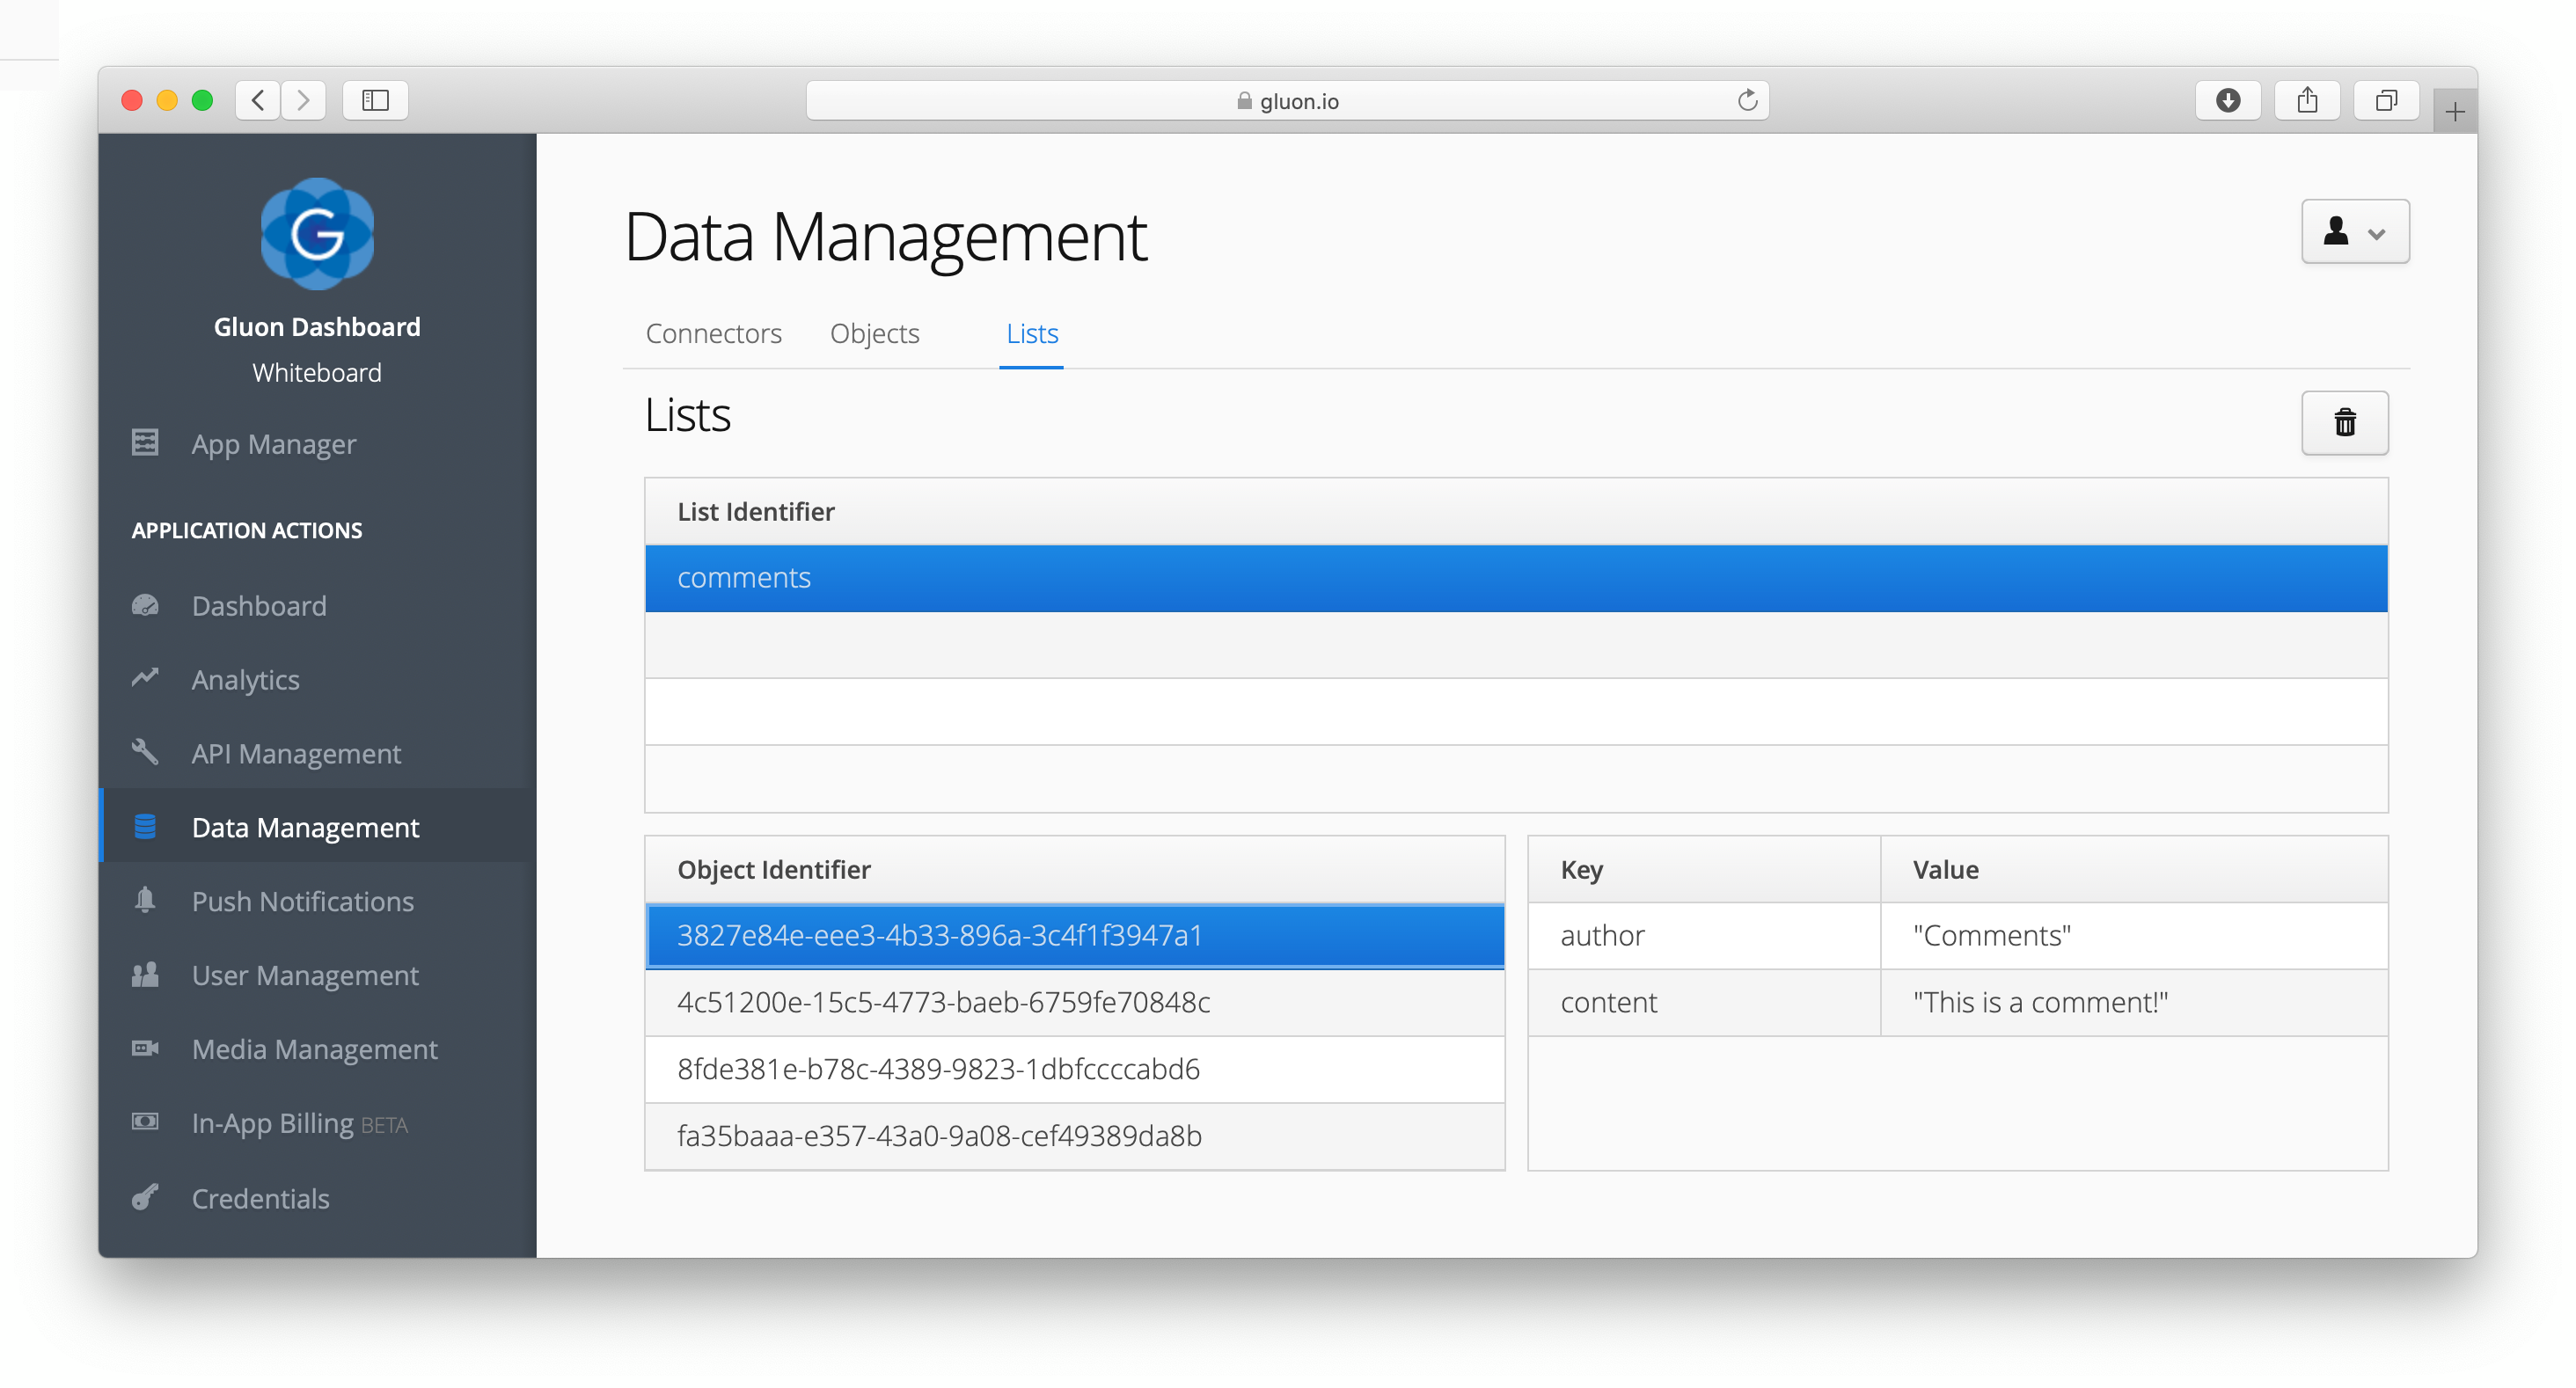
Tracking data with the Dashboard
At any moment, we can launch the Dashboard web application to track the data changes, in the Data Management link:
Conclusion
Throughout this tutorial we have covered in detail the basic steps to create a fully operative app for different platforms, with Cloud services and native UI controls, using only JavaFX and Gluon Mobile, based on the Glisten-Afterburner project generated with the Gluon Plugin. And we have tested the application on desktop and mobile devices, by building a native image.
If you have made it this far, congratulations, we hope this sample and the documentation was helpful to you! In case you have any questions, your first stop should be the Gluon support page, where you can access the latest documentation. Gluon also recommends the community to support each other over at the Gluon StackOverflow page. Finally, Gluon offers commercial support as well, to kick start your projects.