1. Overview
When you develop a JavaFX Application, the result of the compile process is Java Bytecode.
In order to execute this Bytecode, you need a Java Runtime Environment containing the Java Class Libraries (e.g. java.lang.String) and the native libraries used by the runtime. This is shown in the picture below:
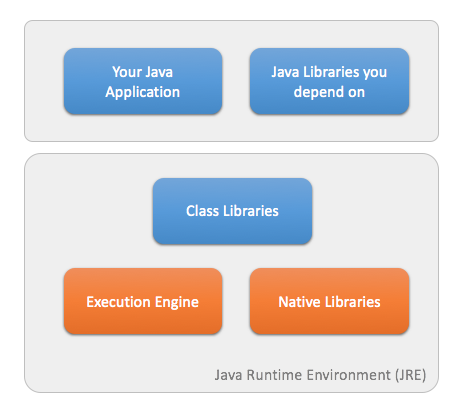
The parts in red are specific for a specific Operating System. The class libraries are common accross different Operating systems. This explains why there are different JRE distributions for e.g. Windows, MacOS and Linux.
This concept requires the installation of the JRE on top of an Operating System. In the typical appstore model, this is not possible. An application needs to be self-contained, and must be packaged in a specific way. This makes the situation more complicated:
-
We need OS-specific implementations of the execution engine and the native libraries
-
We need a mechanism to bundle the application AND (parts of) the JRE in a single package The situation between the iOS implementation and the Android implementation is a bit different. For the iOS port, the JRE needs to be packaged completely inside a bundle. On Android, we leverage the Dalvik VM, which is relative similar to the Java VM.
1.1. Android
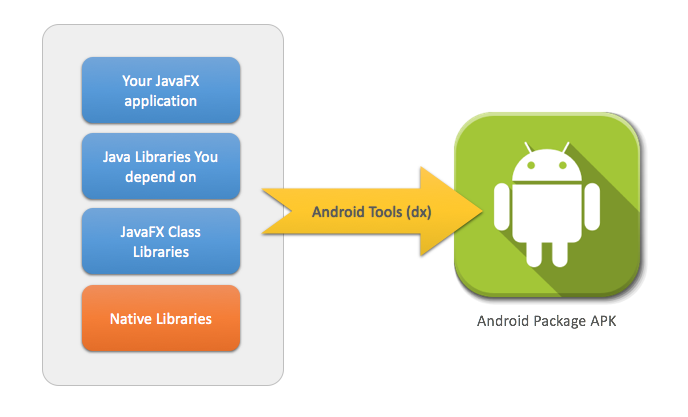
On Android, the situation is as follows:
The gradle build script in the android-tools directory creates the setup for an Android Project. It will set up all the links to your classes (including libraries you depend on) and to the javafx-dalvik SDK containing the JavaFX classes and the native libraries for these JavaFX classes.
Running ant debug in this directory will call the Android SDK tools to create an android Package. This is shown below:
1.2. iOS
To do…
2. Getting Started
The easiest way to get started, is to use the Gradle build system for writing your applications. We provide a Gradle plugin, named jfxmobile-plugin, that does almost all the work. Including this plugin in your regular JavaFX application will automatically create a number of tasks for you, that will package your application as a native iOS or a native Android package. A great example is the JavaFX Ensemble demo, created by the Oracle JavaFX team. You can checkout this example here. The gradle build-file in this demo is very simple, and you can adapt it to your own application:
buildscript {
    repositories {
        jcenter()
    }

    dependencies {
        classpath 'org.javafxports:jfxmobile-plugin:1.0.0-b9'
    }
}

apply plugin: 'org.javafxports.jfxmobile'

mainClassName = 'ensemble.EnsembleApp'

repositories {
    jcenter()
}

jfxmobile {
    ios {
        forceLinkClasses = ['ensemble.**.*']
    }
    android {
        applicationPackage = 'org.javafxports.ensemble'
    }
}
Once you have applied the jfxmobile plugin, you can use the following tasks:
-
./gradlew android will create an Android package signed with a debug keystore
-
./gradlew androidRelease will create an Android package signed with the configured signingConfig
-
./gradlew androidInstall installs your Android application on an Android device that is connected to your development system via a USB cable.
-
./gradlew launchIOSDevice launches your application on an iOS device that is connected to your development system
-
./gradlew launchIPadSimulator launces your application in an iPad simulator
-
./gradlew launchIPhoneSimulator launches your application in an iPhone simulator
-
./gradlew createIpa creates an iOS IPA package
-
./gradlew run will launch your application on your development system.
2.1. Prerequisites
2.1.1. General
-
JDK 8u40, available from http://www.oracle.com/technetwork/java/javase/downloads/index.html
-
Gradle 2.2 or higher is required to build applications with the jfxmobile plugin
2.1.2. iOS
-
A Mac with MacOS X 10.9 or 10.10
-
Xcode 6.x, available from the Mac App Store
2.1.3. Android
-
The Android SDK, available at here.
-
From the Android SDK Manager, install version 21.1.2 of the Build-tools, the SDK Platform for API 21 and from Extras the Android Support Library. Getting started with the Android SDK Manager is explained here.
-
Finally, you have to let the jfxmobile plugin know where to look for the Android SDK installation directory using one of the following ways:
-
an androidSdk property defined under jfxmobile.android in build.gradle
-
a gradle property with the name ANDROID_HOME: defined in ~/.gradle/gradle.properties or by passing -PANDROID_HOME to the gradle build
-
a system environment variable with the name ANDROID_HOME The jfxmobile plugin will first try to look if an androidSdk property has been set. If not, it will look for the ANDROID_HOME gradle property and finally resort to the ANDROID_HOME system environment variable.
-
2.2. How it works
The JavaFXMobile plugin adds a number of tasks to your Java Application that allow you to create packages that can be uploaded to the Apple AppStore and the Android Play Store. You can also execute your applications on the devices, in order to test them. The JavaFXMobile plugin will download and install the JavaFX SDKs for iOS and Android. The source code for those SDKs is available here. Zipped versions of the SDKs are uploaded to maven central, and downloaded by the JavaFXMobile plugin. In order to create an Android application, the Android SDK is needed. You download and install the Android SDK as described above. The location where you install the Android SDK has to be supplied to the plugin as explained before. The plugin will then execute a number of commands that will lead to the creation of an Android package (apk) in the directory build/javafxports/android. On iOS, the situation is internally different — but the gradle commands are similar. The plugin will download and install the RoboVM compiler, and it will use RoboVM compiler commands to create an iOS application in build/javafxports/ios.
2.3. The code
In case you’re interested in the source code for the JavaFXMobile plugin, you can check it out here
3. Setting Up
This page is a guide to setting up a JavaFX application with gradle. Using gradle means we can make use of its convention over configuration paradigm. This allows us to have very simple build scripts, if you follow the conventions when setting up your project.
3.1. Structure
By convention, the project directory structure should be as follows:
src/main/java |
Common Java source |
src/main/resources |
Common resources |
Java code and resources contained in these directories will be shared across all supported platforms. If you want to write code for a specific platform, you will need to add extra directories for them. The jfxmobile plugin will automatically provide the correct classpath dependencies for each different platform, when you write code in the designated platform directory. Below is a listing of the directories that are picked up by the jfxmobile plugin by default.
src/android/java |
Android Java source |
src/android/resources |
Android resources |
src/android/assets |
Android assets |
src/android/jniLibs |
Android native libraries |
src/ios/java |
iOS Java source |
src/ios/resources |
iOS resources |
src/ios/assets |
iOS assets |
src/desktop/java |
Desktop Java source |
src/desktop/resources |
Desktop resources |
The difference between assets and resources is that the files that are included in src/…/resources are automatically added to the classpath of the application, while assets are added as platform specific resources. On Android, assets are the same as the regular Android assets resources. On iOS, assets are the same as iOS resource files.
3.2. build.gradle
To build a gradle project, you need a build.gradle script. The build.gradle file should be created at the root of your project structure. To apply the jfxmobile plugin to your gradle project, add the following lines at the top of the script:
buildscript {
    repositories {
        jcenter()
    }
    dependencies {
        classpath 'org.javafxports:jfxmobile-plugin:1.0.0-b9'
    }
}

apply plugin: 'org.javafxports.jfxmobile'

repositories {
    jcenter()
}
The next required step is to specify your main class name. This is the class that extends the JavaFX Application object. The name of the property is mainClassName:
mainClassName = 'com.example.myproject.MyApplication'For the Android and Desktop platforms you are now good to go. If you also want to run on iOS, there is one final required configuration to set:
jfxmobile {
    ios {
        forceLinkClasses = [ 'com.example.myproject.**.*' ]
    }
}
This is required because the iOS port of JavaFX will load the main class at runtime. Therefor it is not visible by default when calling the RoboVM compiler. The forceLinkClasses property ensures that those classes are linked in during RoboVM compilation.
3.3. JavaFX Application
As the last step we need to create the actual JavaFX application main class. Below shows the code that should be included as a bare minimum for the application to behave correctly.
package com.example.myproject;

import javafx.application.Application;
import javafx.geometry.Rectangle2D;
import javafx.scene.Scene;
import javafx.scene.control.Label;
import javafx.scene.layout.StackPane;
import javafx.stage.Screen;
import javafx.stage.Stage;

public class MyApplication extends Application {
    @Override
    public void start(Stage stage) {
        Rectangle2D bounds = Screen.getPrimary().getVisualBounds();
        Scene scene = new Scene(new StackPane(new Label("Hello World!")),
                bounds.getWidth(), bounds.getHeight());
        stage.setScene(scene);
        stage.show();
    }
}
The width and height of the Scene should be set to the width and height of the visual bounds of the device’s screen to ensure that the application is properly sized when starting it.
3.4. Building and running
Finally we can build the application and run it on our platforms. To run a gradle build, just type gradle followed by the desired task name, e.g. gradle build. Run gradle tasks to get an overview of the gradle tasks that are available in your project. The jfxmobile plugin will add the following platform specific tasks to your project:
3.4.1. Desktop
-
runwill launch the application on your desktop environment
3.4.2. Android
-
androidgenerates an apk that is signed with a debug keystore and put it in the directorybuild/javafxports/android -
androidReleasegenerates an apk that is signed with the configured signingConfig and put it in the directorybuild/javafxports/android -
androidInstallinstalls the generated debug apk onto a device that is connected to your desktop
3.4.3. iOS
-
iosgenerates the ipa in the directorybuild/javafxports/ios -
launchIOSDevicelaunches the application on the device that is connected to your desktop -
launchIPhoneSimulatorlaunches the application on an iPhone simulator -
launchIPadSimulatorlaunches the application on an iPad simulator
4. Configuration
4.1. Dependencies
Apart from the default dependency configurations compile and runtime, the jfxmobile plugin adds extra configurations for each supported platform. This allows developers to add dependencies that should only applied to a specific platform. The names of the platform specific configurations are platformCompile and platformRuntime where platform can be one of the following: android, ios or desktop.
For instance, if your android code wants to do some json processing, you configure the dependencies as follows:
dependencies {
    androidCompile 'org.glassfish:javax.json:1.0.4'
}
4.2. General
property |
description |
default value |
javafxportsVersion |
Specifies which version of javafxports to use. |
8u60-b2 |
4.3. Android
property |
description |
default value |
androidSdk |
The directory containing the Android SDK. |
The ANDROID_HOME gradle property or the system environment variable with the same name. |
dalvikSdk |
The directory containing the JavaFX port for dalvik. |
It will be downloaded from maven central when not specified. |
buildToolsVersion |
The version of the Android build-tools that should be used. |
The plugin will try to look for the highest non-preview version available in the Android SDK. |
applicationPackage |
The name of the Android package, that uniquely identifies your application. |
The package name of your main class name. |
manifest |
The location to a custom AndroidManifest.xml file to use for the application. |
The plugin will generate a default AndroidManifest.xml file. A copy can be found in build/javafxports/tmp/android. |
compileSdkVersion |
The API version of the Android platform to compile against. |
21 |
minSdkVersion |
The minimum API version where the application can run on. |
4 |
targetSdkVersion |
The API version that the application targets. |
compileSdkVersion |
assetsDirectory |
The directory that contains the Android assets. |
src/android/assets |
nativeDirectory |
The directory containing the native Android libraries. |
src/android/jniLibs |
signingConfig |
A signing configuration that should be used to sign the apk. See Signing Your Applications at the Android developer guide for more information. The only difference with the android gradle plugin is, that you directly set the configuration instead of a reference to a signing configuration that was defined elsewhere. |
The android task will ALWAYS use a default debug kesytore. The androidRelease task requires a signingConfig to be configured. |
4.4. iOS
property |
description |
default |
iosSdk |
The directory containing the JavaFX port for ios. |
It will be downloaded from maven central when not specified. |
robovmVersion |
The version of the RoboVM compiler to use. |
1.2.0 |
forceLinkClasses |
A list of string patterns for classes and/or complete packages that should be linked when starting the RoboVM compiler. See http://docs.robovm.com/configuration.html#-lt-forcelinkclasses-gt for more information about which patterns can be used. |
An empty list. |
infoPList |
A File that specifies a custom Info.plist file to use for the application. |
The plugin will generate a default Default-Info.plist file. A copy can be found in build/javafxports/tmp/ios. |
propertiesFile |
The path to a RoboVM properties file which contains info for the application. |
robovm.properties and robovm.local.properties |
configFile |
The path to a RoboVM configuration file which configures the RoboVM compiler. |
robovm.xml |
os |
The operating system to use when running the application. Can be any of the following values: ios, macosx, linux. |
ios |
arch |
The architecture to use when running the application. Can be any of the following values: x86, x86_64, thumbv7, arm64. |
thumbv7 |
iosSkipSigning |
A boolean specifying whether signing of the application should be skipped or not. |
false |
iosSignIdentity |
The identity to sign with when building an iOS bundle for the application. |
Default is to look for an identity starting with ‘iPhone Developer’ or ‘iOS Development’. |
iosProvisioningProfile |
The provisioning profile to use when building for device. |
|
debug |
A boolean specifying whether the application should be launched in debug mode or not. The application will suspend before the main method is called and will wait for a debugger to connect. |
false |
debugPort |
An integer specifying the port to listen for debugger connections on when launching in debug mode. |
If not set a default port will be used. The port actually used will be written to the console before the app is launched. |
ipaArchs |
A list of architectures to include in the IPA. Either thumbv7 or amd64 or both. |
thumbv7 |
assetsDirectory |
The directory that contains the iOS resource files. |
src/ios/assets |
A lot of the configuration properties for iOS can be directly overruled using gradle properties. For instance, instead of specifying the debug in the build.gradle file, you can run gradle as follows to enable debugging: gradle -Probovm.debug=true -Probovm.debugPort=9000 launchIPhoneSimulator. Below follows a list of properties that can be overruled by which gradle property:
configuration property |
gradle property |
os |
robovm.os |
arch |
robovm.arch |
iosSkipSigning |
robovm.iosSkipSigning |
iosSignIdentity |
robovm.iosSignIdentity |
iosProvisioingProfile |
robovm.iosProvisioningProfile |
debug |
robovm.debug |
debugPort |
robovm.debugPort |
ipaArchs |
robovm.ipaArchs |
Finally, two more gradle properties can be provided when launching the iOS simulator to specify which device name and sdk version the simulator should run.
gradle property |
description |
robovm.device.name |
The name of the device to use in the iOS simulator. For instance iPhone4 or iPhone-5s. |
robovm.sdk.version |
The iOS sdk version to use in the iOS simulator. Either 7.1 or 8.1. |
To get a list of possible device names and matching sdk versions, you can run the command ios-sim showdevicetypes. When you’ve run one of the iOS tasks at least once, this command can be found in your local maven repository (which by default is located in your user home directory .m2/repository) under org/robovm/robovm-dist/ROBOVM_VERSION/unpacked/robovm-ROBOVM_VERSION/bin (replace ROBOVM_VERSION with the version used by the jfxmobile plugin).
5. Examples
A few examples already exist here. We will add more examples when time permits.
5.1. SimplePort
This is a very simple application that can be executed both on iOS and on Android. We start with a very simple example containing a single class, showing a Button and a Label in a JavaFX StackPane. The example is a maven project taken from the Pro JavaFX 8 book.
The source code is in src/main/java
The JavaFX code for the class is shown below and should be placed in src/main/java/projavafx/SimplePort.java
package projavafx;

import java.util.Random;
import javafx.application.Application;
import javafx.event.ActionEvent;
import javafx.event.EventHandler;
import javafx.scene.Scene;
import javafx.scene.control.Button;
import javafx.scene.control.Label;
import javafx.scene.layout.StackPane;
import javafx.stage.Stage;

public class SimplePort extends Application {

    final String[] days = new String[]{"Monday", "Tuesday", "Wednesday", "Thursday", "Friday", "Saturday", "Sunday"};
    @Override
    public void start(Stage primaryStage) {
        final Random random = new Random();
        Button btn = new Button();
        btn.setText("Guess a day");
        final Label answer = new Label("no input received");
        answer.setTranslateY(50);
        btn.setOnAction(new EventHandler() {

            @Override
            public void handle(ActionEvent event) {
                int day = random.nextInt(7);
                answer.setText(days[day]);
            }
        });

        StackPane root = new StackPane();
        root.getChildren().addAll(btn, answer);

        Scene scene = new Scene(root, 300, 250);

        primaryStage.setTitle("JavaFX Porting");
        primaryStage.setScene(scene);
        primaryStage.show();
    }

    public static void main(String[] args) {
        launch(args);
    }

}
You can paste this in your favourite IDE, or you can use a text editor.
You can build the project using
mvn clean install
5.1.1. Desktop version
Running it on a desktop is easily done as follows:
java -classpath build/classes projavafx.SimplePort
This will show a user interface with a button and a label. Clicking on the button will change the text in the label.
5.1.2. iOS version
The pom.xml file already contains the required instructions for building the iOS artifacts. We won’t go into the details on how to sign the application which is required for distribution in the AppStore. See the instructions here for more information on how to submit your application to the AppStore.
Before we can run the application, we need to create a specific launcher class. This is an additional Java class that has to be added to each JavaFX Application that you want to run on iOS.
The launcher class for this example is shown below:
package projavafx;
package projavafx;

import javafx.application.Application;
import org.robovm.cocoatouch.foundation.NSAutoreleasePool;
import org.robovm.cocoatouch.foundation.NSDictionary;
import org.robovm.cocoatouch.uikit.UIApplication;
import org.robovm.cocoatouch.uikit.UIApplicationDelegate;

public class SimplePortJFXLauncher extends UIApplicationDelegate.Adapter {

    @Override
    public boolean didFinishLaunching(UIApplication application, NSDictionary launchOptions) {

        Thread launchThread = new Thread() {
            @Override
            public void run() {
                Application.launch(SimplePort.class);
            }
        };
        launchThread.setDaemon(true);
        launchThread.start();

        return true;
    }

    public static void main(String[] args) throws Exception {
        System.setProperty("glass.platform", "ios");
        System.setProperty("prism.text", "native");

        NSAutoreleasePool pool = new NSAutoreleasePool();
        UIApplication.main(args, null, SimplePortJFXLauncher.class);
        pool.drain();
    }
}
Running the application in the iOS emulator is done as follows:
mvn robovm:iphone-sim
5.1.3. Android version
The Android version does not require any new code, as the launcher class is already part of the Android JavaFX SDK. On the other hand, the Android port requires a more complex build structure. Before we start, make sure you have the following resources downloaded and installed:
-
The Android SDK. Download this from http://developer.android.com/sdk/index.html#download and install into /path/to/androidSDK
-
The JavaFX Dalvik SDK, which can be obtained at https://bitbucket.org/javafxports/android/downloads/dalvik-sdk-b10.zip. Unzip this SDK into /path/to/JavaFXDalvikSDK. As a first step, we have to create an Android project. The android-tools directory in the JavaFX Dalvik SDK contains a build.gradle script that allows you to create such a project, based on a few input parameters. The same directory also contains a createHelloWorld script that shows an example on how to create a project.
If you change into the android-tools directory, you can create a new Android project as follows:
gradlew --info createProject -PDEBUG -PDIR=/your/workingdir/android -PPACKAGE=org.javafxports -P NAME=SimplePort -PANDROID_SDK=/path/to/androidSDK -PJFX_SDK=/path/to/JavaFXDalvikSDK -PJFX_APP=/your/workingdir/dist -PJFX_MAIN=projavafx.SimplePort
You can now change into the created Android project directory in /your/workingdir/android/SimplePort and build the Android package with the following command:
ant clean debug
The result will be placed in the bin directory, i.e. SimplePort-debug.apk and can be transfered to an Android device.
5.2. NFC
In this example, we show how you can use the Android NFC API. The same principles apply to other Android API’s as well. Of course, this will only work on phones that have an NFC reader. The code for this example is in a bitbucket repository at https://bitbucket.org/johanvos/androidnfcreader.
This code is not optimized at all, and it contains some experiments that are not relevant in this example, but I already wanted to share it since I got questions from people on how to use Android API’s in JavaFX code.
The key to the Android API’s is provided by the FXActivity class. This class is provided in the jfxdvk.jar that is part of the JavaFX Android SDK. Together with your application code and a number of other libraries, this class will be packaged into the .apk file that eventually will be sent to the Android devices. The FXActivity class extends the Android Context class, and thus provide the access to the Android services. The following code will register a listener for NFC events:
    ...
    import android.content.Context;
    import android.nfc.NfcAdapter;
    import android.nfc.NfcAdapter.ReaderCallback;
    ...
    public class NexusReader extends Application implements ReaderCallback {
    ...

        @Override
        public void start(Stage primaryStage) throws Exception {
            ...
            Context ctx = FXActivity.getInstance();
            NfcAdapter nfcAdapter = NfcAdapter.getDefaultAdapter(ctx);
            nfcAdapter.enableReaderMode(FXActivity.getInstance(), this, NfcAdapter.FLAG_READER_NFC_A, Bundle.EMPTY);
            ...
        }

        @Override
        public void onTagDiscovered(Tag tag) {
            System.out.println ("We got a tag!");
            ....
        }
    }
We first have to obtain a reference to the NfcAdapter, which is obtained via
NfcAdapter nfcAdapter = NfcAdapter.getDefaultAdapter(ctx);
The javadoc for the NfcAdapter can be found here. We now instruct the NfcAdapter to only read when we are in the foreground, and we want to indicate that we provide a callback method, since our application implements the NfcAdapter.ReaderCallback interface:
nfcAdapter.enableReaderMode(FXActivity.getInstance(), this, NfcAdapter.FLAG_READER_NFC_A, Bundle.EMPTY);
The second parameter, “this” is the callback interface. In case the NFCAdapter detects a card, it will call the onTagDiscovered method on our class, providing a Tag instance. In our example, we start a silly animation that allows you to order some coffee. Smart people are most likely capable of doing something more useful.
Questions, remarks, comments? Please post them in our discussion group at here .
6. External Resources
-
Create a Mobile iOS App with RoboVM app on OS-X: http://wiki.eclipse.org/Efxclipse/Tutorials/Tutorial5
-
Develop a JavaFX + iOS app with RoboVM + e(fx)clipse tools in 10 minutes http://tomsondev.bestsolution.at/2013/11/06/develop-a-javafx-ios-app-with-robovm-efxclipse-tools-in-10-minutes/
-
Pong, a.k.a. Retro Game I, available in the App Store! http://asipofjava.blogspot.be/2014/05/pong-aka-retro-game-i-available-in-app.html
-
JavaFX on iOS using RoboVM and Maven: http://www.zenjava.com/2013/08/01/javafx-on-ios-using-robovm-and-maven/
-
JavaFX and Android: http://www.lodgon.com/dali/blog/entry/JavaFX_and_Android