The Notes App is a Gluon code sample. For a full list of Gluon code samples, refer to the Gluon website.
In this tutorial, we’ll explain how to create the Notes application that can be deployed on desktop, Android and iOS devices.
Before you start, make sure to check the list of prerequisites for each platform.
Note: This tutorial will use the plugin for NetBeans, but it works as well on IntelliJ and Eclipse.
Code: The code for this project can be found in the samples repository at GitHub.
The sample is located under the directory notes.
The reader can clone this repository or create the entire project from scratch, based on the following steps.
Creating the project
Please check this tutorial to learn how to create a new Gluon project in NetBeans.
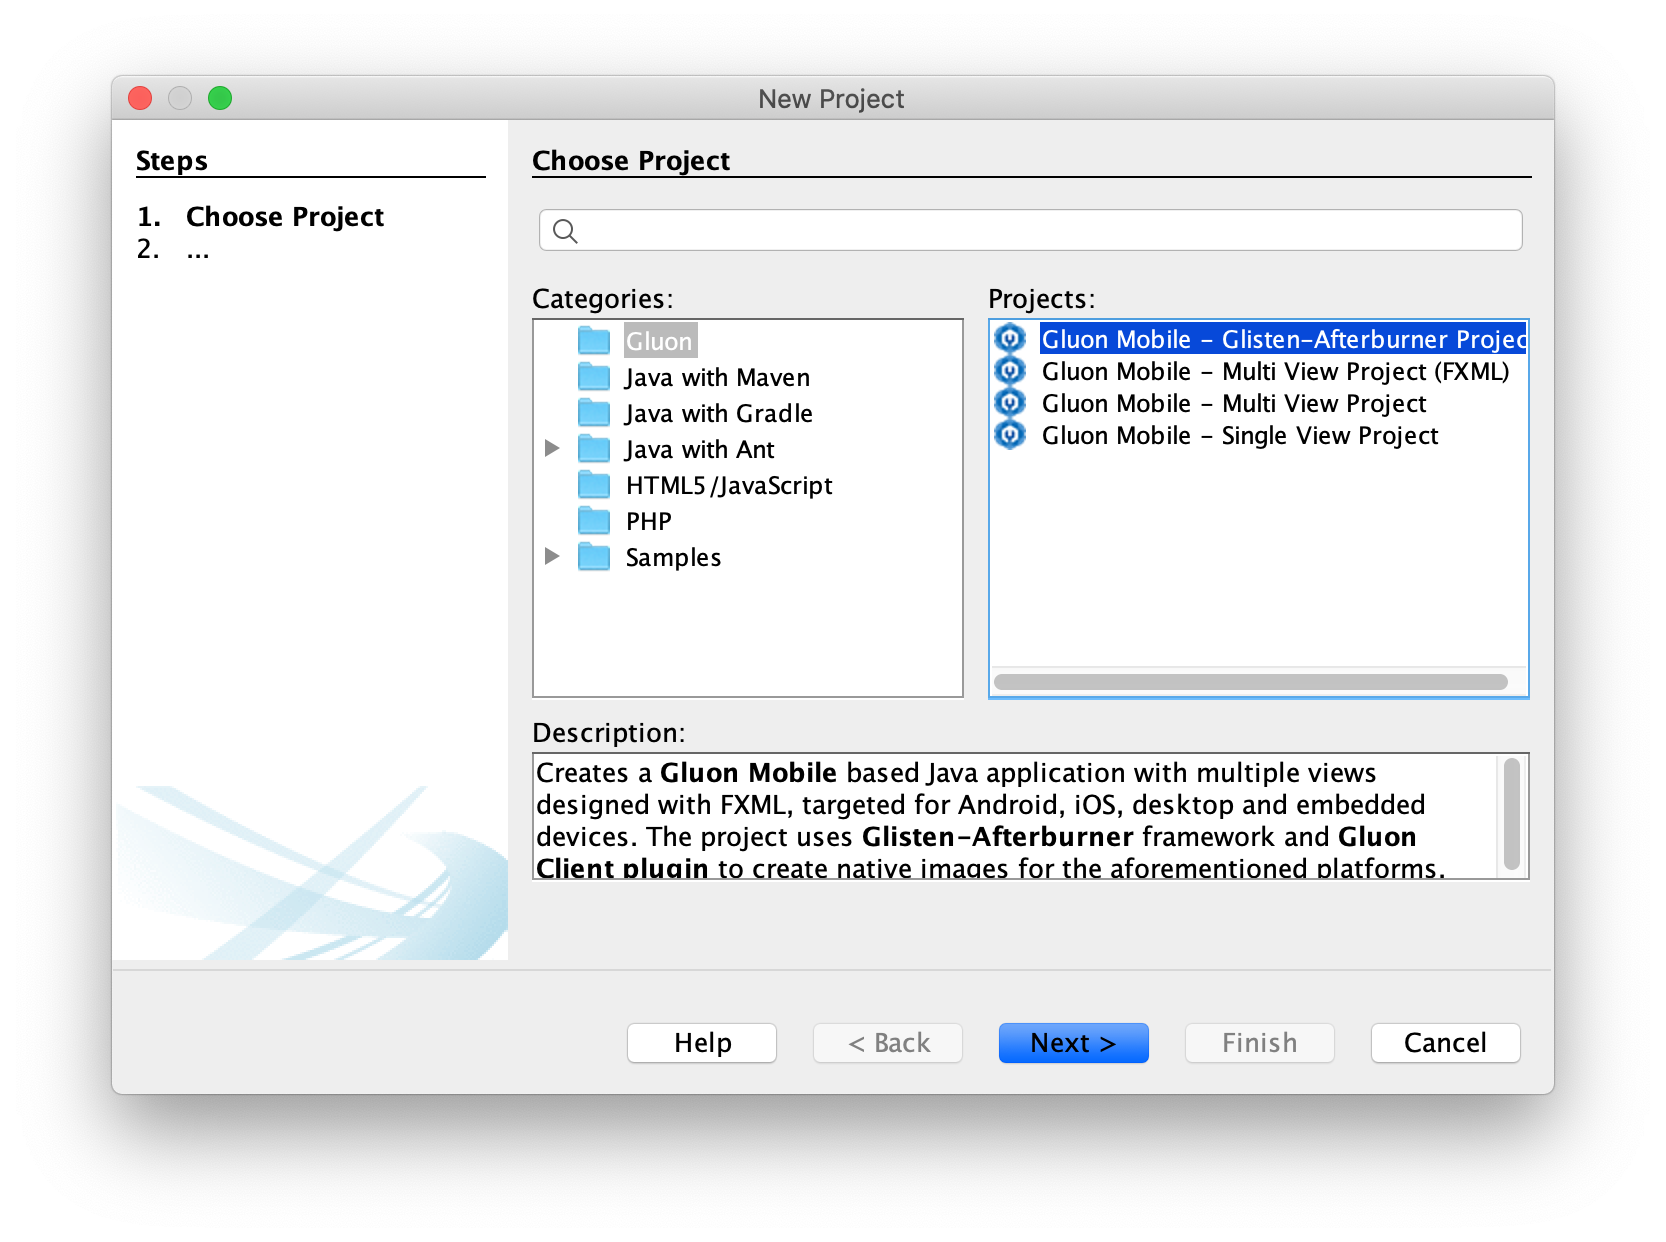
In NetBeans, click File→New Project… and select Gluon on the left. Select Gluon Mobile - Glisten-Afterburner Project from the list of available Projects:
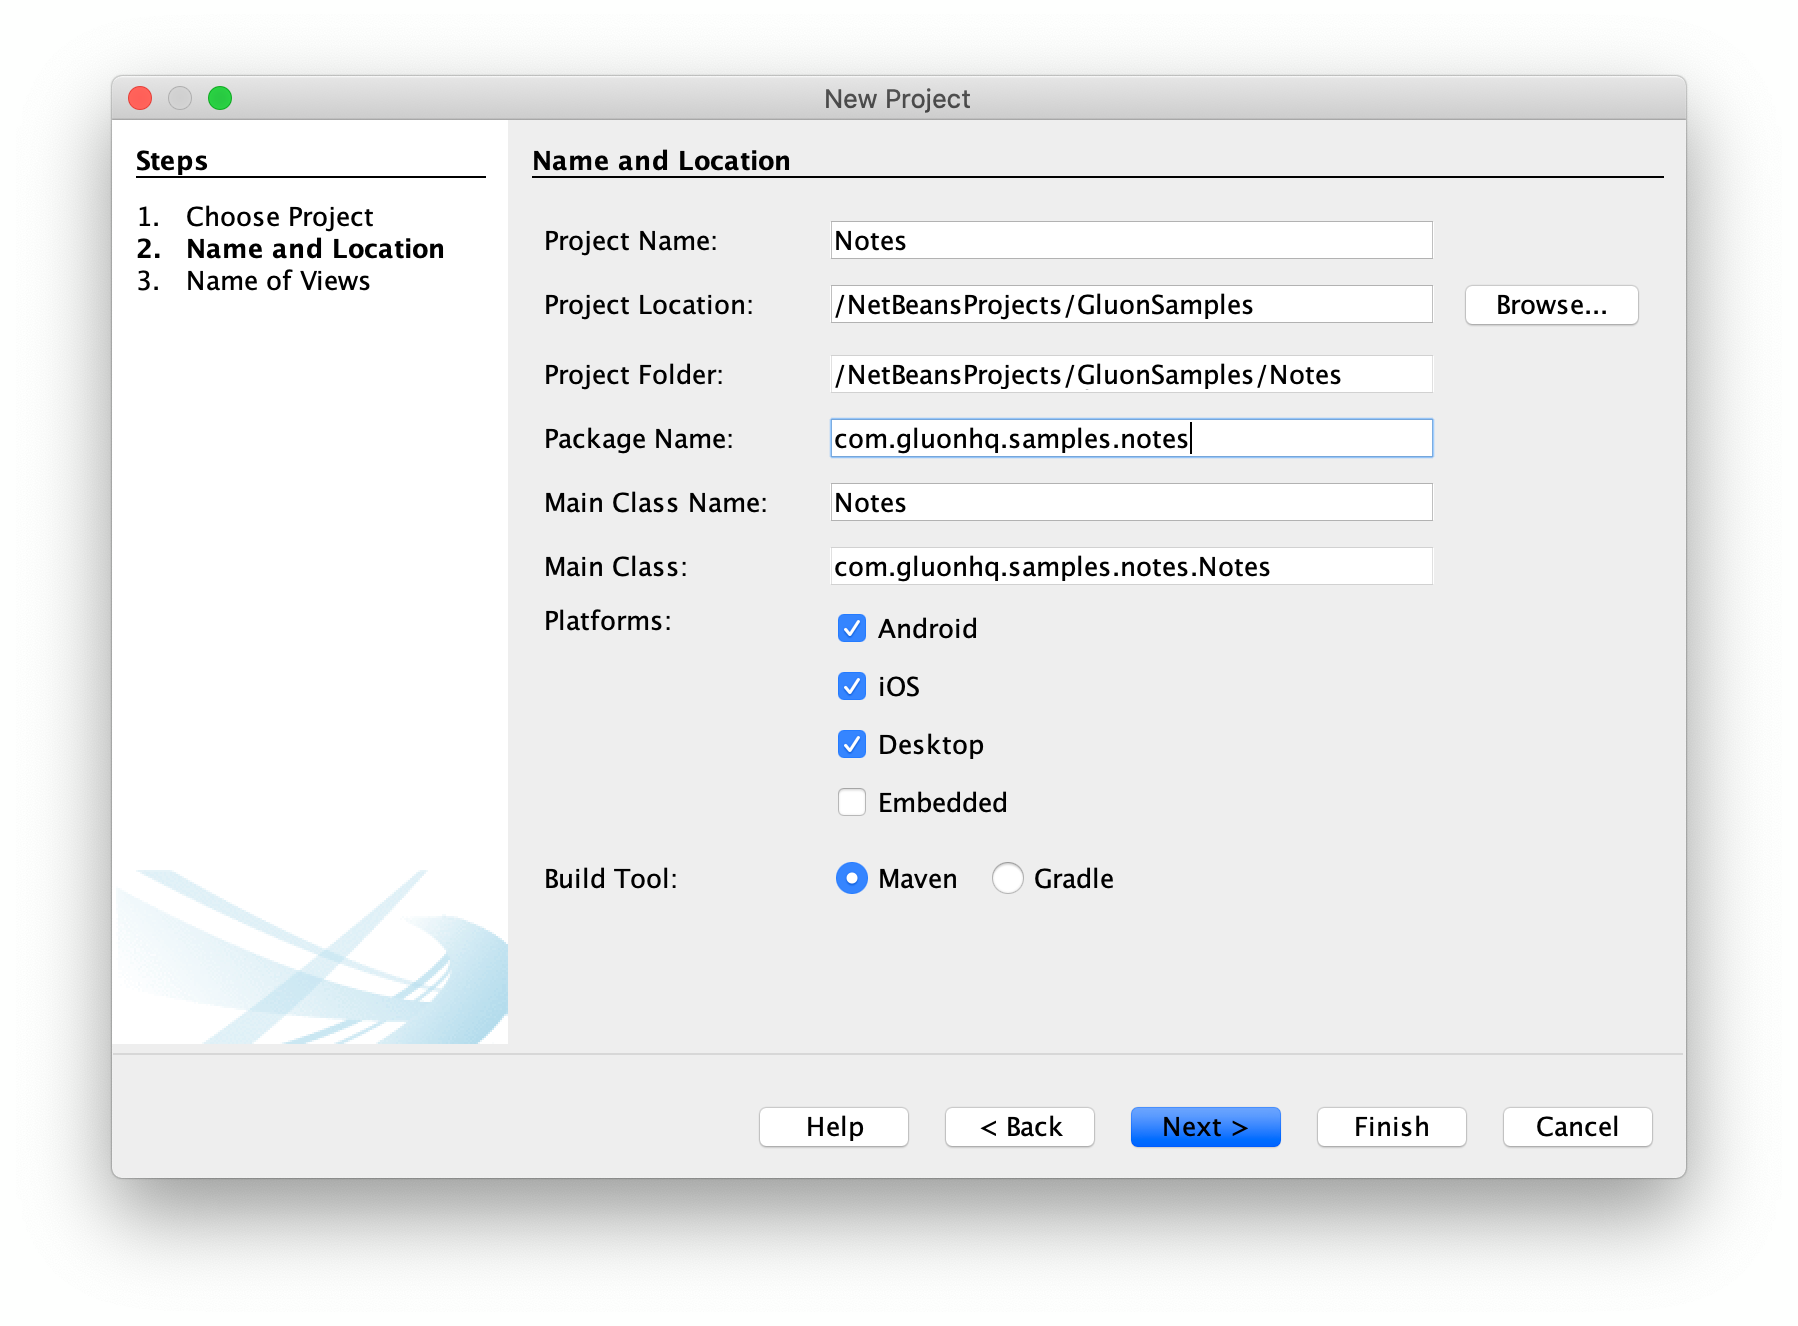
Add a proper name to the application (Notes), find a proper location, add the package name and change the main class name (com.gluonhq.samples.notes.Notes).
Press Next and change the name of the primary and secondary views, to Notes for the former and Edition to the
latter.
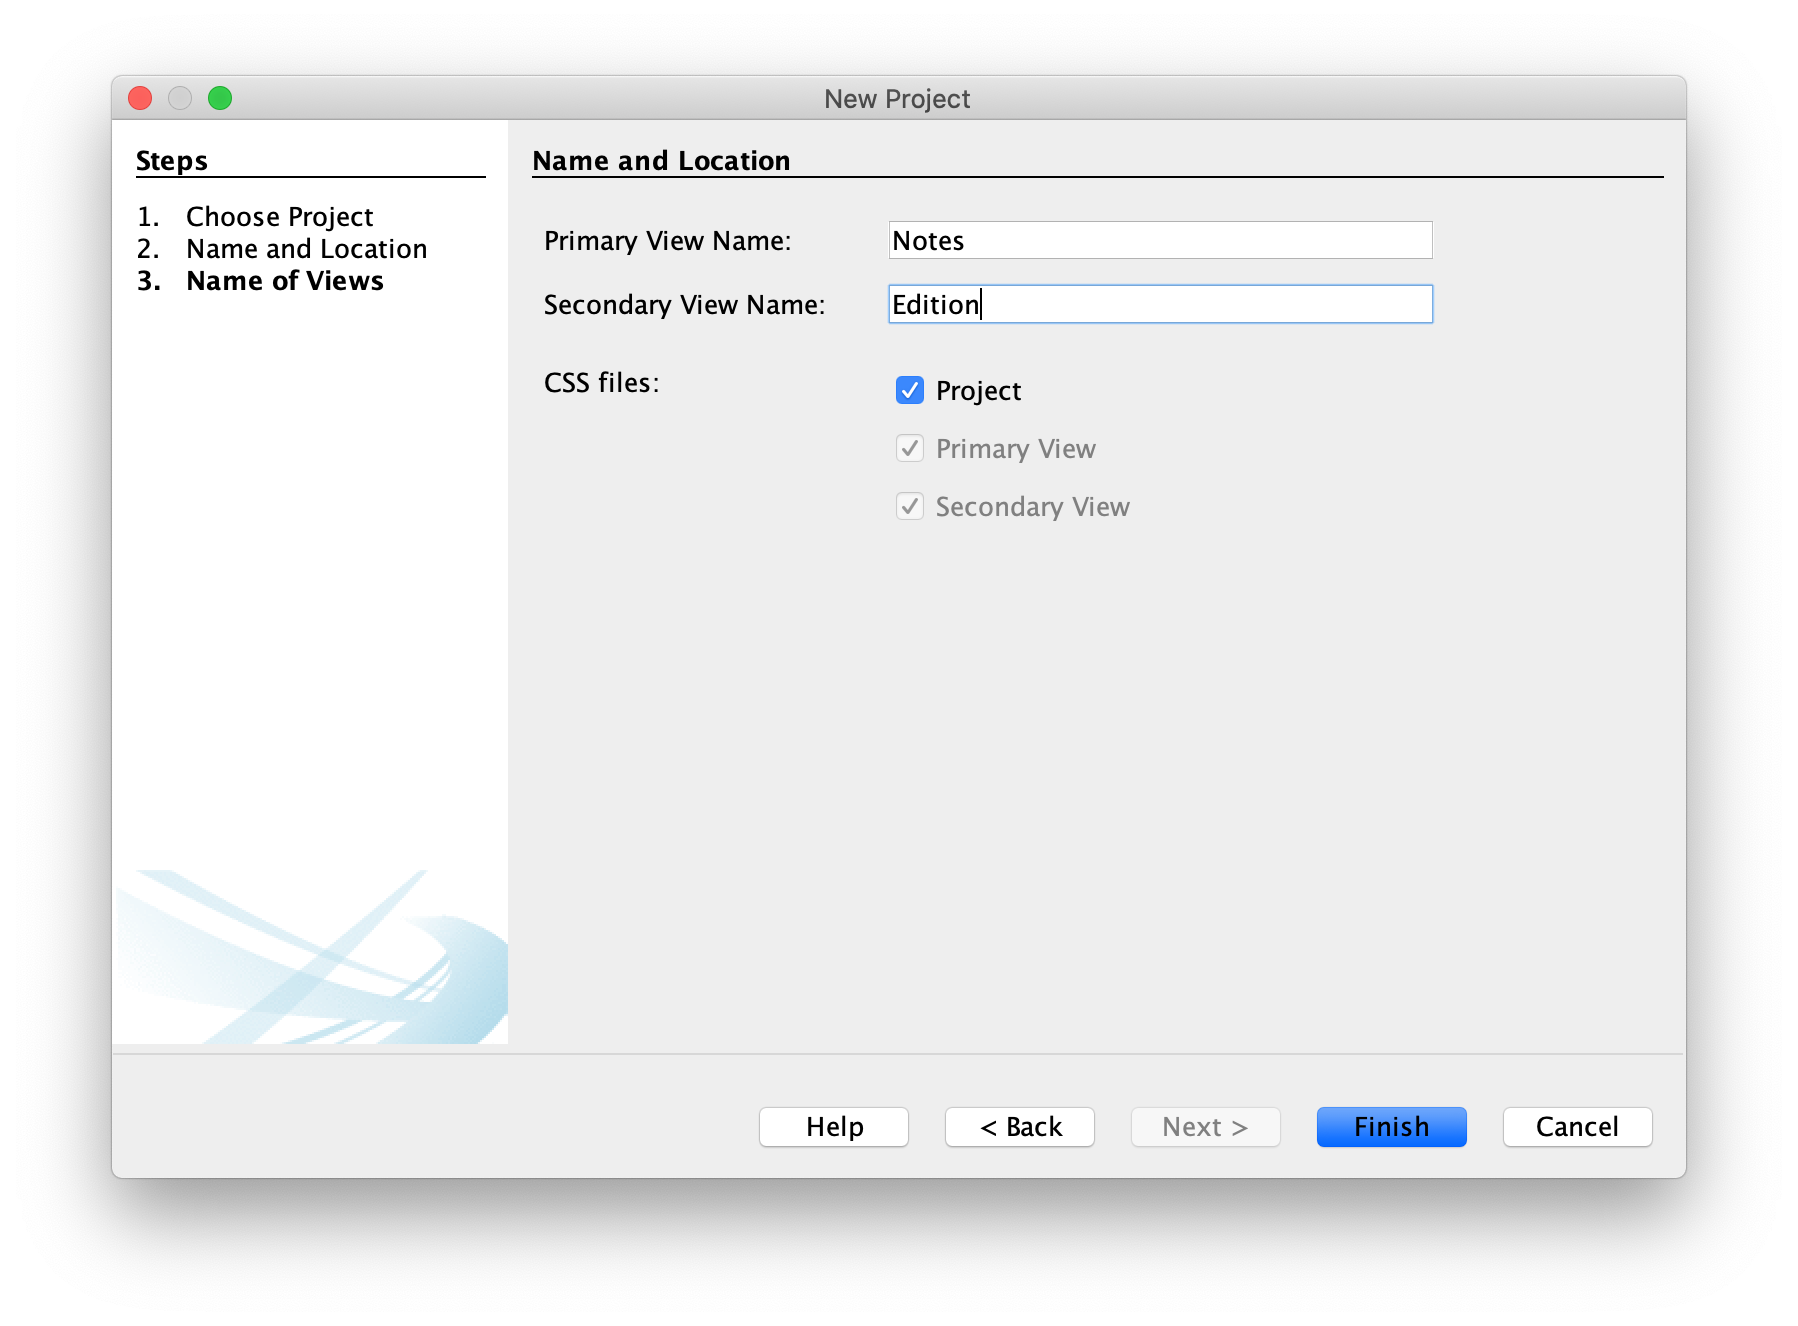
Press Finish and the project will be created and opened.
Reviewing the default project
The main class Notes contains the call to instantiate the views NotesView and EditionView, and the navigation drawer.
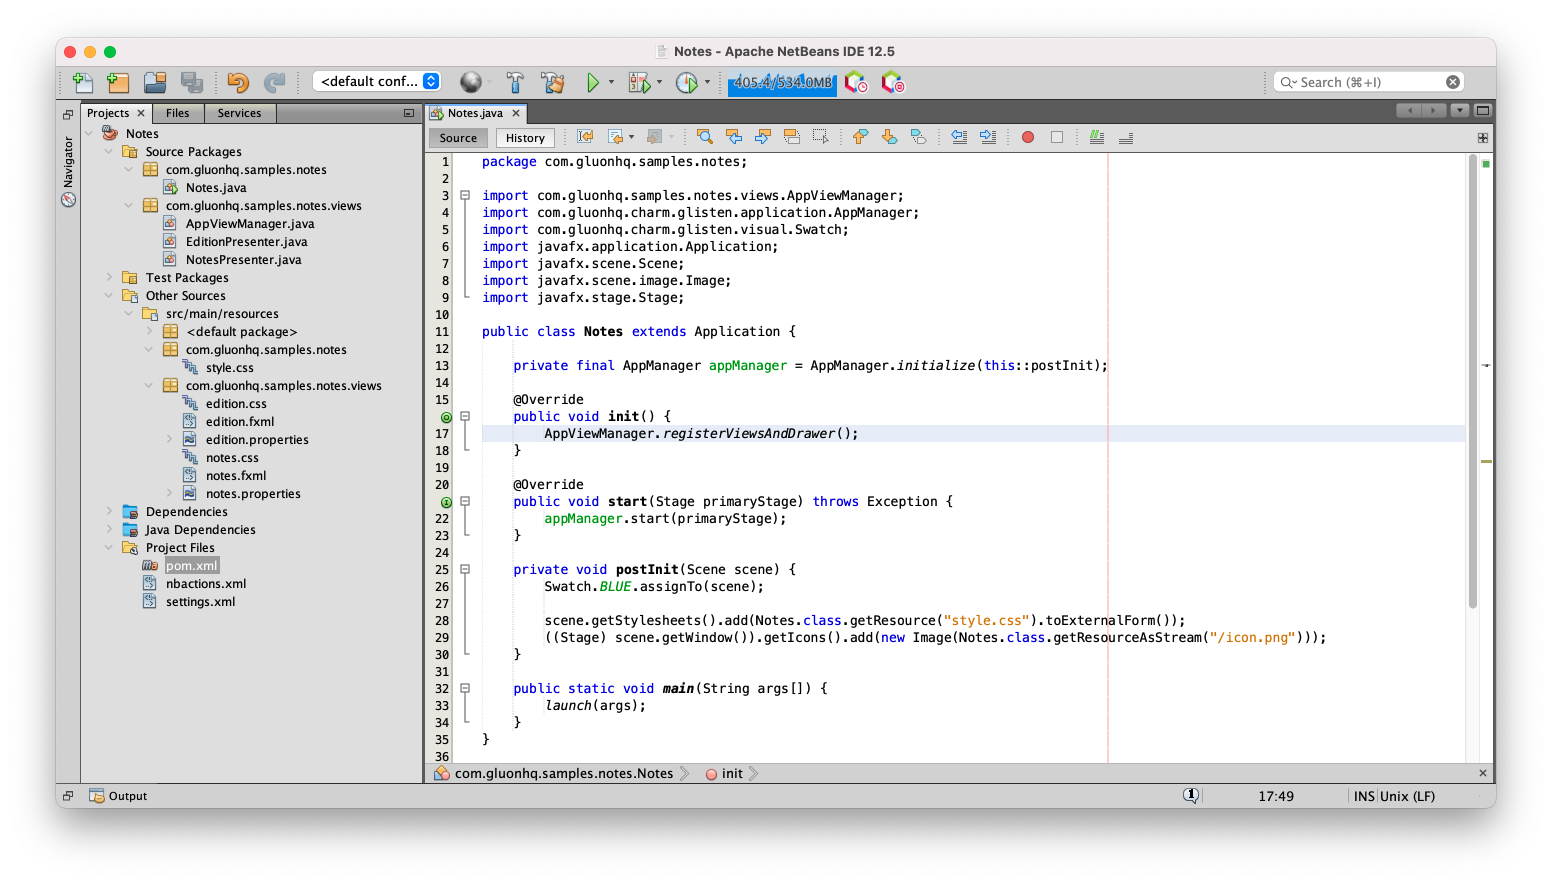
The views are created with FXML with the AppView class, making use of the Afterburner framework. The AppViewManager class takes care of adding the views to an AppViewRegistry instance.
When registerViewsAndDrawer is called, the views in AppViewRegistry are registered.
An instance of NavigationDrawer is fetched from the AppManager instance and send to the
utility method buildDrawer to add header and items to the drawer using the views.
public class AppViewManager {

    public static final AppViewRegistry REGISTRY = new AppViewRegistry();

    public static final AppView NOTES_VIEW = view("Notes", NotesPresenter.class, MaterialDesignIcon.HOME, SHOW_IN_DRAWER, HOME_VIEW, SKIP_VIEW_STACK);
    public static final AppView EDITION_VIEW = view("Edition", EditionPresenter.class, MaterialDesignIcon.DASHBOARD, SHOW_IN_DRAWER);

    private static AppView view(String title, Class<?> presenterClass, MaterialDesignIcon menuIcon, AppView.Flag... flags ) {
        return REGISTRY.createView(name(presenterClass), title, presenterClass, menuIcon, flags);
    }

    private static String name(Class<?> presenterClass) {
        return presenterClass.getSimpleName().toUpperCase(Locale.ROOT).replace("PRESENTER", "");
    }

    public static void registerViewsAndDrawer() {
        for (AppView view : REGISTRY.getViews()) {
            view.registerView();
        }

        NavigationDrawer.Header header = new NavigationDrawer.Header("Gluon Mobile",
                "Multi View Project",
                new Avatar(21, new Image(Notes.class.getResourceAsStream("/icon.png"))));

        Utils.buildDrawer(AppManager.getInstance().getDrawer(), header, REGISTRY.getViews());
    }
}
The FXML files can be edited with Scene Builder, that includes the Gluon Charm dependencies, so you can easily design Gluon Mobile views.
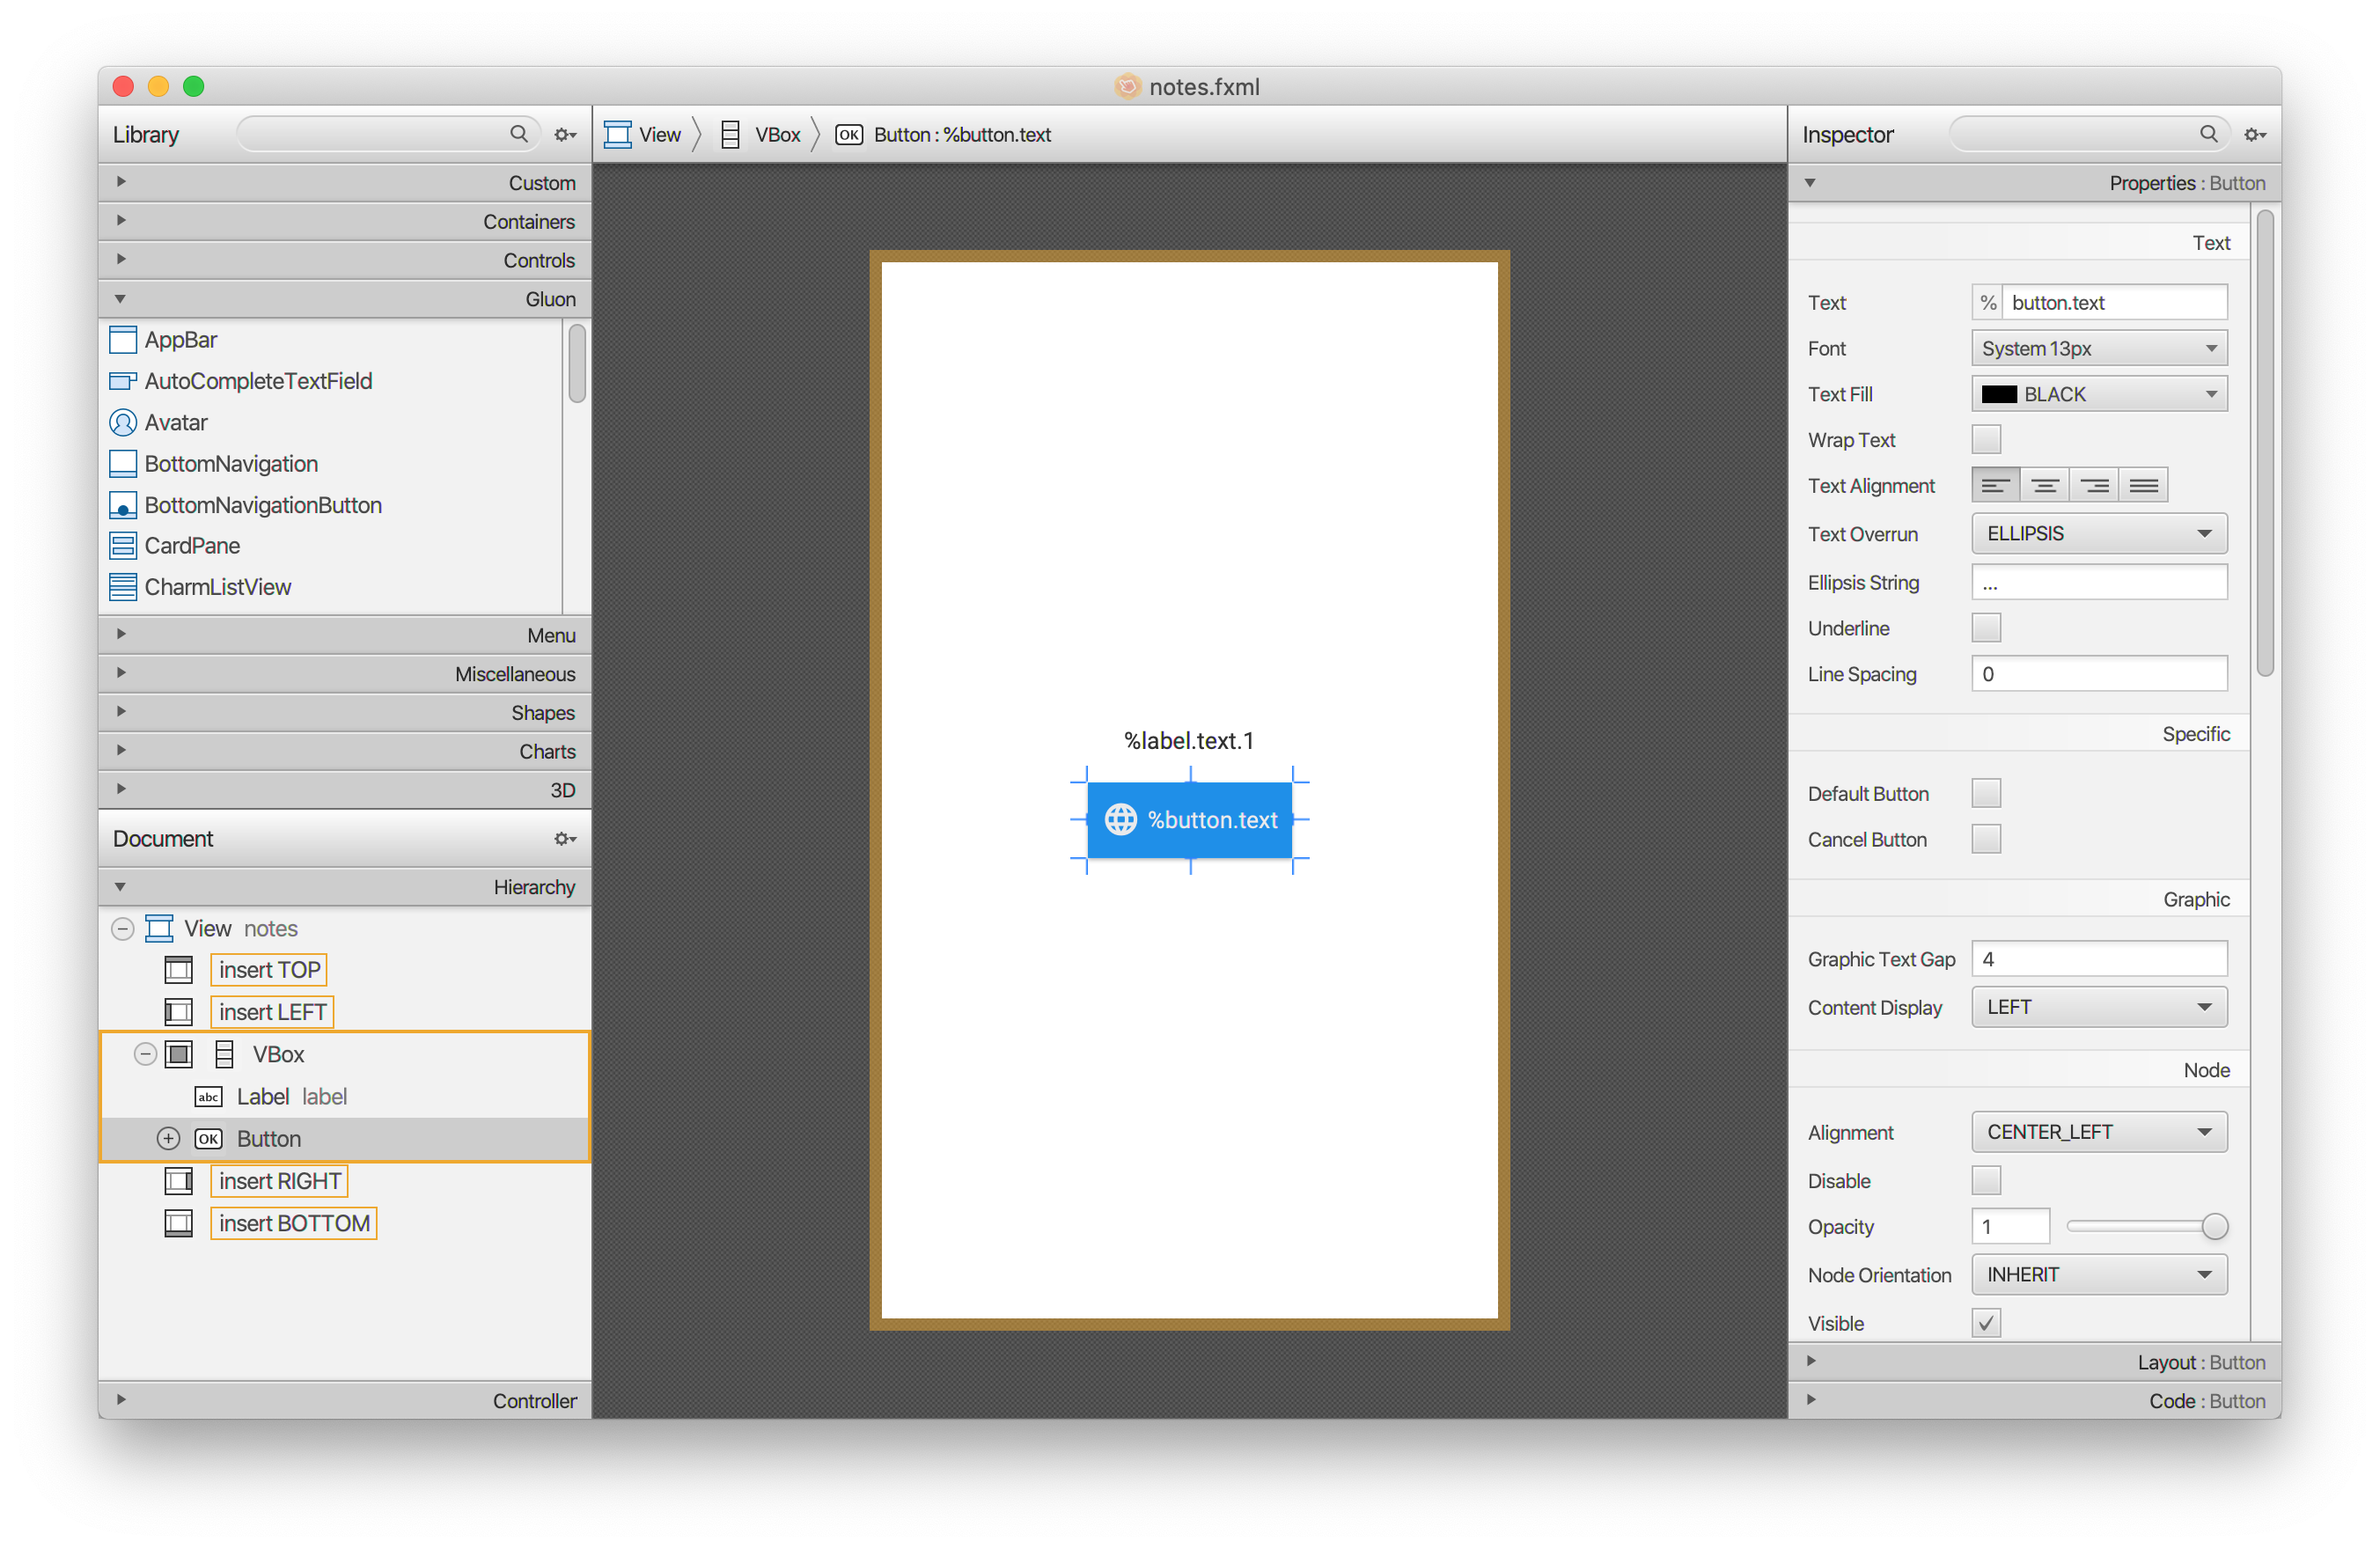
The controller or presenter (as it is called when using the Afterburner framework) contains the code to manage the AppBar and the event handler for the button.
public class NotesPresenter {

    @FXML
    private View notes;

    @FXML
    private Label label;

    @FXML
    private ResourceBundle resources;

    public void initialize() {
        notes.showingProperty().addListener((obs, oldValue, newValue) -> {
            if (newValue) {
                AppBar appBar = AppManager.getInstance().getAppBar();
                appBar.setNavIcon(MaterialDesignIcon.MENU.button(e ->
                        AppManager.getInstance().getDrawer().open()));
                appBar.setTitleText("Notes");
                appBar.getActionItems().add(MaterialDesignIcon.SEARCH.button(e ->
                        System.out.println("Search")));
            }
        });
    }

    @FXML
    void buttonClick() {
        label.setText(resources.getString("label.text.2"));
    }
}
If we build and run the application, we’ll see the default project with its functionality: the AppBar, the views and their transitions, as well as the side menu NavigationDrawer.

Modifying the project
Let’s start modifying the default project to create our Notes application.
Note class
Our model will be a Note class, with two StringProperty fields for the title and text of the note, and a long field for the date of creation.
public class Note {

    private final StringProperty title = new SimpleStringProperty();
    private final StringProperty text = new SimpleStringProperty();
    private long creationDate;

    public Note() {
        this.creationDate = LocalDateTime.now().toEpochSecond(ZoneOffset.UTC);
    }

    public Note(String title, String text) {
        this.title.set(title);
        this.text.set(text);
        this.creationDate = LocalDateTime.now().toEpochSecond(ZoneOffset.UTC);
    }

    public final String getTitle() { return title.get(); }
    public final void setTitle(String title) { this.title.set(title); }
    public final StringProperty titleProperty() { return this.title; }

    public final String getText() { return text.get(); }
    public final void setText(String text) { this.text.set(text); }
    public final StringProperty textProperty() { return this.text; }

    public final LocalDateTime getCreationDate() {
        return LocalDateTime.ofEpochSecond(creationDate, 0, ZoneOffset.UTC);
    }
}
Notes View
For starters, let’s add a CharmListView to the main view, that will contain each and every note we create. As headers, we’ll use the local date of creation of the notes.
So let’s edit notes.fxml with Scene Builder, remove the content, and add a CharmListView control in the center.

Back to the NotesPresenter, add the list and the cell factories for notes and headers, and include a FloatingActionButton control, that allows changing to Edition view to add a new note, as follows:
public class NotesPresenter {
    ...
    @FXML
    private CharmListView<Note, LocalDate> lstNotes;

    public void initialize() {
        ...
        lstNotes.setHeadersFunction(n -> n.getCreationDate().toLocalDate());
        lstNotes.setCellFactory(p -> new NoteCell());
        lstNotes.setHeaderCellFactory(p -> new HeaderCell());
        lstNotes.setPlaceholder(new Label("There are no notes"));

        final FloatingActionButton floatingActionButton = new FloatingActionButton();
        floatingActionButton.setOnAction(e ->
            AppViewManager.EDITION_VIEW.switchView());
        floatingActionButton.showOn(notes);
    }
    ...
}
where NoteCell is the cell factory for the notes. It uses a ListTile control to wrap the text in the center, a graphic on the left and two buttons on the right:
public class NoteCell extends CharmListCell<Note> {

    private final ListTile tile;
    private Note currentItem;
    private final DateTimeFormatter dateFormat;

    public NoteCell() {
        tile = new ListTile();
        tile.setPrimaryGraphic(MaterialDesignIcon.DESCRIPTION.graphic());

        Button btnEdit = MaterialDesignIcon.EDIT.button();
        Button btnRemove = MaterialDesignIcon.DELETE.button();
        HBox buttonBar = new HBox(0, btnEdit, btnRemove);
        buttonBar.setAlignment(Pos.CENTER_RIGHT);

        tile.setSecondaryGraphic(buttonBar);

        dateFormat = DateTimeFormatter.ofPattern("EEE, MMM dd yyyy - HH:mm", Locale.ENGLISH);
    }

    @Override
    public void updateItem(Note item, boolean empty) {
        super.updateItem(item, empty);
        currentItem = item;
        if (!empty && item != null) {
            update();
            setGraphic(tile);
        } else {
            setGraphic(null);
        }
    }

    private void update() {
        if (currentItem != null) {
            tile.textProperty().setAll(currentItem.getTitle(),
                                       currentItem.getText(),
                                       dateFormat.format(currentItem.getCreationDate()));
        } else {
            tile.textProperty().clear();
        }
    }
}
and HeaderCell is the one for the headers. We’ll use a Label to render the dates with a given format:
public class HeaderCell extends CharmListCell<Note> {

    private final Label label;
    private Note currentItem;
    private final DateTimeFormatter dateFormat;

    public HeaderCell() {
        label = new Label();
        dateFormat = DateTimeFormatter.ofPattern("EEEE, MMM dd", Locale.ENGLISH);
    }

    @Override
    public void updateItem(Note item, boolean empty) {
        super.updateItem(item, empty);
        currentItem = item;
        if (!empty && item != null) {
            update();
            setGraphic(label);
        } else {
            setGraphic(null);
        }
    }

    private void update() {
        if (currentItem != null) {
            label.setText(dateFormat.format(currentItem.getCreationDate()));
        } else {
            label.setText("");
        }
    }
}
In Notes::postInit, set Swatch.LIGHT_GREEN as the primary swatch. The notes.css file can be updated to style the list and tiles:
.charm-list-view .header-cell {
    -fx-background-color: -primary-swatch-200;
}

.charm-list-view .header-cell:empty {
    -fx-background-color: transparent;
}

.charm-list-view .header-cell .label {
    -fx-text-fill: -primary-swatch-900;
}

.list-tile > .primary-graphic {
    -fx-text-fill: -primary-swatch-900;
}
Now, for testing purposes, we’ll add a pair of notes to the NotesPresenter:
lstNotes.setItems(FXCollections.observableArrayList(
new Note("Note 1", "This is a note"),
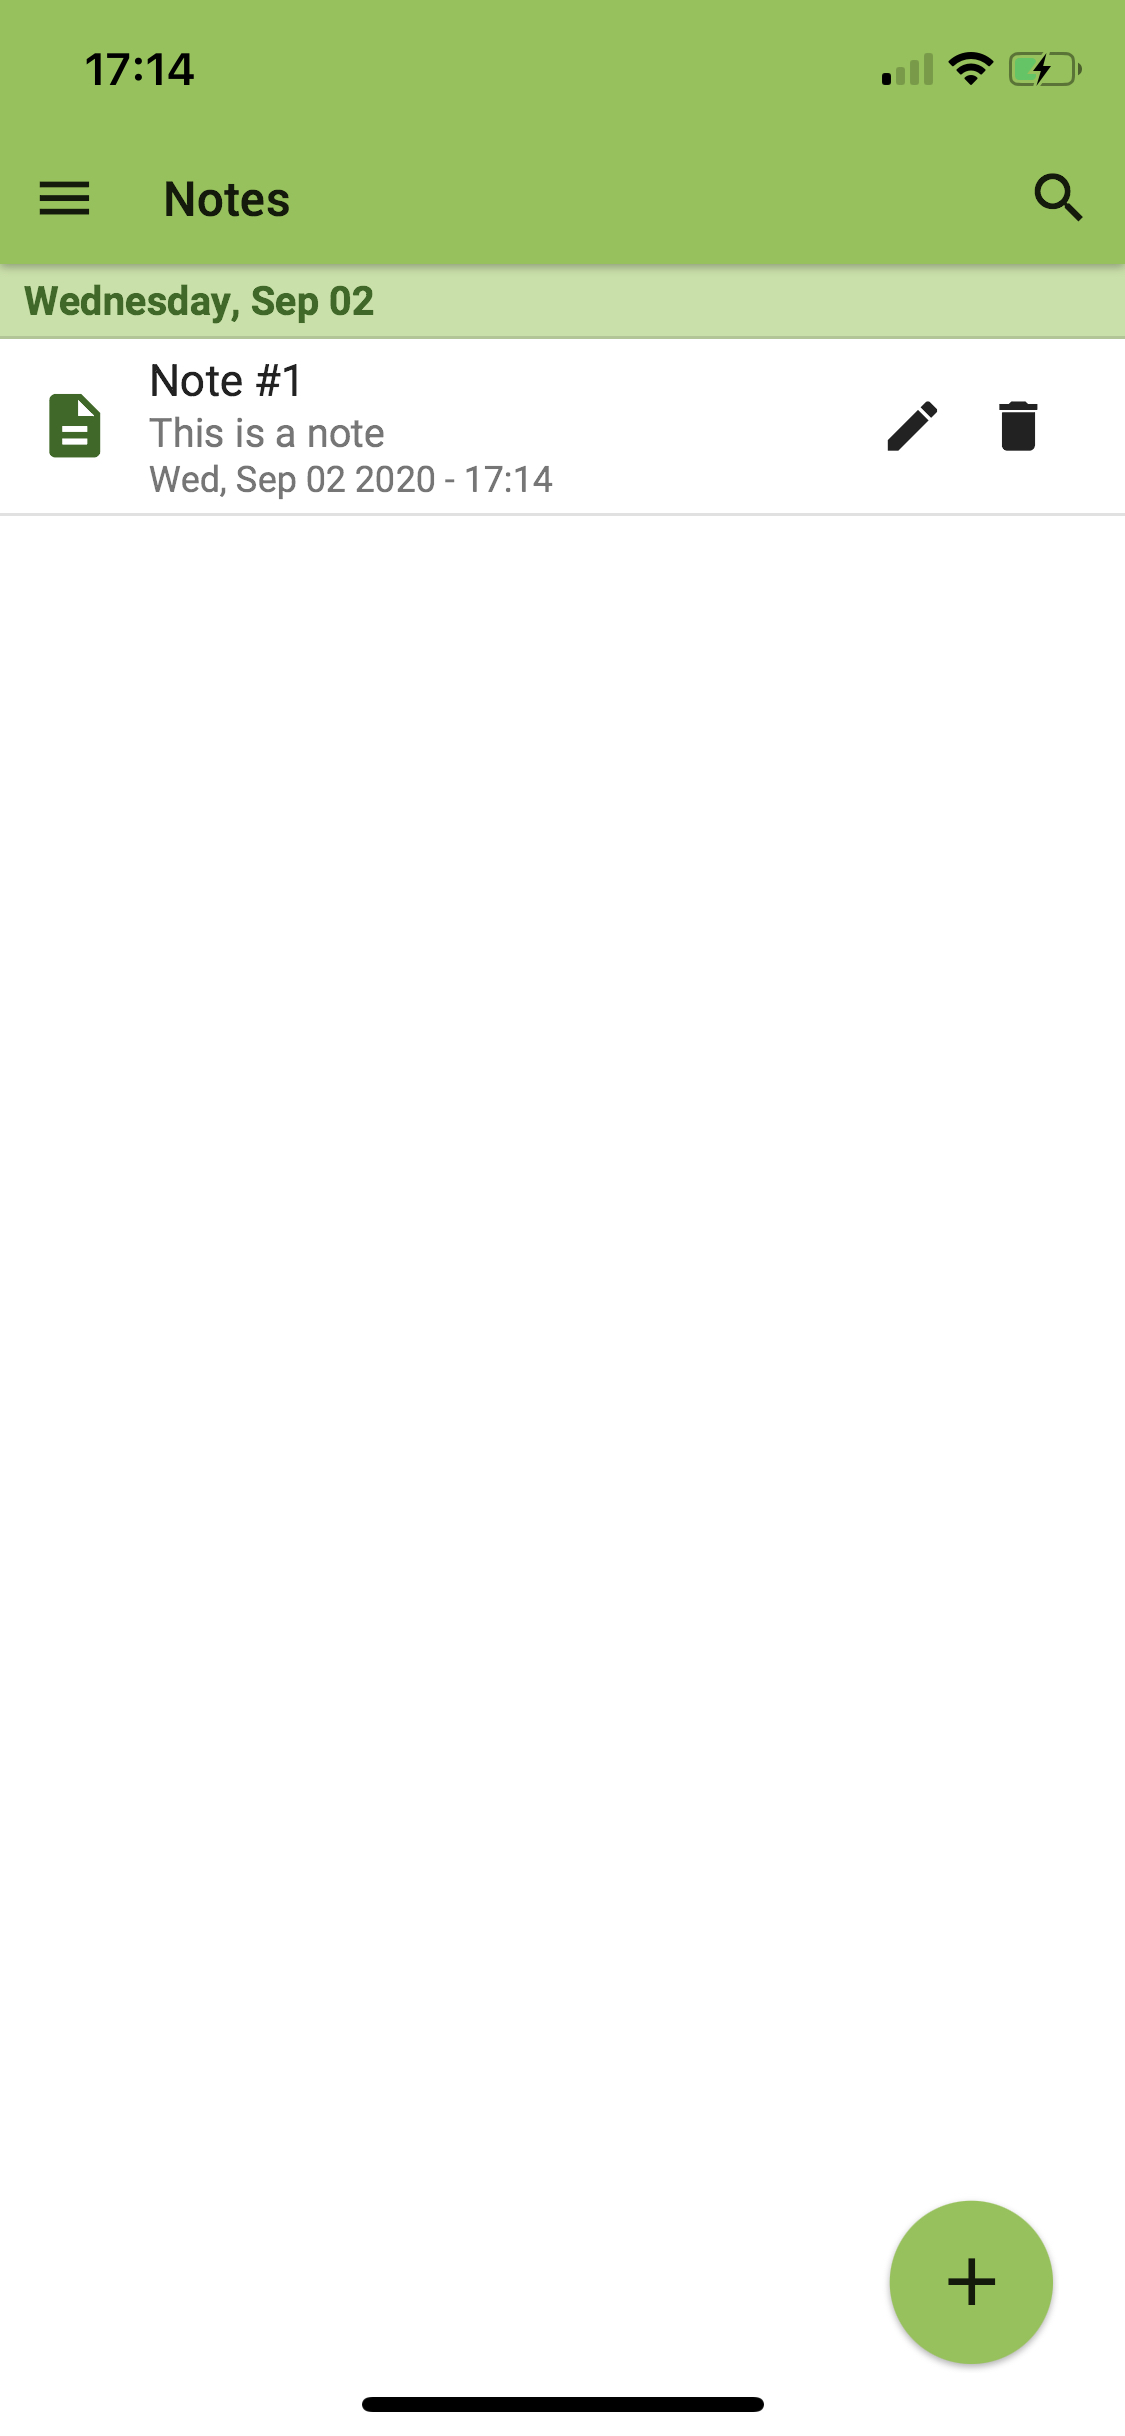
new Note("Other note", "And this is another note")));Running the application, it should show this result:

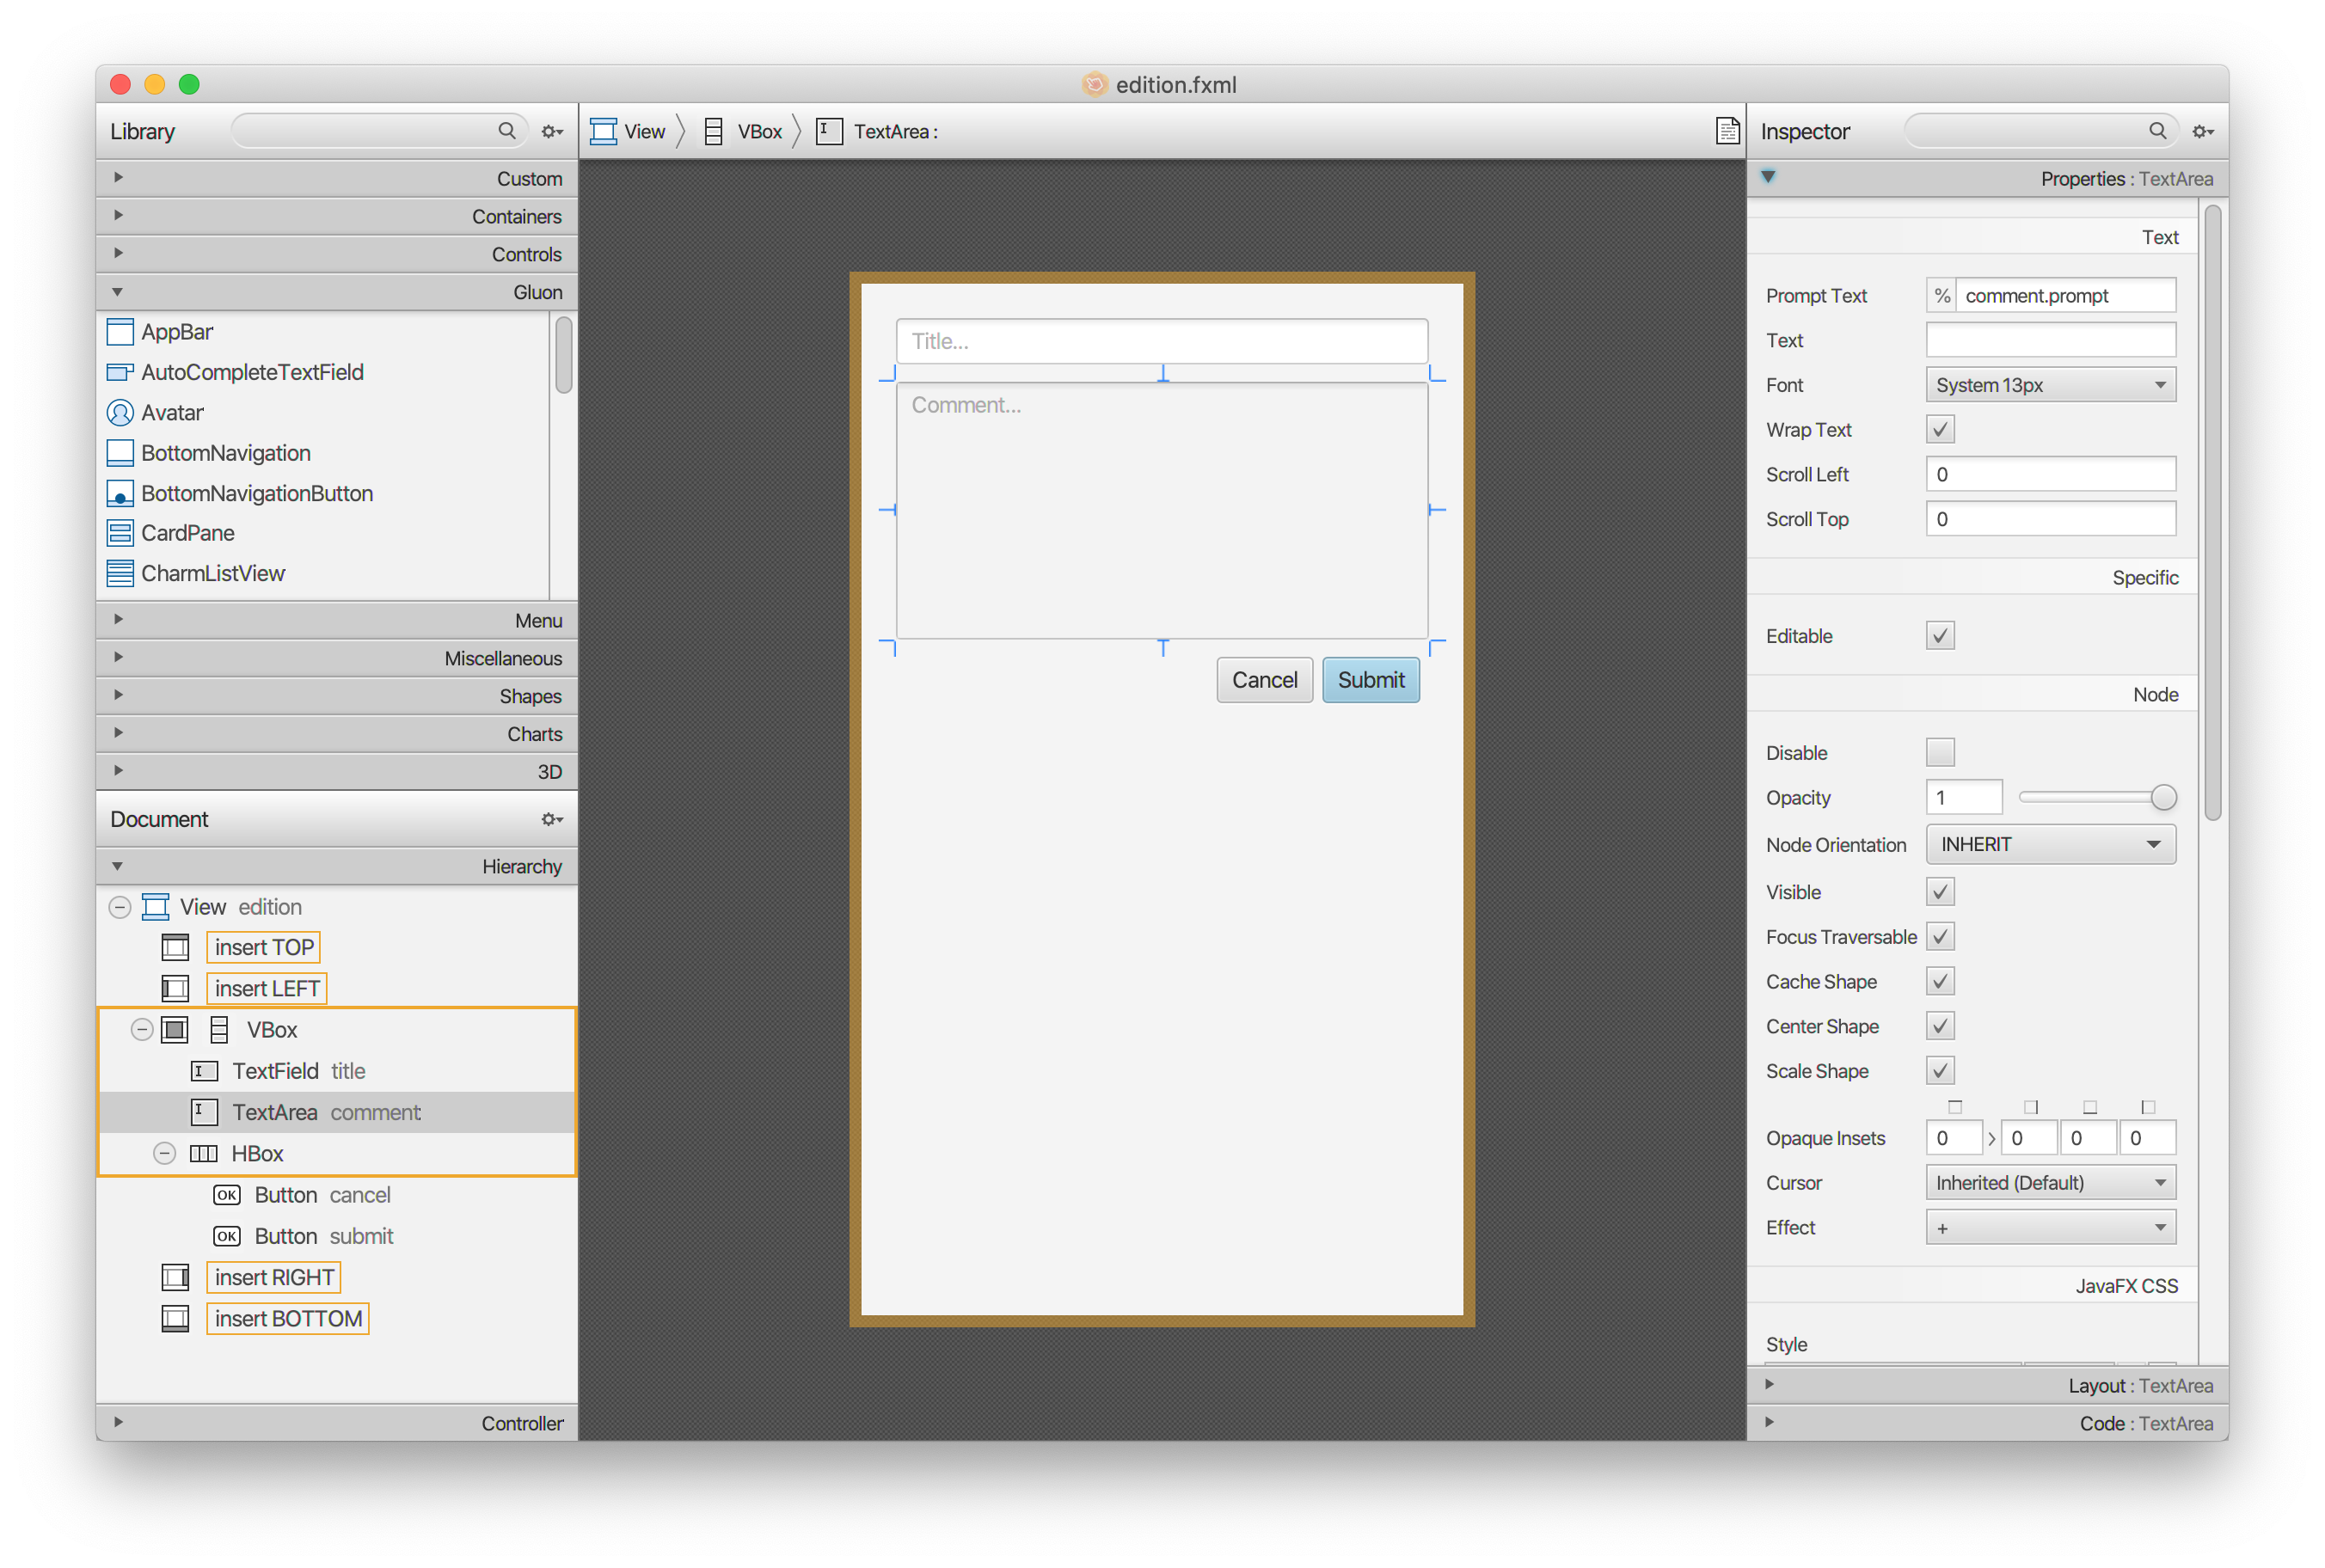
Edition View
In order to create and edit the notes, let’s add now to the Edition view a TextField for the title and a TextArea for the content of the note. Also, a pair of Button controls to cancel or submit the note.
We’ll use this view to either create a new note or edit an existing one. For that we need to create a model that keeps track of the selected note, if any, from the Notes view. By using the Afterburner framework, we’ll be able to inject this model in our presenters.
public class Model {

    private final ObjectProperty<Note> activeNote = new SimpleObjectProperty<>();

    public ObjectProperty<Note> activeNote() {
        return activeNote;
    }
}
Since Note and Model will be injected, we need to add these classes to the reflection list:
<reflectionList>
    <list>com.gluonhq.samples.notes.views.NotesPresenter</list>
    <list>com.gluonhq.samples.notes.views.EditionPresenter</list>
    <list>com.gluonhq.samples.notes.model.Model</list>
    <list>com.gluonhq.samples.notes.model.Note</list>
</reflectionList>
In NotesPresenter, let’s add the selected note when the user clicks the edit button of any given note.
First, we need to modify the NoteCell class, in order to pass two Consumers for the edit and delete buttons:
public NoteCell(Consumer<Note> edit, Consumer<Note> remove) {
    ...
    Button btnEdit = MaterialDesignIcon.EDIT.button(e -> edit.accept(currentItem));
    Button btnRemove = MaterialDesignIcon.DELETE.button(e -> remove.accept(currentItem));
    ...
}
And now we create the edit and remove methods in the presenter, and pass them to create the cell factory:
public class NotesPresenter {
    ...
    @Inject private Model model;

    public void initialize() {
        ...
        lstNotes.setCellFactory(p -> new NoteCell(this::edit, this::remove));
        ...
        floatingActionButton.setOnAction(e -> edit(null));
    }

    private void edit(Note note) {
        model.activeNote().set(note);
        AppViewManager.EDITION_VIEW.switchView();
    }

    private void remove(Note note) { }
    ...
}
In EditionPresenter, we manage the create/edit mode and also add the event handlers to the buttons. We’ll bind the disable property of the submit button to a BooleanBinding that will detect changes in the title and text of the note.
public class EditionPresenter {
@Inject private Model model;
@FXML private View edition;
@FXML private Button submit;
@FXML private Button cancel;
@FXML private TextField title;
@FXML private TextArea comment;
private boolean editMode;
public void initialize() {
edition.setShowTransitionFactory(BounceInRightTransition::new);
edition.showingProperty().addListener((obs, oldValue, newValue) -> {
if (newValue) {
submit.disableProperty().unbind();
Note activeNote = model.activeNote().get();
if (activeNote != null) {
submit.setText("APPLY");
title.setText(activeNote.getTitle());
comment.setText(activeNote.getText());
submit.disableProperty().bind(Bindings.createBooleanBinding(() -> {
if (title == null || comment == null) {
return true;
}
return title.textProperty()
.isEqualTo(activeNote.getTitle())
.and(comment.textProperty()
.isEqualTo(activeNote.getText())).get();
}, title.textProperty(),comment.textProperty()));
editMode = true;
} else {
submit.setText("SUBMIT");
submit.disableProperty().bind(Bindings.createBooleanBinding(() -> {
return title.textProperty()
.isEmpty()
.or(comment.textProperty()
.isEmpty()).get();
}, title.textProperty(), comment.textProperty()));
editMode = false;
}
AppBar appBar = AppManager.getInstance().getAppBar();
appBar.setNavIcon(MaterialDesignIcon.MENU.button(e ->
AppManager.getInstance().getDrawer().open()));
appBar.setTitleText(editMode ? "Edit Note" : "Add Note");
} else {
title.clear();
comment.clear();
}
});
submit.setOnAction(e -> {
Note note = editMode ? model.activeNote().get() : new Note();
note.setTitle(title.getText());
note.setText(comment.getText());
close();
});
cancel.setOnAction(e -> close());
}
private void close() {
title.clear();
comment.clear();
model.activeNote().set(null);
AppManager.getInstance().goHome();
}
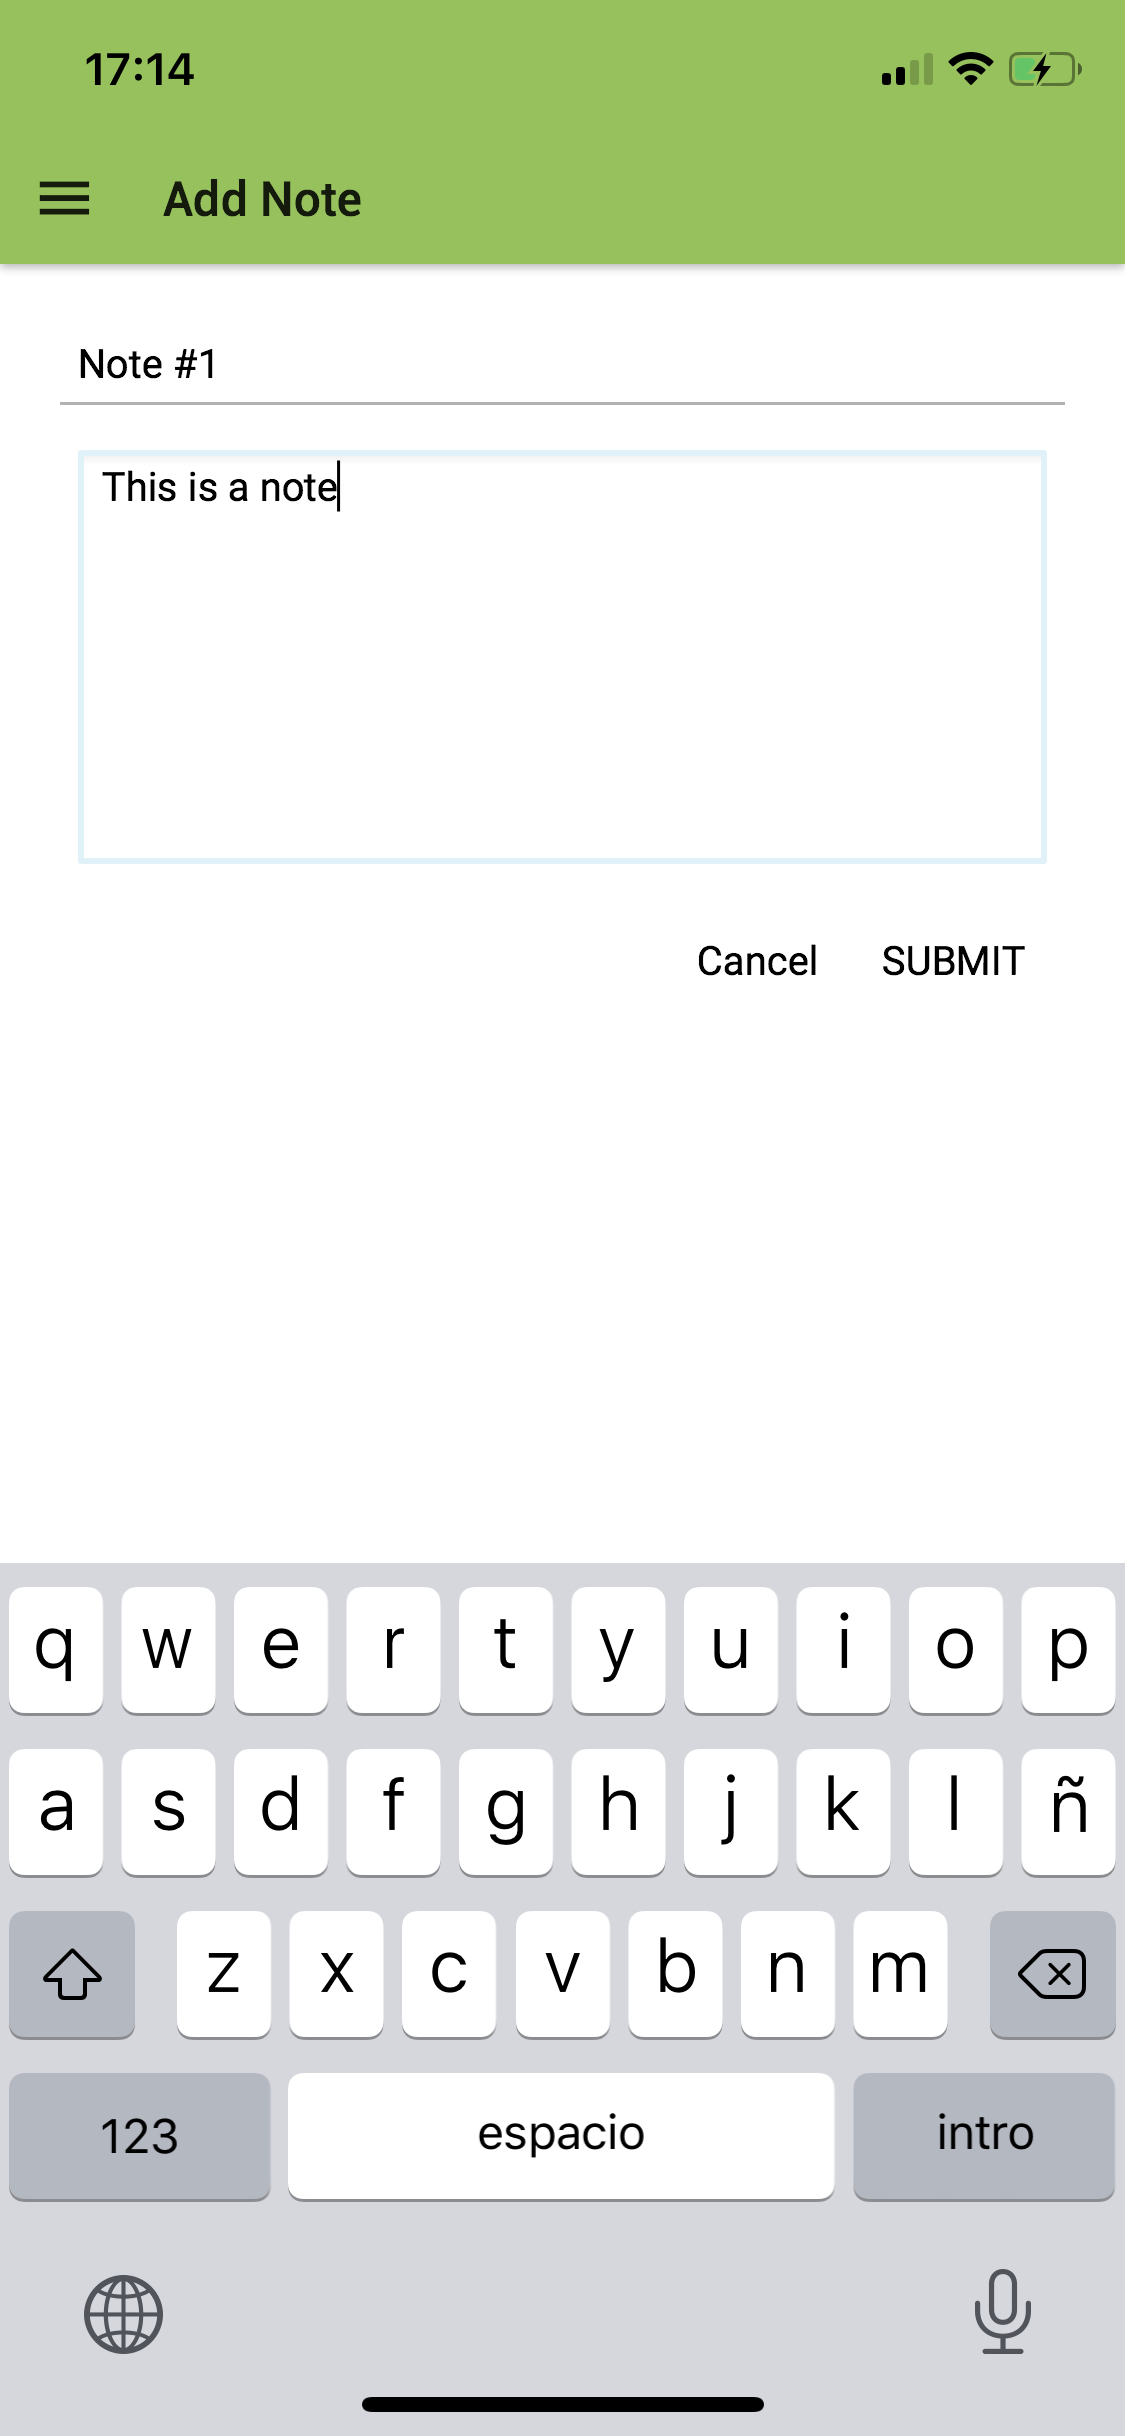
}So far, we can edit or create new notes:

But changes won’t be persisted or notified to the CharmListView. For that purpose we are going to create a service.
Notes service
Let’s create a service that uses Gluon CloudLink to persist the notes we create and/or edit in the local storage of our device.
You can check the Data Storage section of the Gluon CloudLink
documentation to find out about DataClient and GluonObservableList concepts in more detail.
Let’s add first the following dependencies to the pom:
<dependencies>
    ...
    <dependency>
        <groupId>com.gluonhq</groupId>
        <artifactId>charm-cloudlink-client</artifactId>
        <version>6.0.7</version>
    </dependency>
    <dependency>
        <groupId>com.gluonhq</groupId>
        <artifactId>connect</artifactId>
        <version>2.0.1</version>
    </dependency>
    <dependency>
        <groupId>org.glassfish</groupId>
        <artifactId>jakarta.json</artifactId>
        <version>1.1.6</version>
        <classifier>module</classifier>
        <scope>runtime</scope>
    </dependency>
    <dependency>
        <groupId>org.glassfish.jaxb</groupId>
        <artifactId>jaxb-runtime</artifactId>
        <version>2.3.1</version>
        <scope>runtime</scope>
    </dependency>
</dependencies>
The service will have a ListProperty<Note>, a wrapper of an observable list of notes. It will have some methods to add or remove notes to that list.
When creating the DataClient instance, we’ll make use of OperationMode.LOCAL_ONLY to indicate that all data
operations will be exclusively local.
Using a DataProvider as an entry point to retrieve a GluonObservableList, we need to supply a proper
ListDataReader, a valid entity with the ability to read a list of objects. For that, the DataClient instance already
has a method: createListDataReader(). All it needs is an identifier (NOTES), the object class to be read
(Note.class), and the synchronization flags:
-
SyncFlag.LIST_WRITE_THROUGH, so changes in the list of comments are automatically stored locally. -
SyncFlag.OBJECT_WRITE_THROUGH, so changes in the properties of any commment in the list are also stored locally.
public class Service {

    private static final String NOTES = "notes-v4";

    private final ListProperty<Note> notes = new SimpleListProperty<>(FXCollections.observableArrayList());

    private DataClient dataClient;

    @PostConstruct
    public void postConstruct() {
        dataClient = DataClientBuilder.create()
                .operationMode(OperationMode.LOCAL_ONLY)
                .build();
    }

    public void retrieveNotes() {
        GluonObservableList<Note> gluonNotes = DataProvider.retrieveList(
                dataClient.createListDataReader(NOTES, Note.class,
                SyncFlag.LIST_WRITE_THROUGH, SyncFlag.OBJECT_WRITE_THROUGH));

        gluonNotes.stateProperty().addListener((obs, ov, nv) -> {
            if (ConnectState.SUCCEEDED.equals(nv)) {
                notes.set(gluonNotes);
            }
        });
    }

    public Note addNote(Note note) {
        notes.get().add(note);
        return note;
    }

    public void removeNote(Note note) {
        notes.get().remove(note);
    }

    public ListProperty<Note> notesProperty() {
        return notes;
    }
}
Now we can inject this service in our presenters, so we need to add this class to the reflection list as well:
<reflectionList>
    ...
    <list>com.gluonhq.samples.notes.service.Service</list>
</reflectionList>
In NotesPresenter, we’ll remove the creation of 2 notes, and instead we’ll add a listener to the notesProperty() in order to load the list of notes into lstNotes, whenever the service finishes retrieving that list from the local storage, process that will start by calling service.retrieveNotes():
public class NotesPresenter {

    ...
    @Inject private Service service;

    public void initialize() {
        ...
        service.notesProperty().addListener((ListChangeListener.Change<? extends Note> c) -> {
            ObservableList<Note> notes = FXCollections.observableArrayList(new ArrayList<Note>(c.getList()));
            lstNotes.setItems(notes);
            lstNotes.setComparator((n1, n2) -> n1.getCreationDate().compareTo(n2.getCreationDate()));
        });
        ...

        service.retrieveNotes();
    }

    private void remove(Note note) {
        service.removeNote(note);
    }
}
In EditionPresenter, we modify the event handler of the submit button, in order to add the new created note.
public class EditionPresenter {

    @Inject private Service service;

    public void initialize() {
        ...
        submit.setOnAction(e -> {
            ...
            if (!editMode) {
                service.addNote(note);
            }
            close();
        });
        ...
    }
}
On edit mode, the changes in the note will be persisted (thanks to the GluonObservableList), and the note in the CharmListView will be updated as well.
Testing the application
Build, run and test the application on desktop, both on HotSpot and creating a native image:
HotSpot
Before creating a native image, let’s run first the app on HotSpot with the regular JDK 11+, as this will be faster for spotting and fixing any possible issue.
Press the Run project (Notes) button or press F6, or open a terminal and run: mvn gluonfx:run.
Native image
Open a terminal and run: mvn gluonfx:build gluonfx:nativerun.
If everything works as it should, it is time to target the application for mobile platforms like Android and iOS.
These steps are already documented in the client docs for each IDE. We will refer to the NetBeans section.
-
For Android: Create & install an Android native image
-
For iOS: Create & install an iOS native image
Android
From a Linux machine, plug an Android device and run:
mvn -Pandroid gluonfx:build gluonfx:package gluonfx:install gluonfx:nativerun
You should get the application running on the device:


iOS
On MacOS, plug an iOS device and run:
mvn -Pios gluonfx:build gluonfx:nativerun
You should get the application running on the device:
Settings
Gluon Mobile has a SettingsPane control that helps creating a Settings View. All we need is a JavaFX bean with some properties that will be used to configure and customize the application, and those properties will be modified with the proper editors in that view.
Let’s create a Settings class, that will contain a showDate boolean property, to show or not the date of creation in the Notes view.
public class Settings {
private final BooleanProperty showDate = new SimpleBooleanProperty(this, "showDate", true);
public final BooleanProperty showDateProperty() {
return showDate;
}
public final boolean isShowDate() {
return showDate.get();
}
public final void setShowDate(boolean value) {
showDate.set(value);
}
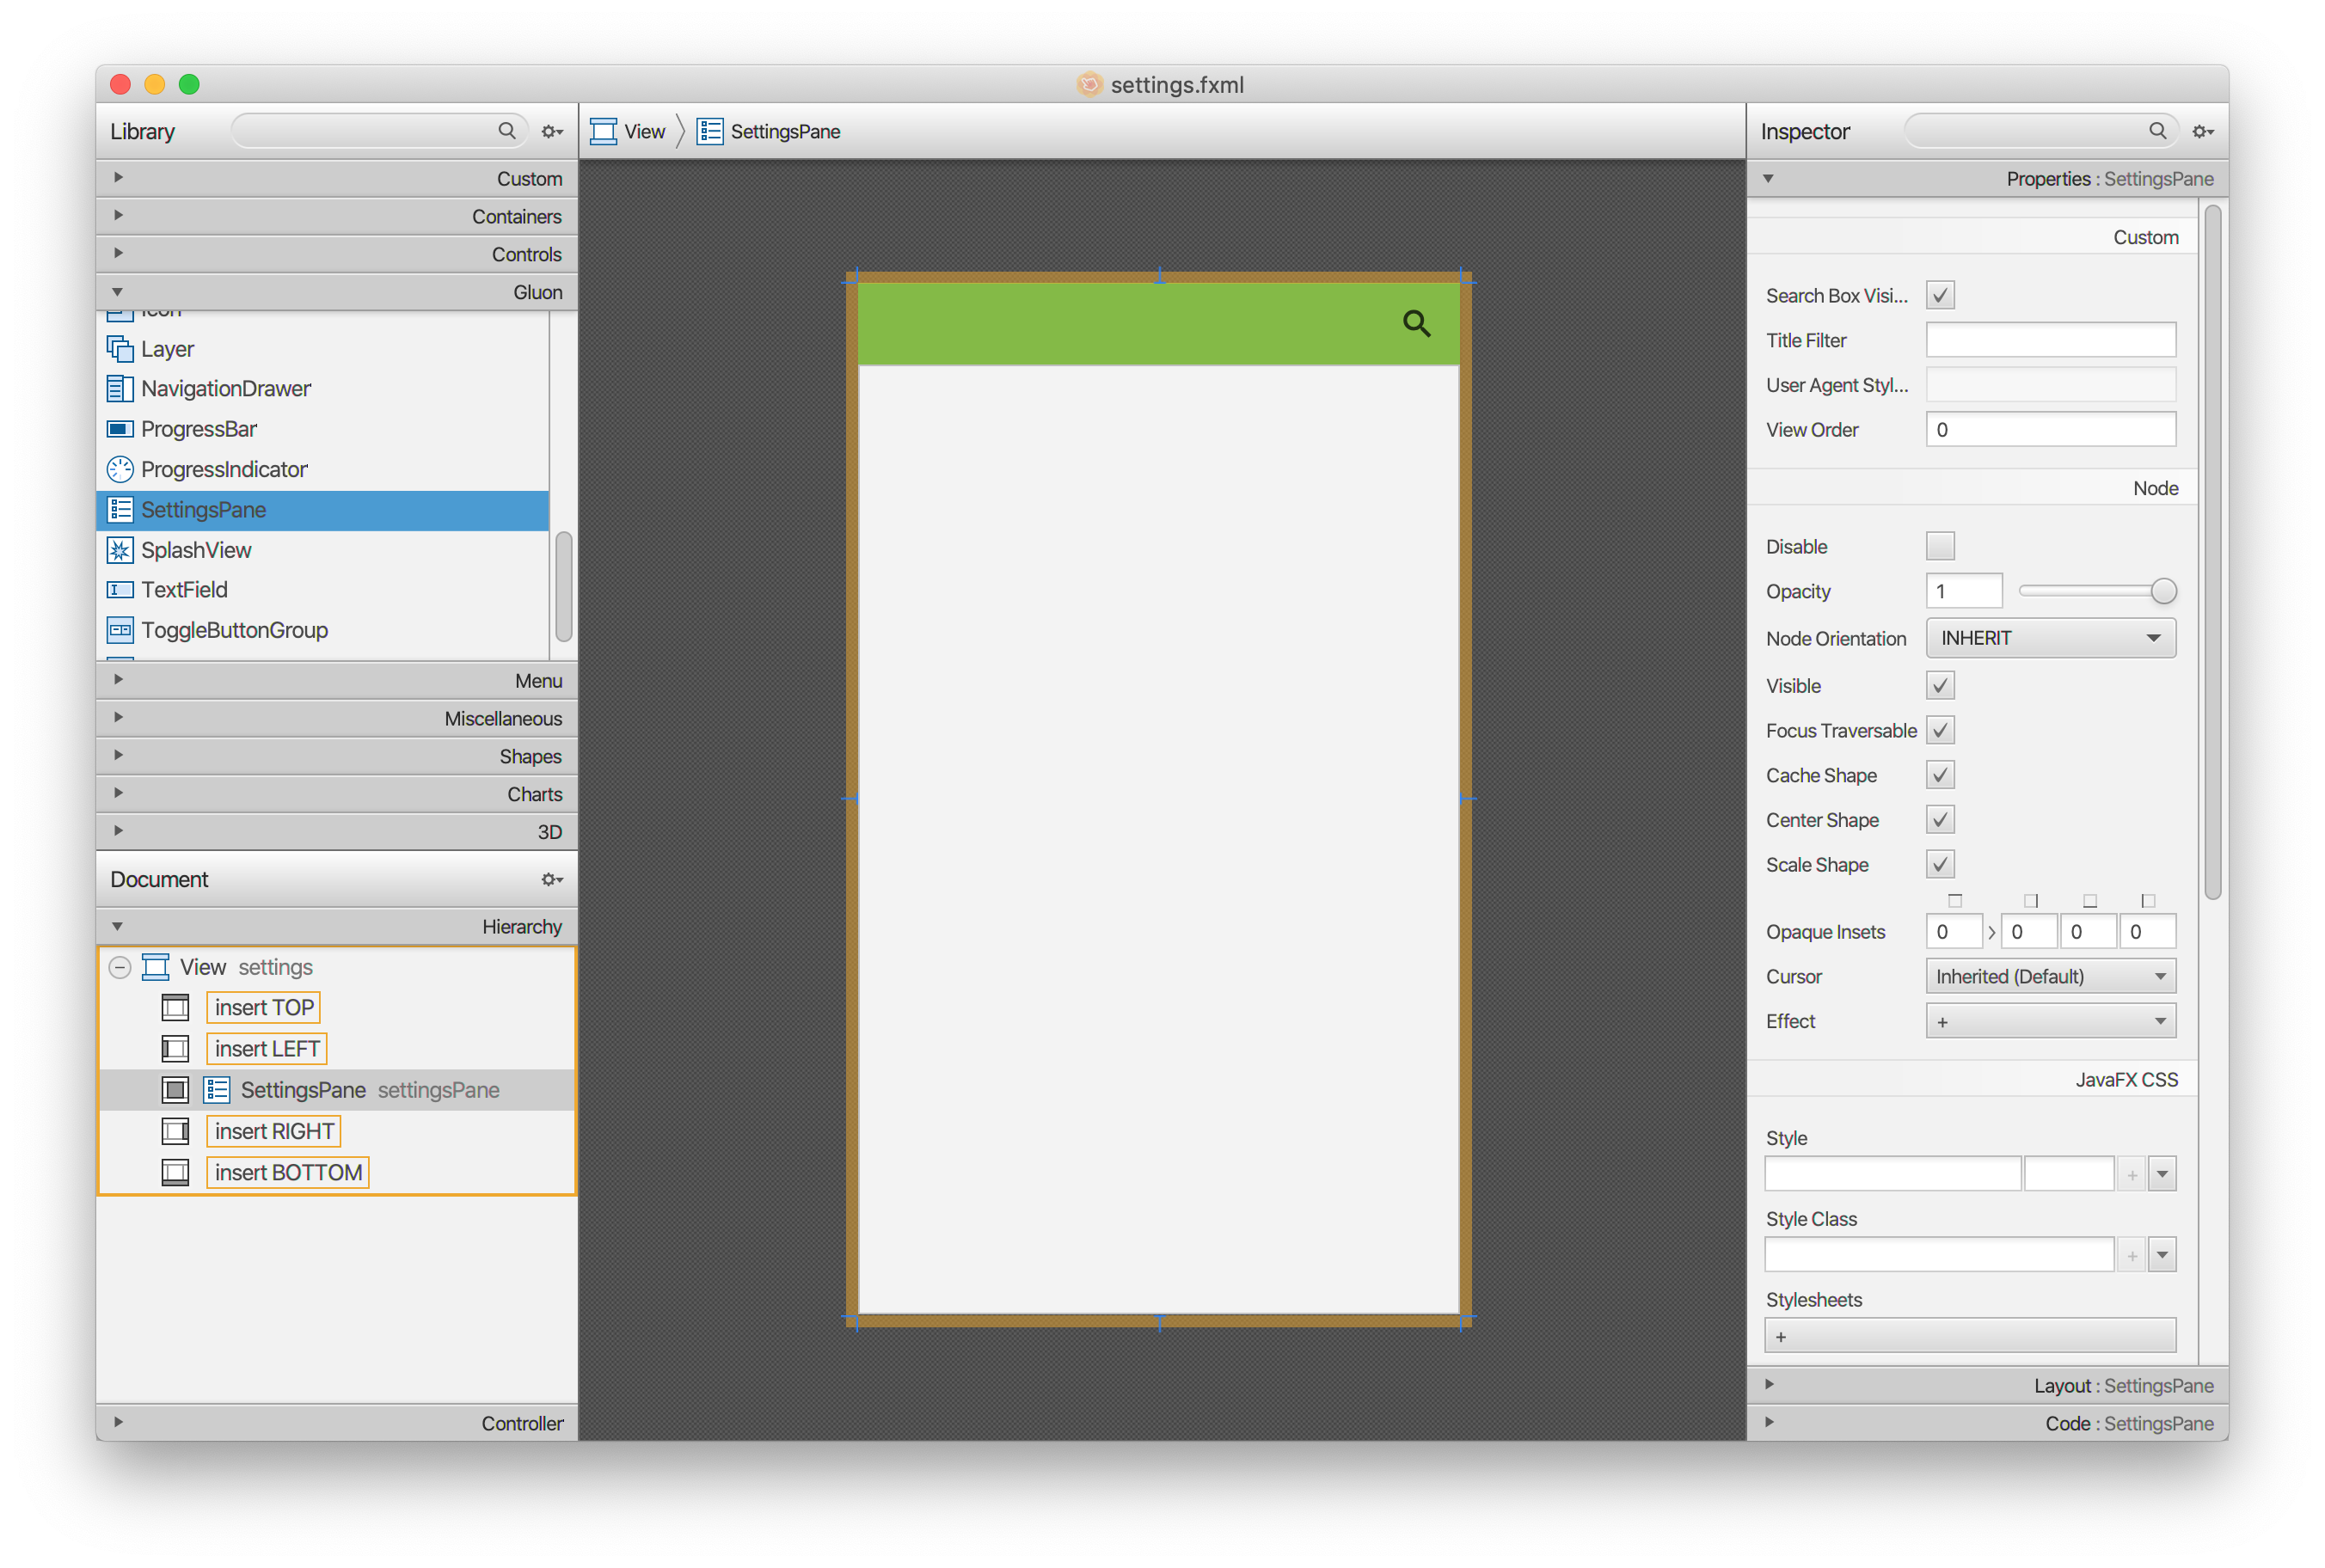
}Now create a new view by adding a presenter SettingsPresenter, the settings.fxml file, with the settings.css and settings.properties if required.
If you are using NetBeans, you can use New→Empty FXML… wizard to create these files and place them in the proper packages.
Edit the fxml, remove the AnchorPane and add a View instead. Add a SettingsPane in the center of the view. Add the controller and the fx:id for both view and control.
Add the view to the factory by creating a new AppView:
public class AppViewManager {
    ...
    public static final AppView SETTINGS_VIEW = view("Settings", SettingsPresenter.class, MaterialDesignIcon.SETTINGS, SHOW_IN_DRAWER);
    ...
}
Now, on the presenter, inject the settings, and create a DefaultOption for each settings property. A default editor will be used to view and edit the value of that property.
public class SettingsPresenter {
@Inject private Settings config;
@FXML private View settings;
@FXML private SettingsPane settingsPane;
public void initialize() {
settings.setShowTransitionFactory(BounceInUpTransition::new);
settings.showingProperty().addListener((obs, oldValue, newValue) -> {
if (newValue) {
AppBar appBar = AppManager.getInstance().getAppBar();
appBar.setNavIcon(MaterialDesignIcon.MENU.button(e ->
AppManager.getInstance().getDrawer().open()));
appBar.setTitleText("Settings");
appBar.getActionItems().add(MaterialDesignIcon.CLOSE.button(e -> AppManager.getInstance().goHome()));
}
});
final Option<BooleanProperty> dateOption = new DefaultOption(MaterialDesignIcon.DATE_RANGE.graphic(),
"Show Date", "Show the note's date", null, config.showDateProperty(), true);
settingsPane.getOptions().addAll(dateOption);
settingsPane.setSearchBoxVisible(false);
}
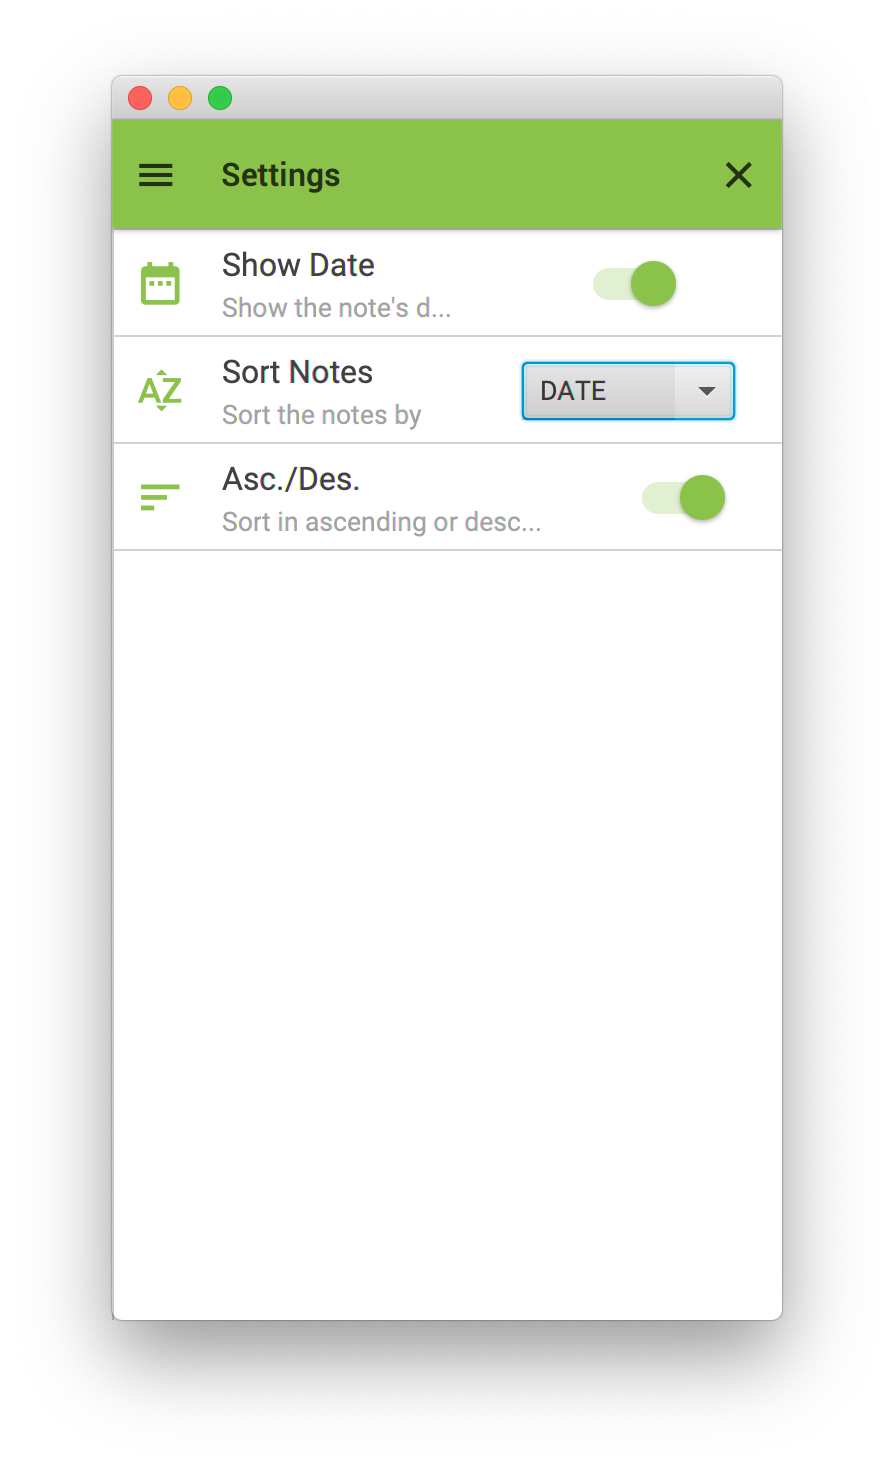
}Run the application on Hotspot, open the drawer and select the Settings item, the view will be displayed:

Finally, we just need to react to changes in the settings properties.
Since these settings affects how the notes are rendered, we’ll have to pass the settings to the factory cell, add a listener to changes in any of the properties, and render the cell accordingly.
public class NoteCell extends CharmListCell<Note> {
    ...
    private final Settings settings;

    public NoteCell(Settings settings, Consumer<Note> edit, Consumer<Note> remove) {
        this.settings = settings;
        ...
        settings.showDateProperty().addListener((obs, ov, nv) -> update());
    }

    private void update() {
        if (currentItem != null) {
            tile.textProperty().setAll(currentItem.getTitle(),
                                       currentItem.getText());
            if (settings.isShowDate()) {
                tile.textProperty().add(dateFormat.format(currentItem.getCreationDate()));
            }
        } else {
            tile.textProperty().clear();
        }
    }
}
Now we update NotesPresenter, and we can test how changing the settings affects the Notes view.
public class NotesPresenter {
    ...
    @Inject private Settings settings;

    public void initialize() {
        ...
        lstNotes.setCellFactory(p -> new NoteCell(settings, this::edit, this::remove));
        ...
    }
    ...
}
Don’t forget to add these two new classes to the reflection list, as these will be called reflectively when running the native image. Also the resources bundle has to be included in the bundles list:
<bundlesList>
    ...
    <list>com.gluonhq.samples.notes.views.settings</list>
</bundlesList>
<reflectionList>
    ...
    <list>com.gluonhq.samples.notes.views.SettingsPresenter</list>
    <list>com.gluonhq.samples.notes.model.Settings</list>
</reflectionList>
Let’s add now two more properties: ascending, a boolean property allowing header and notes sorting by ascending or descending dates, and sorting, an object property based on SORTING, an enum that allows sorting by title, content or date.
public class Settings {

    public static enum SORTING {
        DATE,
        TITLE,
        CONTENT
    }

    // ascending
    private final BooleanProperty ascending = new SimpleBooleanProperty(this, "ascending", true);

    public final BooleanProperty ascendingProperty() {
       return ascending;
    }

    public final boolean isAscending() {
       return ascending.get();
    }

    public final void setAscending(boolean value) {
        ascending.set(value);
    }

    // sorting
    private final ObjectProperty<SORTING> sorting = new SimpleObjectProperty<>(this, "sorting", SORTING.DATE);

    public final ObjectProperty<SORTING> sortingProperty() {
       return sorting;
    }

    public final SORTING getSorting() {
       return sorting.get();
    }

    public final void setSorting(SORTING value) {
        sorting.set(value);
    }

}
By default, any enum will use a ComboBox editor.
public class SettingsPresenter {

    public void initialize() {
        ...
        final DefaultOption<ObjectProperty<SORTING>> sortOption = new DefaultOption<>(MaterialDesignIcon.SORT_BY_ALPHA.graphic(),
                "Sort Notes", "Sort the notes by", null, config.sortingProperty(), true);

        final DefaultOption<BooleanProperty> ascendingOption = new DefaultOption<>(MaterialDesignIcon.SORT.graphic(),
                "Asc./Des.", "Sort in ascending or descending order", null, config.ascendingProperty(), true);

        settingsPane.getOptions().addAll(dateOption, sortOption, ascendingOption);
    }
}
Now, let’s update NotesPresenter:
public class NotesPresenter {
...
public void initialize() {
...
settings.ascendingProperty().addListener((obs, ov, nv) -> updateSettings());
settings.sortingProperty().addListener((obs, ov, nv) -> updateSettings());
updateSettings();
}
private void updateSettings() {
if (settings.isAscending()) {
lstNotes.setHeaderComparator((h1, h2) -> h1.compareTo(h2));
} else {
lstNotes.setHeaderComparator((h1, h2) -> h2.compareTo(h1));
}
switch (settings.getSorting()) {
case DATE:
if (settings.isAscending()) {
lstNotes.setComparator((n1, n2) -> n1.getCreationDate().compareTo(n2.getCreationDate()));
} else {
lstNotes.setComparator((n1, n2) -> n2.getCreationDate().compareTo(n1.getCreationDate()));
}
break;
case TITLE:
if (settings.isAscending()) {
lstNotes.setComparator((n1, n2) -> n1.getTitle().compareTo(n2.getTitle()));
} else {
lstNotes.setComparator((n1, n2) -> n2.getTitle().compareTo(n1.getTitle()));
}
break;
case CONTENT:
if (settings.isAscending()) {
lstNotes.setComparator((n1, n2) -> n1.getText().compareTo(n2.getText()));
} else {
lstNotes.setComparator((n1, n2) -> n2.getText().compareTo(n1.getText()));
}
break;
}
}
...
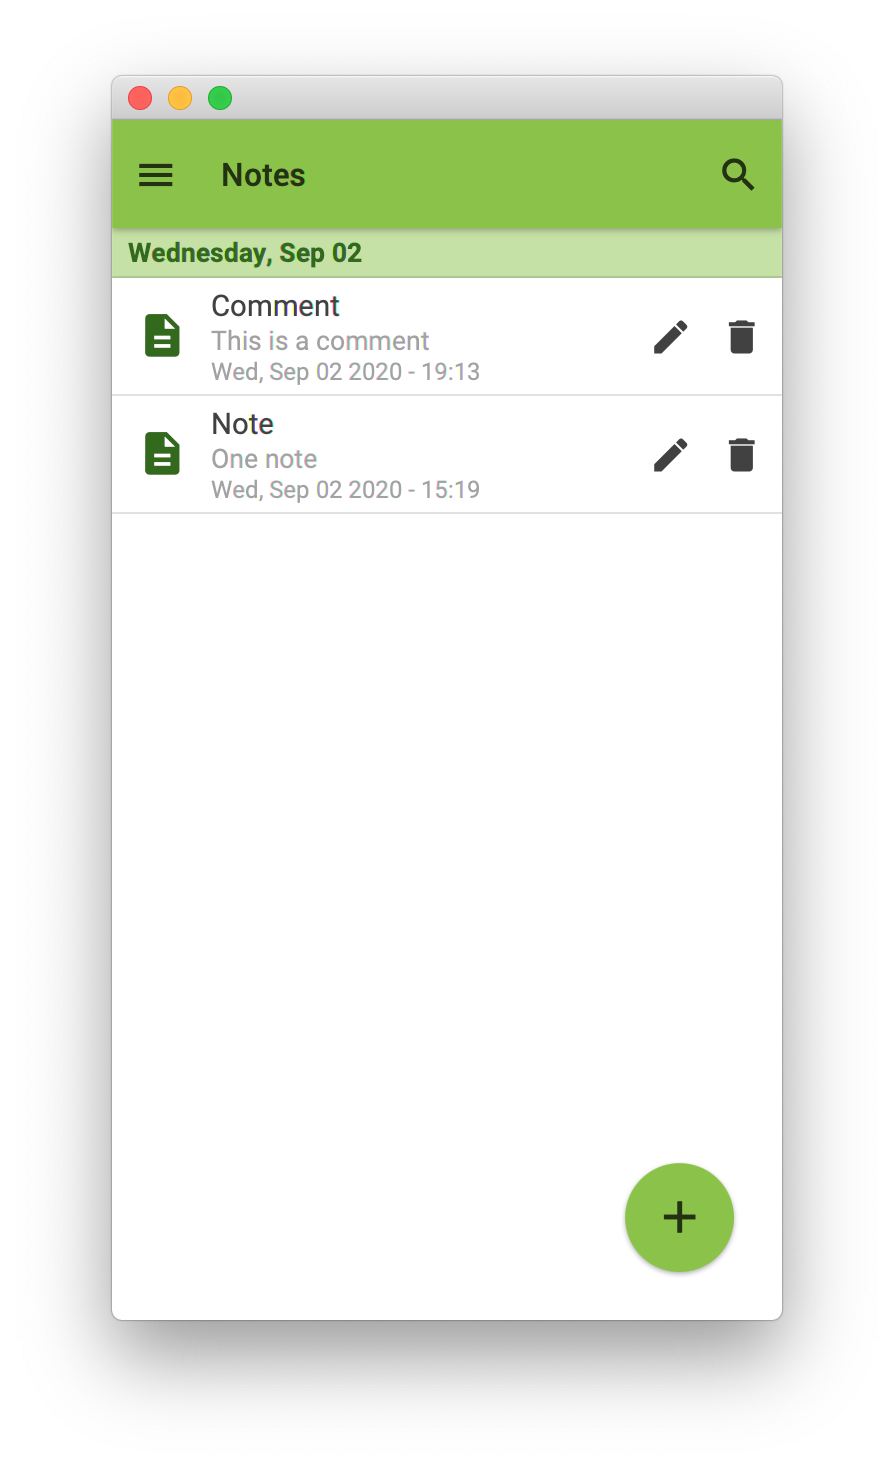
}This image corresponds to descending sorting, by title:
Custom editors
Let’s finally add fontSize to Settings , an integer property to set the font size of the notes text.
public class Settings {
private final IntegerProperty fontSize = new SimpleIntegerProperty(this, "fontSize", 10);
public final IntegerProperty fontSizeProperty() {
return fontSize;
}
public final int getFontSize() {
return fontSize.get();
}
public final void setFontSize(int value) {
fontSize.set(value);
}
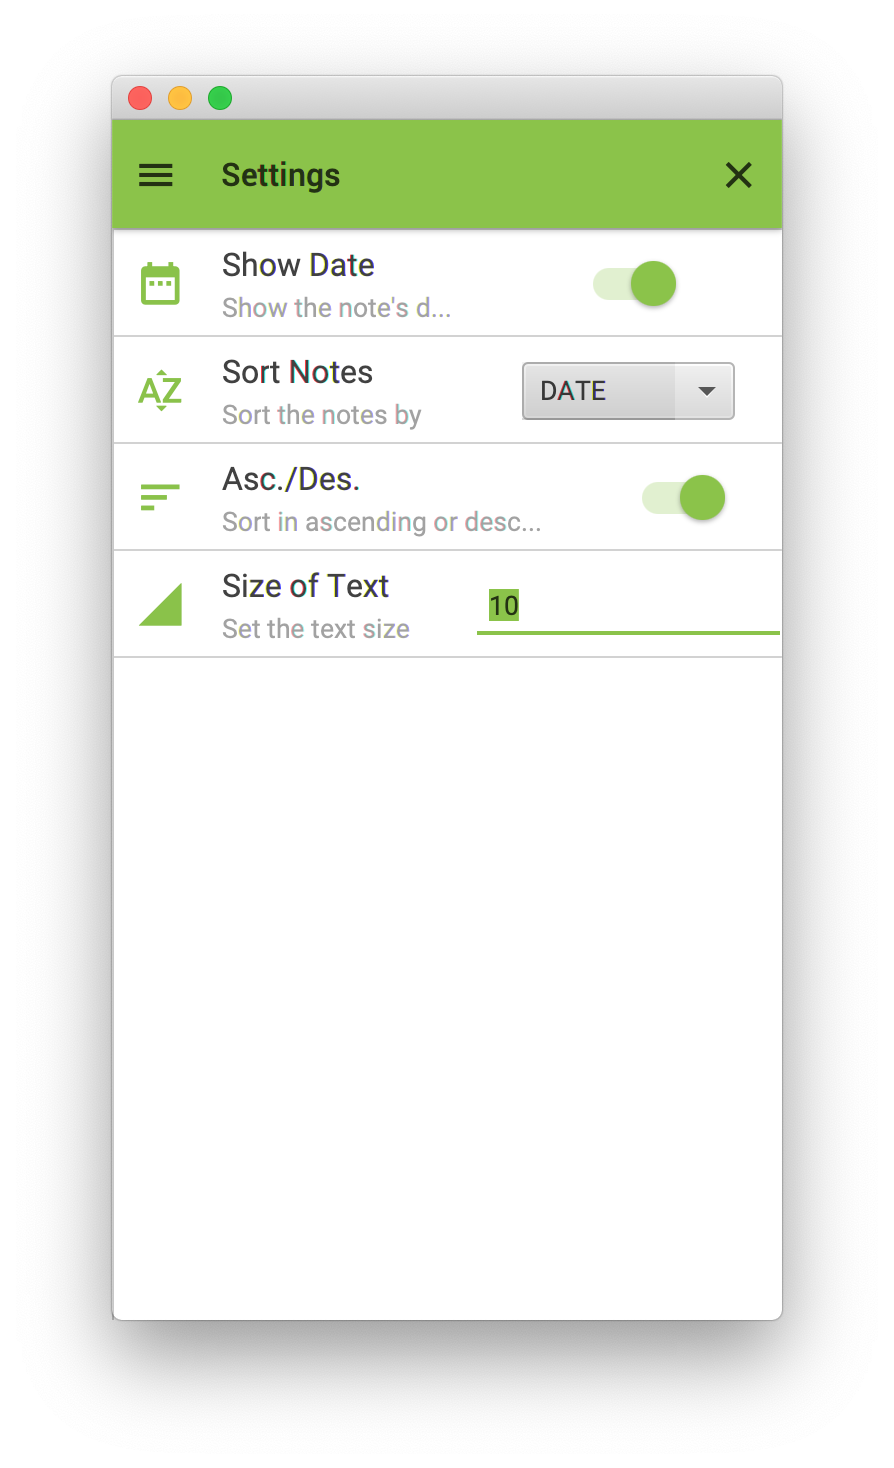
}The default editor for this property will be a TextField with validation for integer numbers.
public class SettingsPresenter {

    public void initialize() {
        ...
        final Option<Number> fontOption = new DefaultOption(MaterialDesignIcon.NETWORK_CELL.graphic(),
                "Size of Text", "Set the text size", null, config.fontSizeProperty(), true);

        settingsPane.getOptions().addAll(dateOption, sortOption, ascendingOption, fontOption);
    }

}
Let’s modify now the font size of the ListTile text based on this property. Note that we’ll use a 1.4 scale factor for Tablet devices.
public class NoteCell extends CharmListCell<Note> {
    ...
    private int fontSize = -1;

    public NoteCell(Settings settings, Consumer<Note> edit, Consumer<Note> remove) {
        ...
        settings.fontSizeProperty().addListener((obs, ov, nv) -> update());
    }

    private void update() {
        if (currentItem != null) {
            ...
            if (fontSize != settings.getFontSize()) {
                fontSize = settings.getFontSize();
                tile.getCenter().setStyle("-fx-font-size: " +
                        (DisplayService.create()
                                .map(d -> d.isTablet() ? 1.4 : 1.0)
                                .orElse(1.0) * fontSize) + "pt;");
            }
        }
    }
    ...
}
While this works fine, what if we wanted to use a different editor, other than the TextField? Let’s say we want to use an Slider. How can we use that control instead?
Luckily, the SettingsPane control allows replacing the default editors with new ones provided by the developer. Let’s see how.
For starters, we have to define a SliderEditor class that implements OptionEditor<T>, uses a Slider control and overrides its methods:
public class SettingsPresenter {

    private class SliderEditor implements OptionEditor<Number> {

        private final Slider slider;

        public SliderEditor(Option<Number> option, int min, int max) {
            slider = new Slider(min, max, option.valueProperty().getValue().doubleValue());
            slider.setSnapToTicks(true);
            slider.setMajorTickUnit(1);
            slider.setMinorTickCount(0);
            valueProperty().bindBidirectional(option.valueProperty());
        }

        @Override
        public Node getEditor() {
            return slider;
        }

        @Override
        public Number getValue() {
            return slider.getValue();
        }

        @Override
        public void setValue(Number value) {
            slider.setValue(value.doubleValue());
        }

        @Override
        public final Property<Number> valueProperty() {
            return (Property<Number>) slider.valueProperty();
        }
    }
}
Note that you can easily customize the slider appearance.
Now we have to create a SliderOption class, as a subclass of OptionBase<Number>. By overriding the editorFactoryProperty() method, we’ll be able to inject the SliderEditor. Also we can set some custom parameters for the slider, like the min and max values.
public class SettingsPresenter {

    private class SliderOption extends OptionBase<Number> {

        private final int min;
        private final int max;

        public SliderOption(Node graphic, String caption, String description, String category, IntegerProperty value,
                boolean isEditable, int min, int max) {
            super(graphic, caption, description, category, (Property<Number>) value, isEditable);
            this.min = min;
            this.max = max;
        }

        @Override
        public Property<Number> valueProperty() {
            return value;
        }

        @Override
        public Optional<Function<Option<Number>, OptionEditor<Number>>> editorFactoryProperty() {
            return Optional.of(option -> new SliderEditor(option, min, max));
        }
    }
}
With this custom option, we can finally replace the default one:
public class SettingsPresenter {

    public void initialize() {
        ...
        final Option<Number> fontOption = new SliderOption(MaterialDesignIcon.NETWORK_CELL.graphic(),
                "Size of Text", "Set the text size", null, config.fontSizeProperty(), true, 8, 12);

        settingsPane.getOptions().addAll(dateOption, sortOption, ascendingOption, fontOption);
    }
}
And we’ll have the slider editor ready:
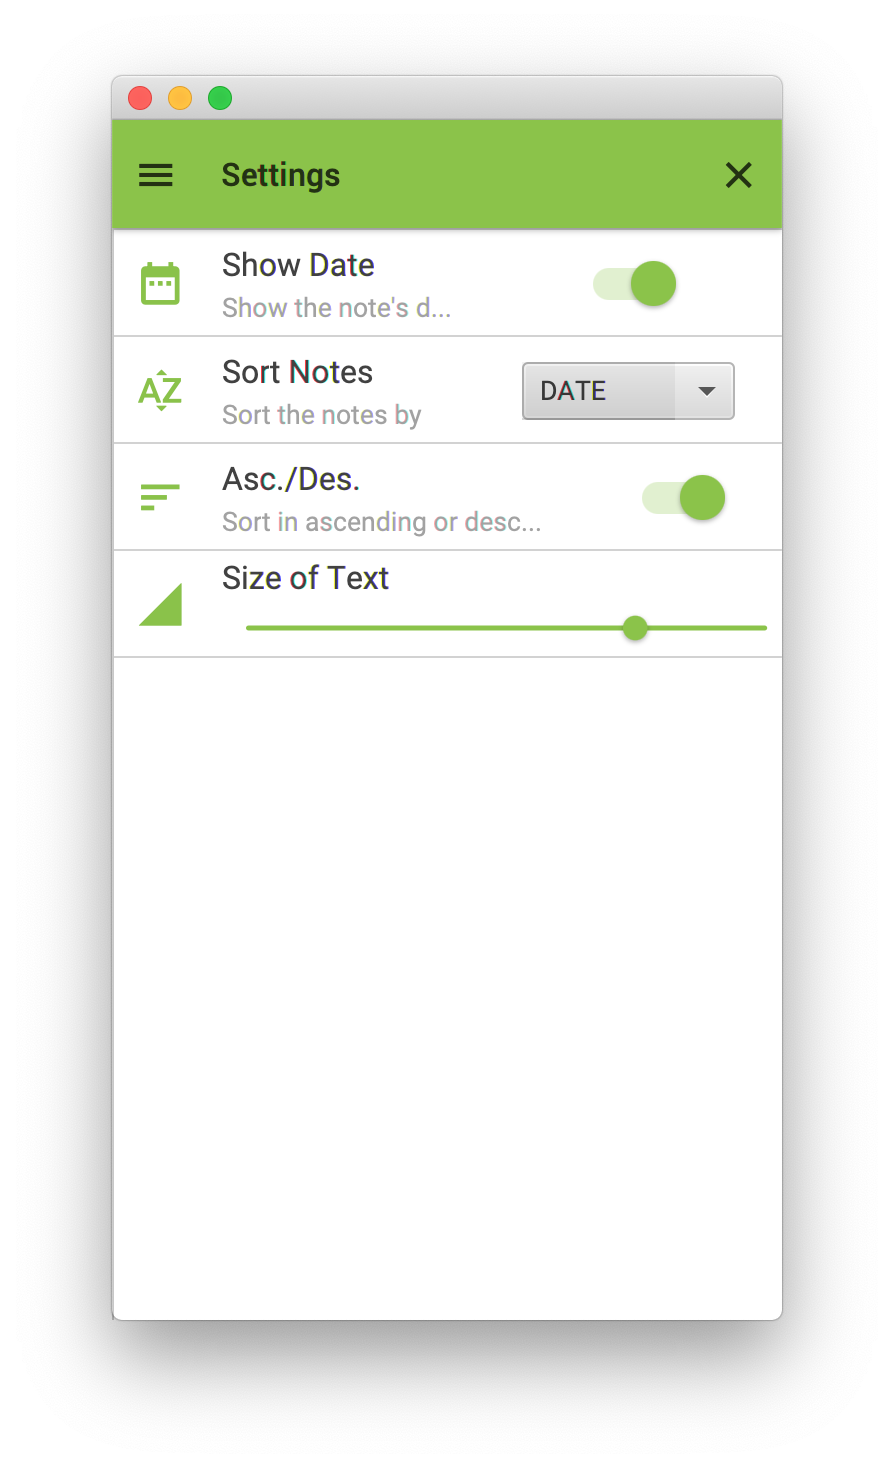
Note that the settings pane already changes the layout of this editor, providing more horizontal space for the slider.
As a result of the changes, the notes view is updated:

Persisting the Settings
Given that we already persist the notes using the Data Storage service of Gluon CloudLInk, we could persist the user
settings as well. Since this is done in the Service class, we won’t inject Settings anymore: we’ll retrieve them
from the injected Service instead.
Let’s create a settings property, based on an initial instance of Settings, and retrieve the stored settings, if any.
In a similar way as we did for the GluonObservableList, based on the DataClient instance, we can retrieve a
GluonObservableObject, using the method DataClient.createObjectDataReader(). And for writing the settings object to
the local storage, we’ll use DataClient.createObjectDataWriter().
public class Service {
    ...
    private static final String NOTES_SETTINGS = "notes-settings";

    private final ObjectProperty<Settings> settings = new SimpleObjectProperty<>(new Settings());

    public void retrieveNotes() {
        ...
        gluonNotes.stateProperty().addListener((obs, ov, nv) -> {
            if (ConnectState.SUCCEEDED.equals(nv)) {
                notes.set(gluonNotes);
                retrieveSettings();
            }
        });
    }

    private void retrieveSettings() {
        GluonObservableObject<Settings> gluonSettings = DataProvider.retrieveObject(
                dataClient.createObjectDataReader(NOTES_SETTINGS, Settings.class));
        gluonSettings.stateProperty().addListener((obs, ov, nv) -> {
            if (ConnectState.SUCCEEDED.equals(nv) && gluonSettings.get() != null) {
                settings.set(gluonSettings.get());
            }
        });
    }

    public void storeSettings() {
        DataProvider.storeObject(settings.get(),
                dataClient.createObjectDataWriter(NOTES_SETTINGS, Settings.class));
    }

    public ObjectProperty<Settings> settingsProperty() {
        return settings;
    }
}
Let’s update NoteCell and NotesPresenter:
public class NoteCell extends CharmListCell<Note> {
    ...
    private Settings settings;

    public NoteCell(Service service, Consumer<Note> edit, Consumer<Note> remove) {
        ...
        service.settingsProperty().addListener((obs, ov, nv) -> {
            settings = nv;
            update();
        });
        settings = service.settingsProperty().get();
        update();
    }
    ...
}public class NotesPresenter {
...
public void initialize() {
...
lstNotes.setCellFactory(p -> new NoteCell(service, this::edit, this::remove));
...
service.settingsProperty().addListener((obs, ov, nv) -> updateSettings());
updateSettings();
}
private void updateSettings() {
Settings settings = service.settingsProperty().get();
...
}
}Finally, we can update the SettingsPresenter. Whenever a change is done in any of the editors, it will create a new Settings instance. This will be passed to the Service, so it can be persisted, and it will trigger all the listeners, in order to update the Notes view.
public class SettingsPresenter {

    @Inject private Service service;
    private Settings config;

    public void initialize() {
        ...
        config = new Settings();
        updateSettings(service.settingsProperty().get());
        service.settingsProperty().addListener((obs, ov, nv) -> updateSettings(nv));

        config.showDateProperty().addListener((obs, ov, nv) -> updateService());
        config.sortingProperty().addListener((obs, ov, nv) -> updateService());
        config.ascendingProperty().addListener((obs, ov, nv) -> updateService());
        config.fontSizeProperty().addListener((obs, ov, nv) -> updateService());

        ...
    }

    private void updateSettings(Settings settings) {
        this.config.setShowDate(settings.isShowDate());
        this.config.setSorting(settings.getSorting());
        this.config.setAscending(settings.isAscending());
        this.config.setFontSize(settings.getFontSize());
    }

    private void updateService() {
        Settings newConfig = new Settings();
        newConfig.setShowDate(this.config.isShowDate());
        newConfig.setFontSize(this.config.getFontSize());
        newConfig.setSorting(this.config.getSorting());
        newConfig.setAscending(this.config.isAscending());

        service.settingsProperty().set(newConfig);
        service.storeSettings();
    }
}
At this point, try again running the application on HotSpot and building the native image to verify that everything is in place.
Filtering the notes
Finally, let’s add a filter to search for notes. We’ll create a popup to allow showing a TextField, with a pair of buttons to
search and close the popup.
First, let’s give a name to the layer:
public class Notes extends Application {
public static final String POPUP_FILTER_NOTES = "Filter Notes";
...
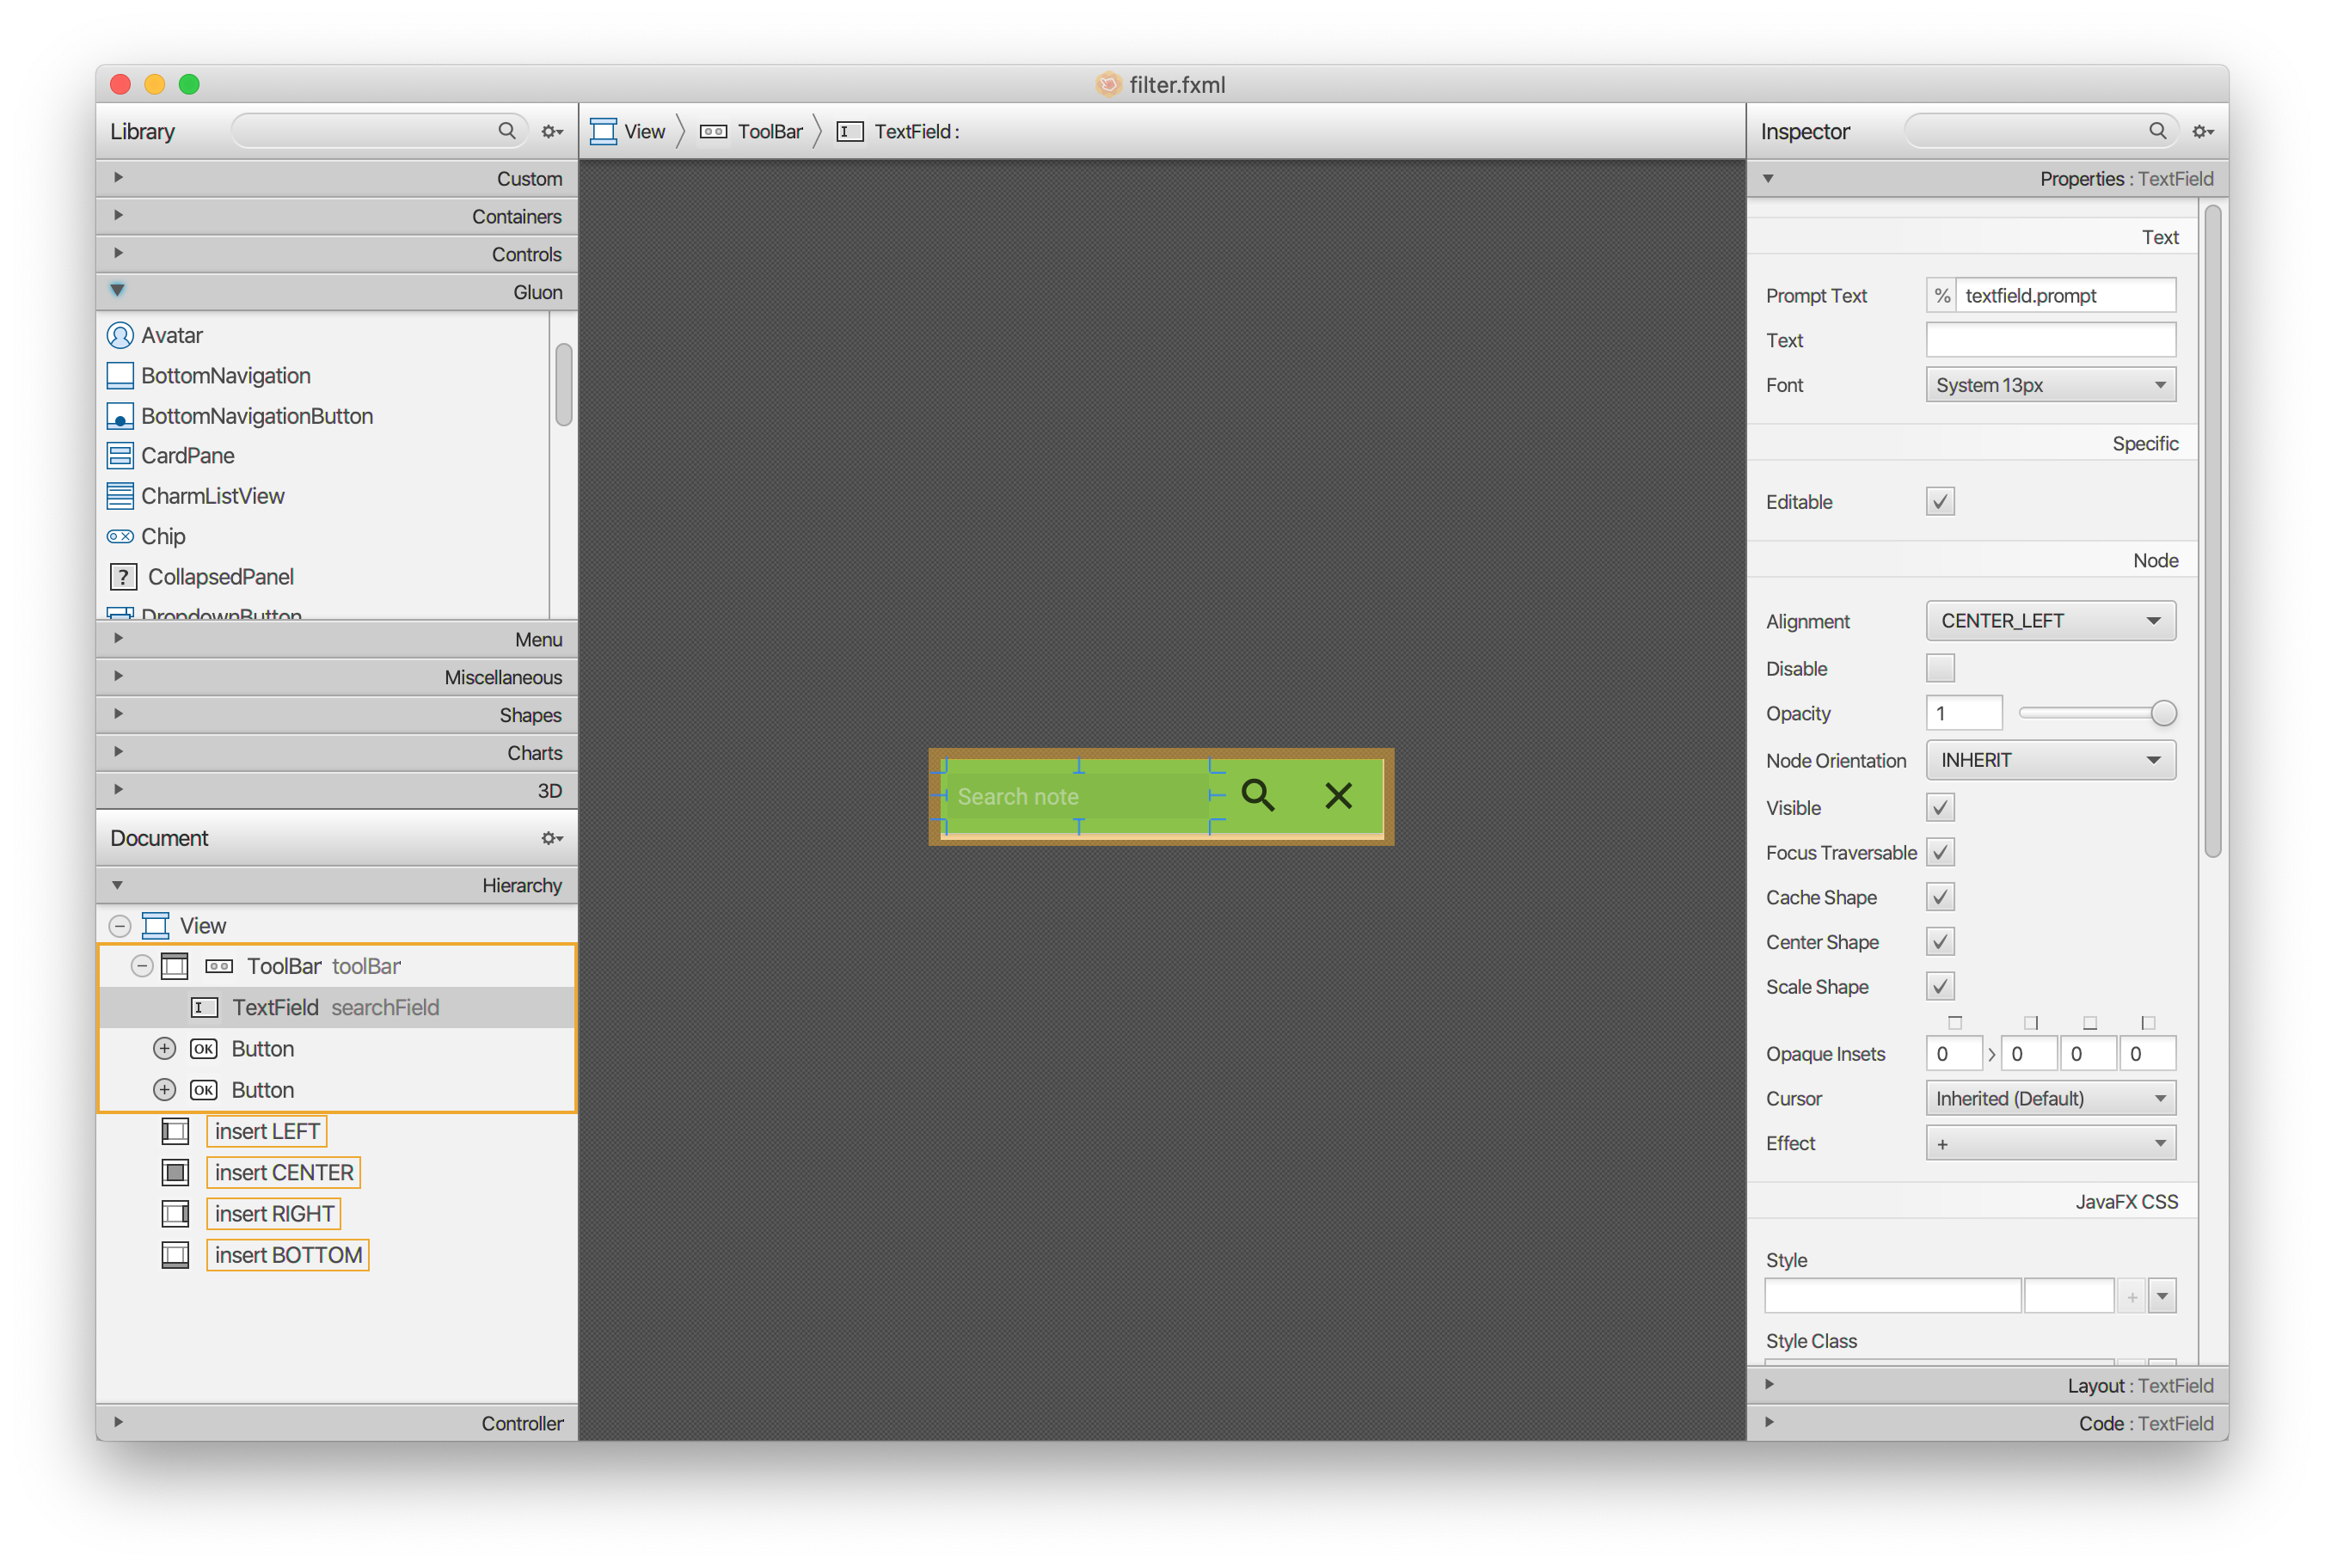
}Now, using fxml, let’s add the filter.fxml, filter.css and filter.properties files, and the FilterPresenter class.
.text-field {
    -fx-prompt-text-fill: #ffffff80;
}
FilterPresenter will return a Predicate based on the text in the TextField.
public class FilterPresenter {

    @FXML private TextField searchField;

    public void initialize() {
        HBox.setHgrow(searchField, Priority.ALWAYS);
    }

    @FXML
    private void search() {
        AppManager.getInstance().hideLayer(Notes.POPUP_FILTER_NOTES);
    }

    @FXML
    private void close() {
        searchField.clear();
        AppManager.getInstance().hideLayer(Notes.POPUP_FILTER_NOTES);
    }

    public Predicate<? super Note> getPredicate() {
        return n -> n.getTitle().contains(searchField.getText()) ||
                    n.getText().contains(searchField.getText());
    }

}- Include the class in the reflection list and the resource bundle in the bundles list
<bundlesList>
    ...
    <list>com.gluonhq.samples.notes.views.filter</list>
</bundlesList>
<reflectionList>
    ...
    <list>com.gluonhq.samples.notes.views.FilterPresenter</list>
</reflectionList>
On the notes view, we need to wrap our observable list of notes with a FilteredList<Note>, so we can later set the predicate based on the filter.
Also, in order to show the popup, we have to add the layer to the layers factory, and we’ll add a button to the AppBar’s action items to show it.
public class NotesPresenter {

    private FilteredList<Note> filteredList;

    public void initialize() {
        notes.showingProperty().addListener((obs, oldValue, newValue) -> {
            if (newValue) {
                ...
                appBar.getActionItems().add(MaterialDesignIcon.FILTER_LIST.button(e -> {
                    AppManager.getInstance().showLayer(Notes.POPUP_FILTER_NOTES);
                }));
            }
        });
        ...
        service.notesProperty().addListener((ListChangeListener.Change<? extends Note> c) -> {
            ...
            filteredList = new FilteredList<>(notes);
            lstNotes.setItems(filteredList);
            lstNotes.setComparator((n1, n2) -> n1.getCreationDate().compareTo(n2.getCreationDate()));
        });
        ...
        AppManager.getInstance().addLayerFactory(Notes.POPUP_FILTER_NOTES, () -> {
            GluonView filterView = new GluonView(FilterPresenter.class);
            FilterPresenter filterPresenter = (FilterPresenter) filterView.getPresenter();

            SidePopupView sidePopupView = new SidePopupView(filterView.getView(), Side.TOP, true);
            sidePopupView.showingProperty().addListener((obs, ov, nv) -> {
                if (ov && !nv) {
                    filteredList.setPredicate(filterPresenter.getPredicate());
                }
            });
            return sidePopupView;
        });
    }

}
The filter layer is shown on top:
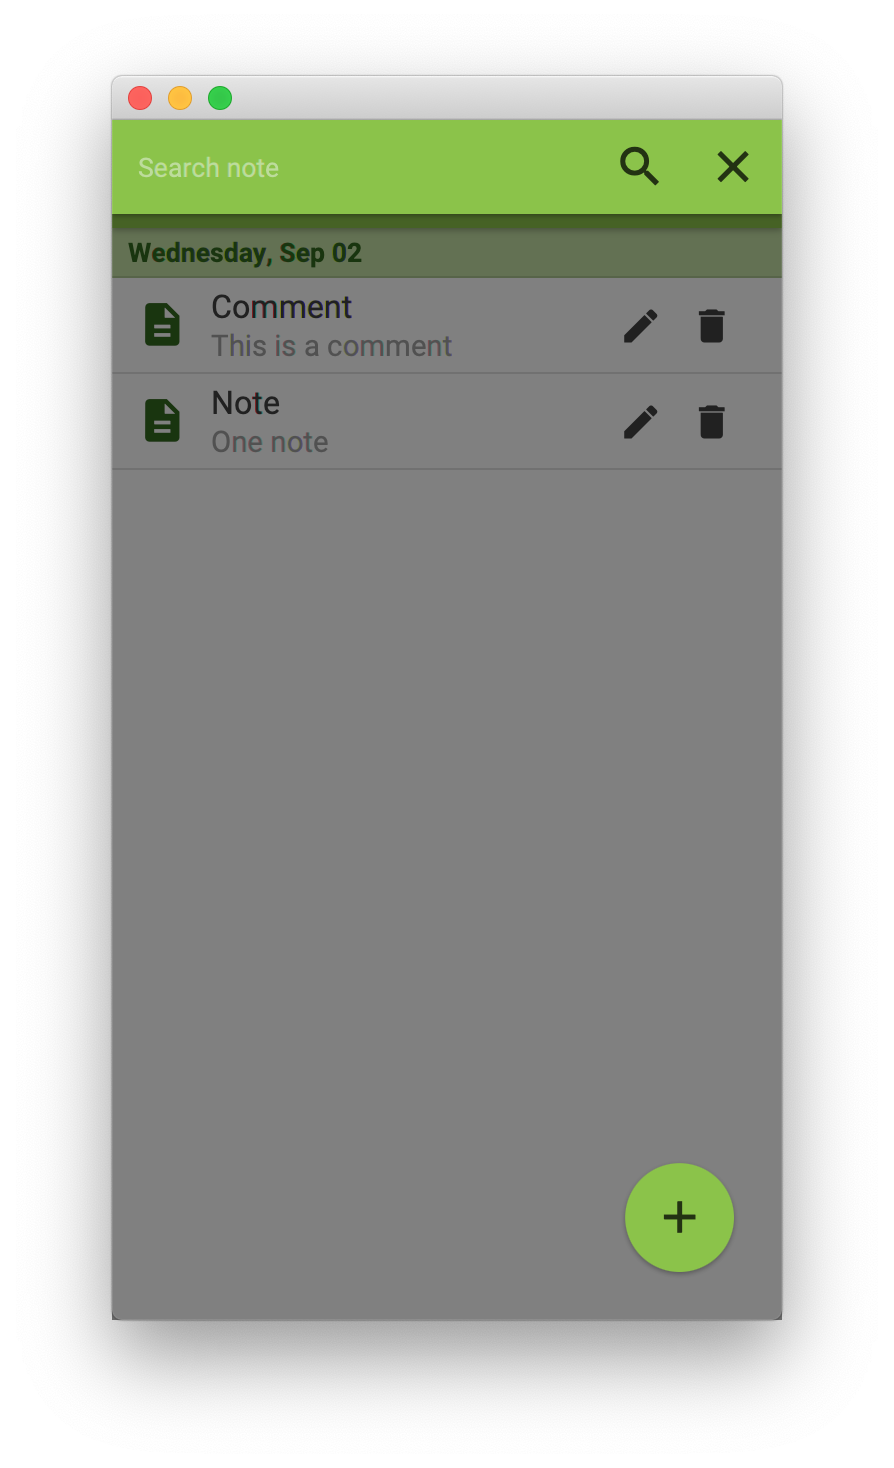
When entering some text and clicking the search icon, the layer closes and the filter is applied to the notes that have the searched text in the title or in the text.
When clicking again on the filter icon, the filter can be cleared clicking the close button.
Conclusion
During this tutorial we have accomplished several tasks with a Glisten-Afterburner project:
-
Starting from the default project created by the Gluon plugin, we have modified it to use a
CharmListViewcontrol with customNoteCellandHeaderCellcells to render the created notes. -
We have added local persistence with
DataClientandGluonObservableList. -
We have seen how to use
View, transitions, update theAppBar, use theNavigationDrawer, among other features. -
We have added a
SettingsPanecontrol in a third view, that allows customizing the application settings. It also included a custom editor for the font size property. -
We stored the settings in the local persistence with
DataClientas aGluonObservableObject. -
We have added a filter to allow searching within the list of notes
-
We have also tested the application on desktop and mobile devices, by building a native image of the app.
If you have made it this far, congratulations, we hope this sample and the documentation was helpful to you! In case you have any questions, your first stop should be the Gluon support page, where you can access the latest documentation. Gluon also recommends the community to support each other over at the Gluon StackOverflow page. Finally, Gluon offers commercial support as well, to kick start your projects.