1. Gluon CloudLink Documentation
2. Gluon CloudLink Overview
Gluon CloudLink enables enterprise and mobile developers to easily connect their disparate services and applications together, enabling bi-directional communications between mobile apps, enterprise infrastructure, and cloud systems.
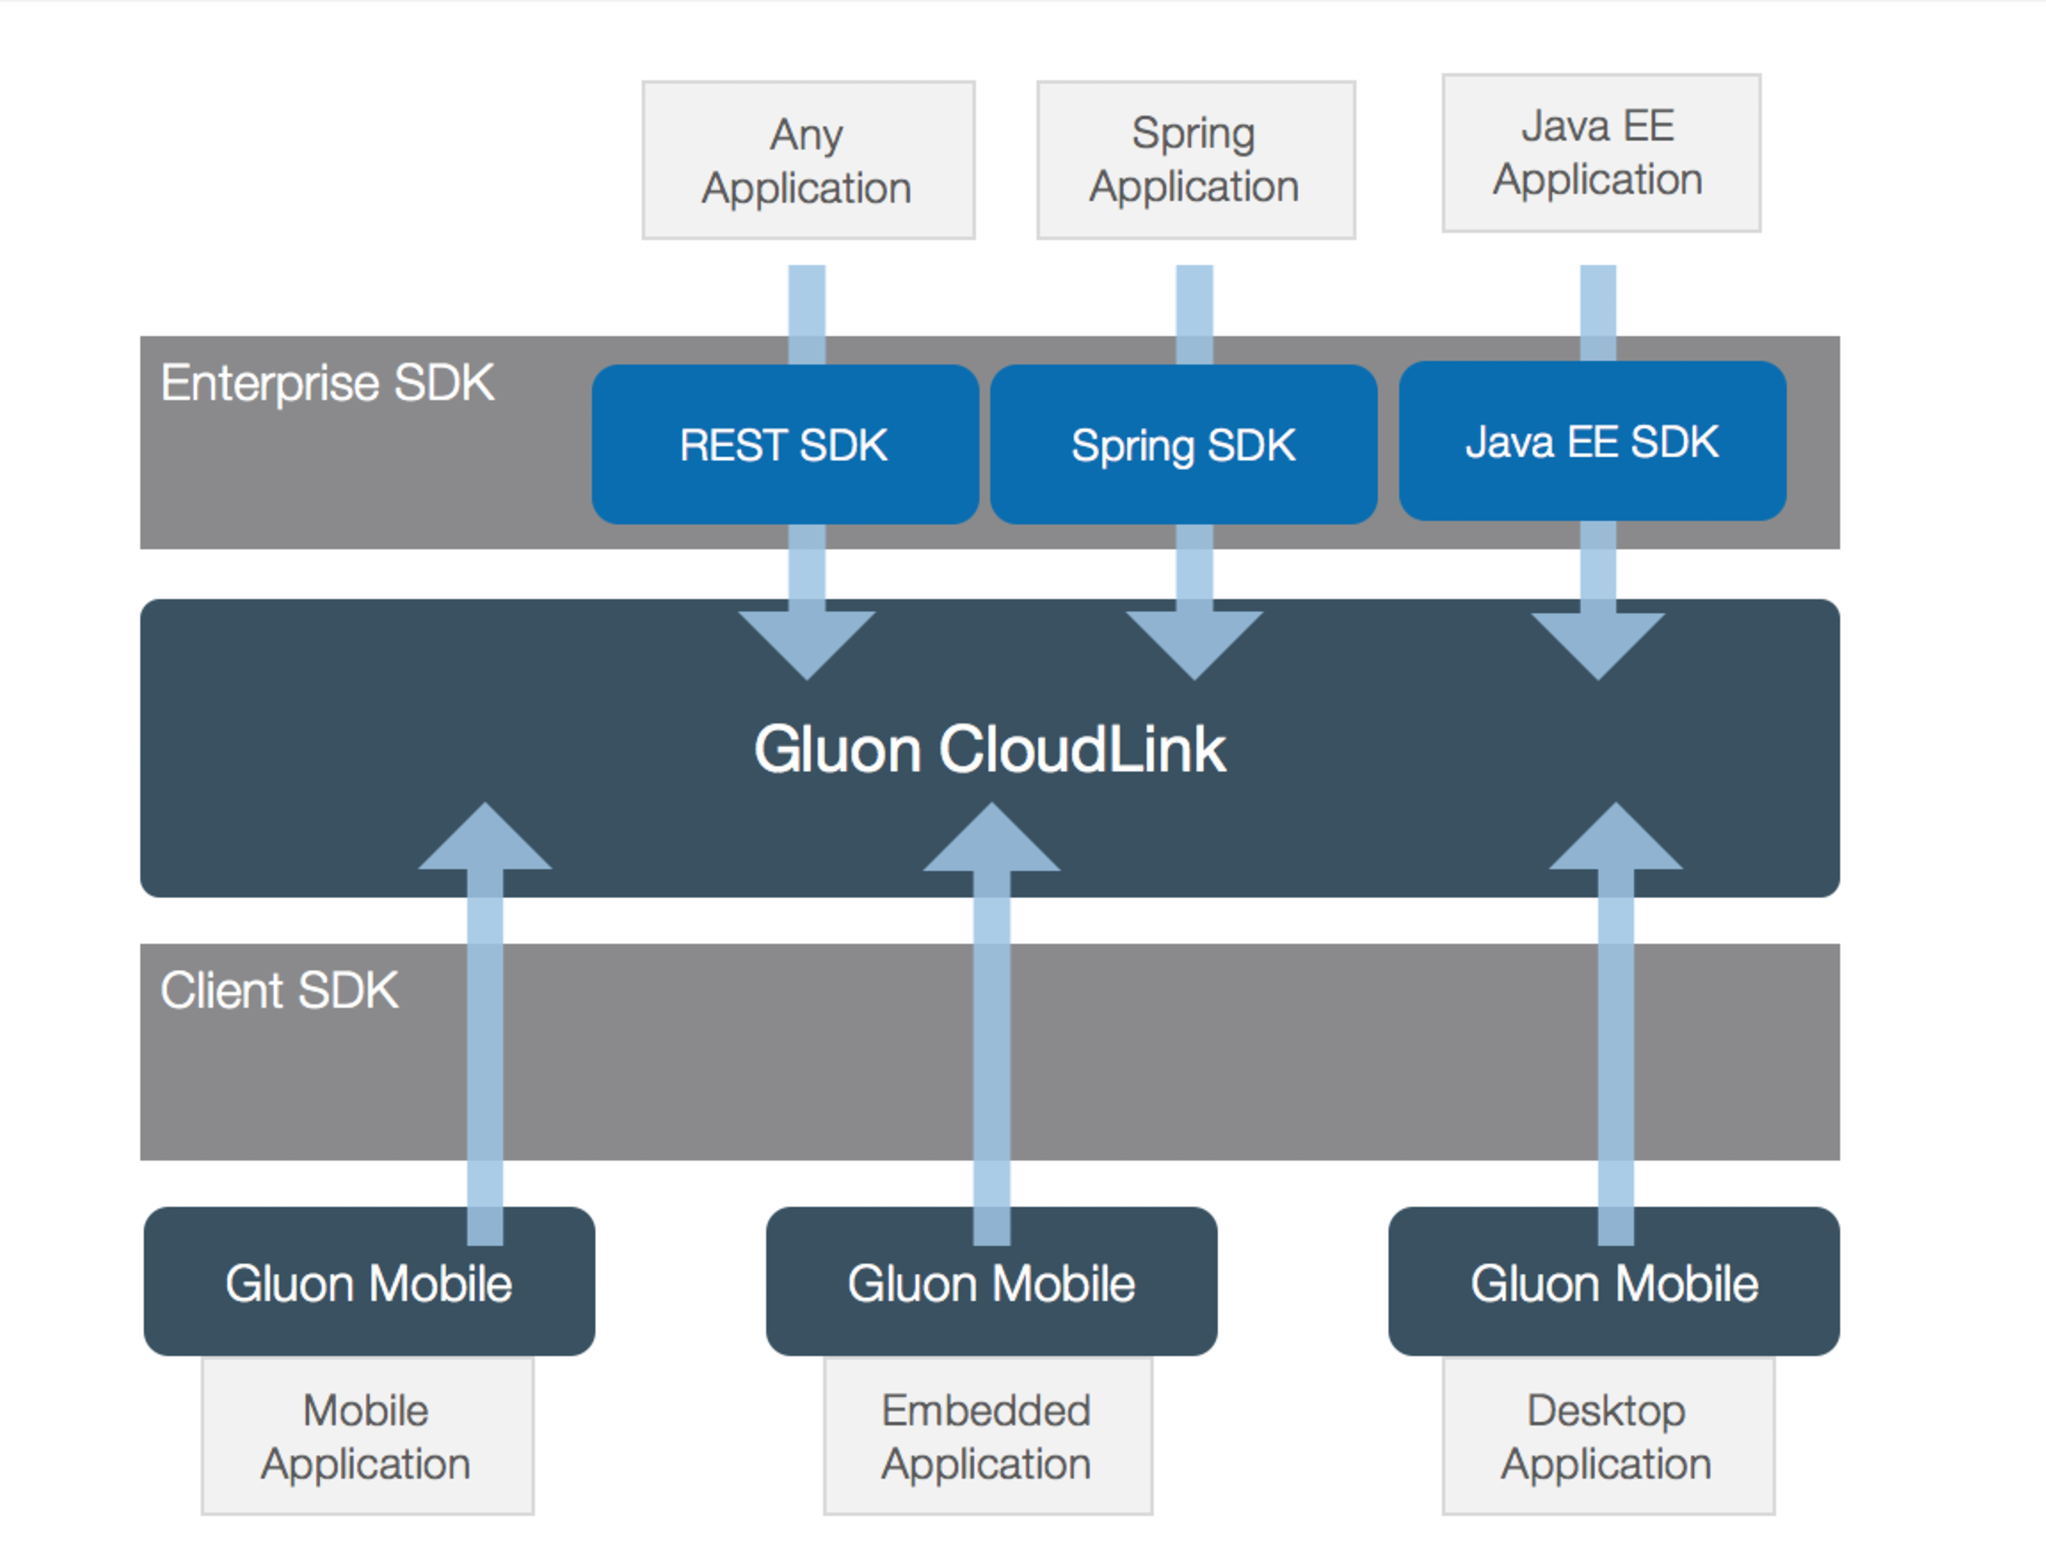
Gluon CloudLink is a Mobile Back-end as a Service (MBaaS) providing:
-
Data storage, synchronization (to the back-end or across devices) and connectors to other back-ends.
-
User management, including login methods for popular identity providers.
-
Usage analytics
-
Push notifications to Android and iOS devices.
3. Application Registration
The first step in enabling Gluon CloudLink in your application is to sign up for a Gluon CloudLink account. If you already have a Gluon CloudLink subscription you can safely skip this part. If not, go to the Gluon CloudLink Product page and choose a subscription that matches your needs. There is also an option to sign up for a 30-day trial account. Enter your billing information or login with your existing account when you have signed up for one of our other products before.
Once you are successfully signed up, a Gluon CloudLink application will be created for you automatically. You will also receive an email that contains a link to access the Gluon Dashboard.
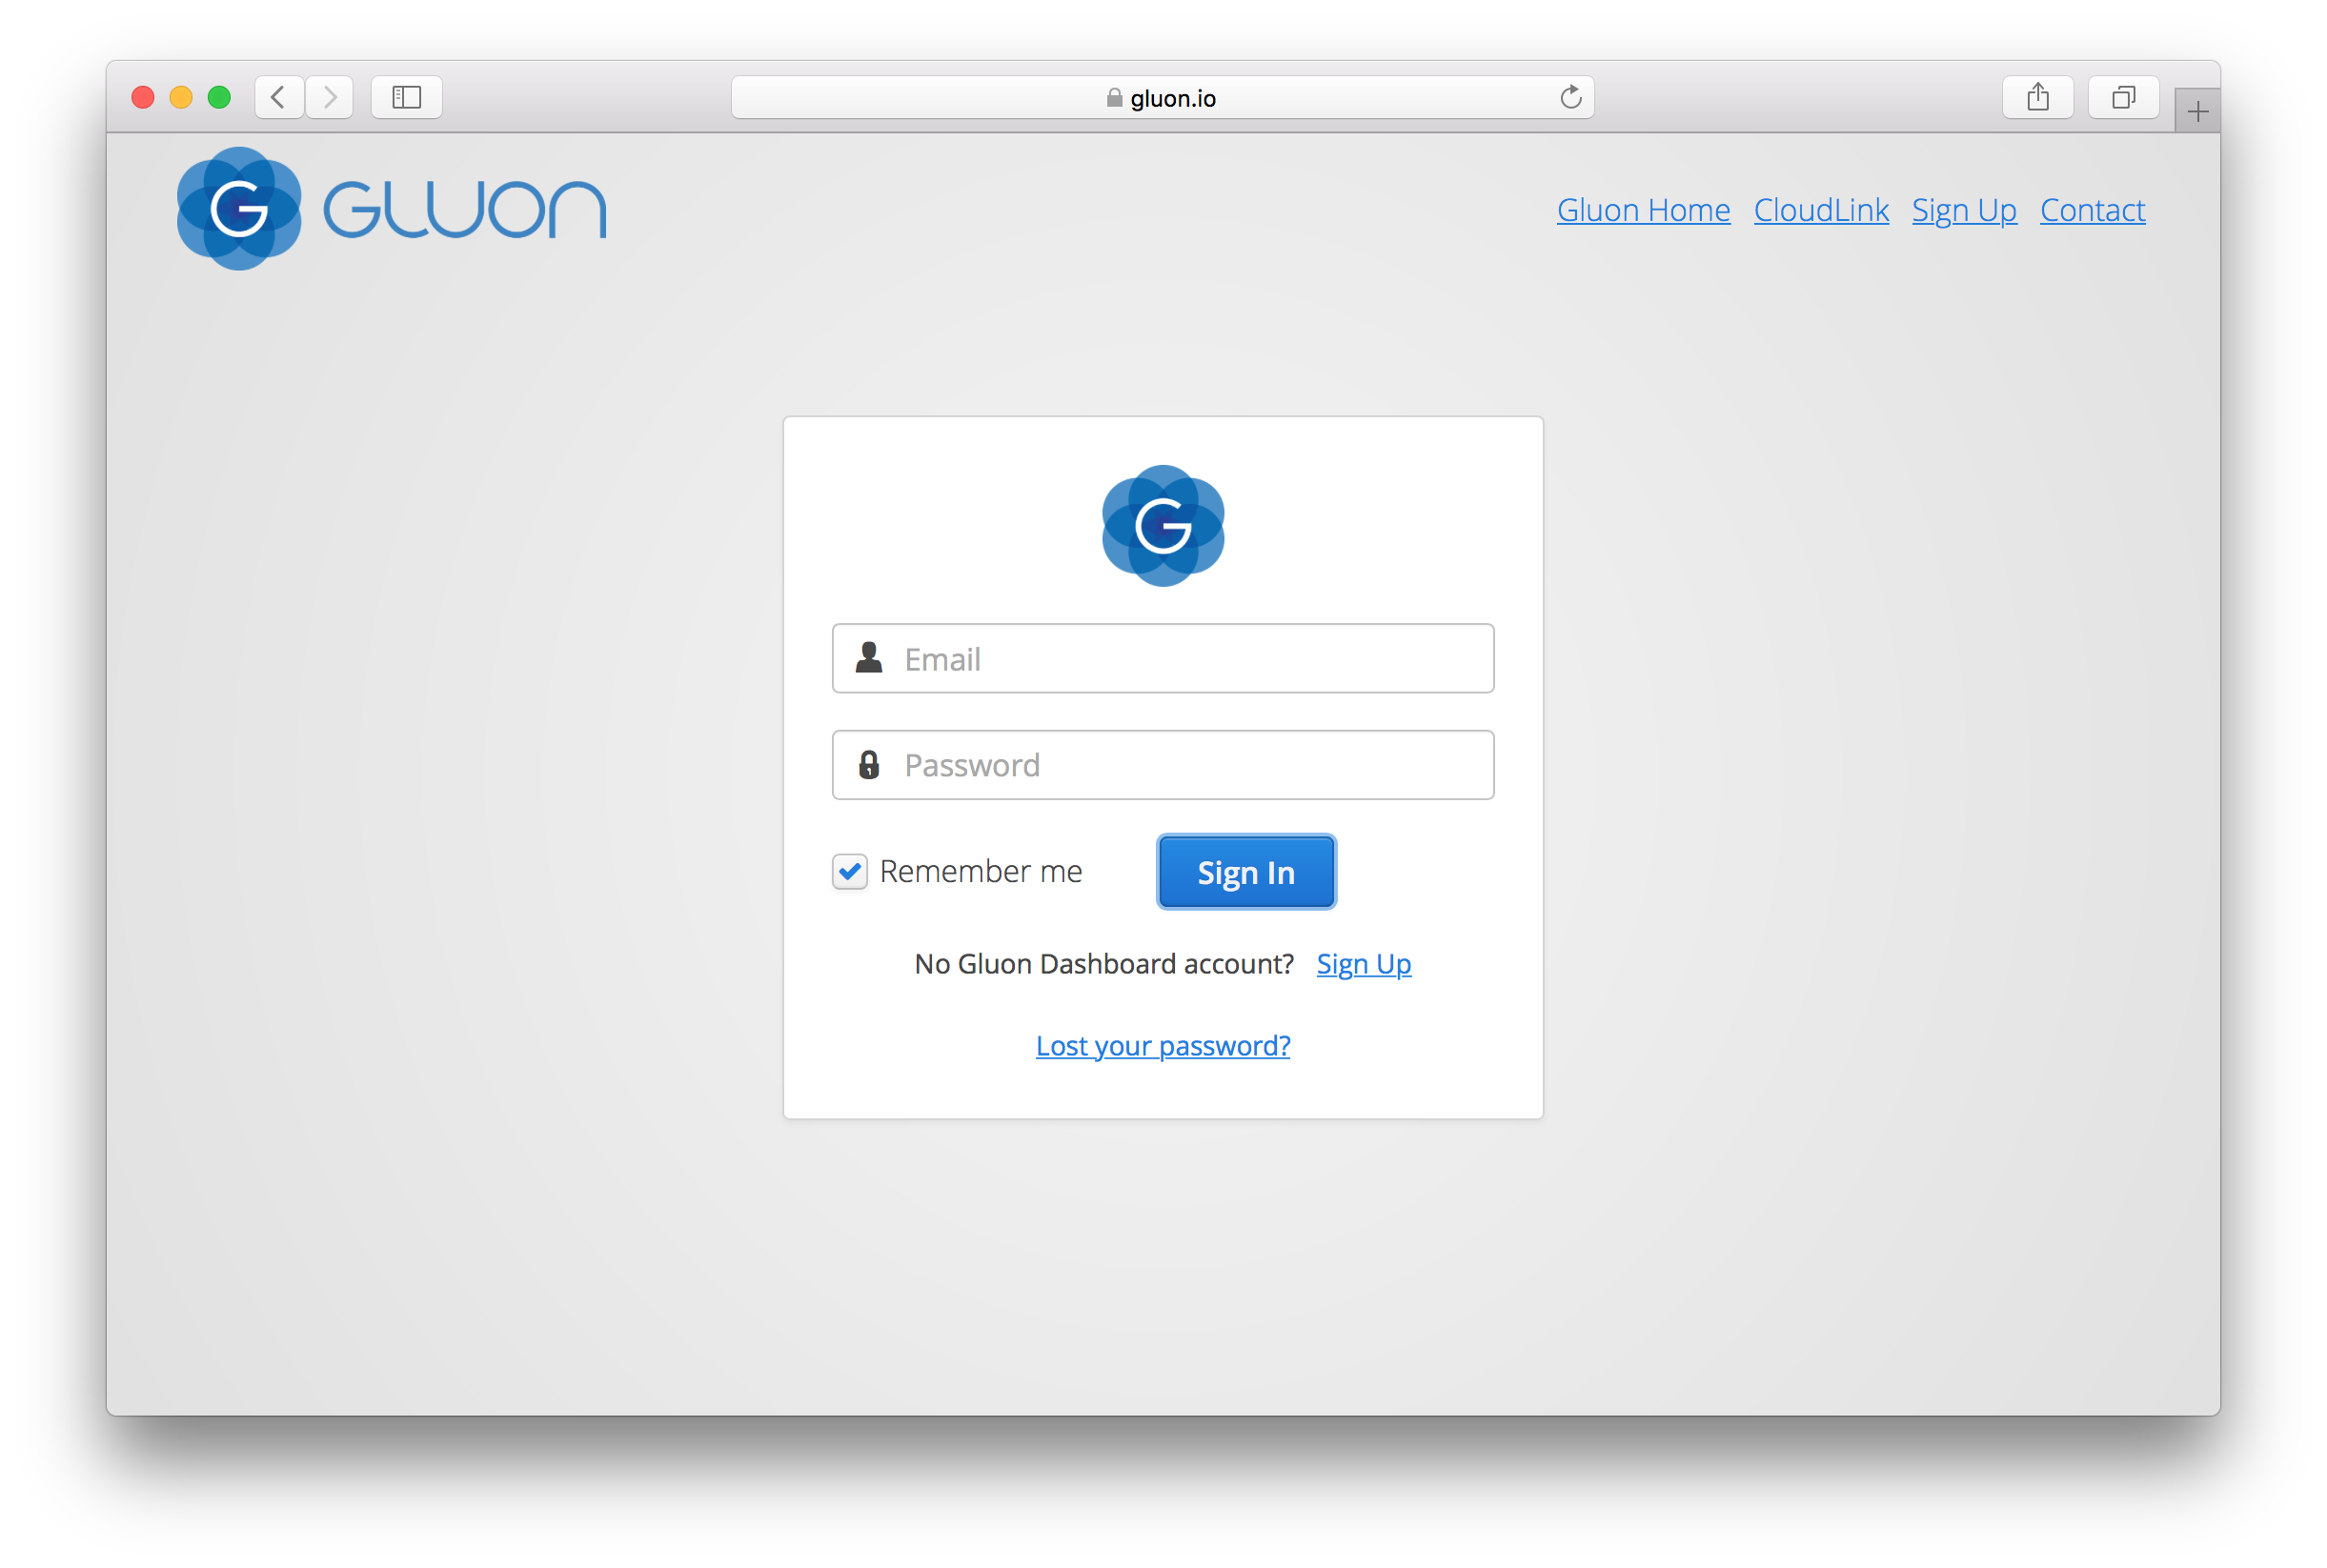
3.1. Gluon Dashboard
The Gluon Dashboard is a web application from which you can configure and monitor your Gluon CloudLink application. Point your browser to https://gluon.io and sign in with the same account credentials that you used when subscribing for Gluon CloudLink at gluonhq.com.
Select any of the items from the menu on the left to begin configuring your Gluon Application.
3.2. Before you begin
The chapters that follow below will describe all the functional components that are provided by Gluon CloudLink. Each component talks about the required steps on how to set up, configure and use them from the perspective of your enterprise application as well as from the mobile client application. To be able to use Gluon CloudLink you will need to make sure everything is set up correctly.
3.2.1. Server Configuration
Communication between your enterprise application and Gluon CloudLink is done by using the designated Gluon CloudLink Enterprise REST endpoints. Each of these endpoints is described in the appropriate sections below. For your convenience, we also provide a Java Client that calls on these same endpoints. The Java Client currently has two implementations that you can choose from. The Java EE client is most suited when your enterprise application is running inside a Java EE application container. The Spring client is more suited for enterprise applications that are running inside the Spring framework.
JavaDocs for the Gluon CloudLink Enterprise SDK can be found at the following URL:
Content Encoding
All data that is written to Gluon CloudLink by using the enterprise REST endpoints, either
directly or by use of the Java Client must be encoded in UTF-8. This is the only encoding that
is supported by Gluon CloudLink. If your data you sent looks garbled, please verify that you
correctly applied UTF-8 encoding.
Dependencies
The following maven dependencies should be added to your enterprise project to make use of the Gluon CloudLink Enterprise SDK. Note that the Eclipse Yasson dependency is only required when you are running inside a Java EE 7 container. Java EE 8 containers should automatically ship with an implementation of the JSON-Binding API.
Java EE
<dependencies>
    <dependency>
        <groupId>com.gluonhq</groupId>
        <artifactId>cloudlink-enterprise-sdk-javaee</artifactId>
        <version>1.2.1</version>
    </dependency>
    <!-- only required when running inside a Java EE 7 container -->
    <dependency>
        <groupId>org.eclipse</groupId>
        <artifactId>yasson</artifactId>
        <version>1.0</version>
        <scope>runtime</scope>
    </dependency>
</dependencies>repositories {
mavenCentral()
}
dependencies {
compile 'com.gluonhq:cloudlink-enterprise-sdk-javaee:1.2.1'
// only required when running inside a Java EE 7 container
runtime 'org.eclipse:yasson:1.0'
}Spring
<dependencies>
    <dependency>
        <groupId>com.gluonhq</groupId>
        <artifactId>cloudlink-enterprise-sdk-spring</artifactId>
        <version>1.2.1</version>
    </dependency>
</dependencies>repositories {
mavenCentral()
}
dependencies {
compile 'com.gluonhq:cloudlink-enterprise-sdk-spring:1.2.1'
}Authentication
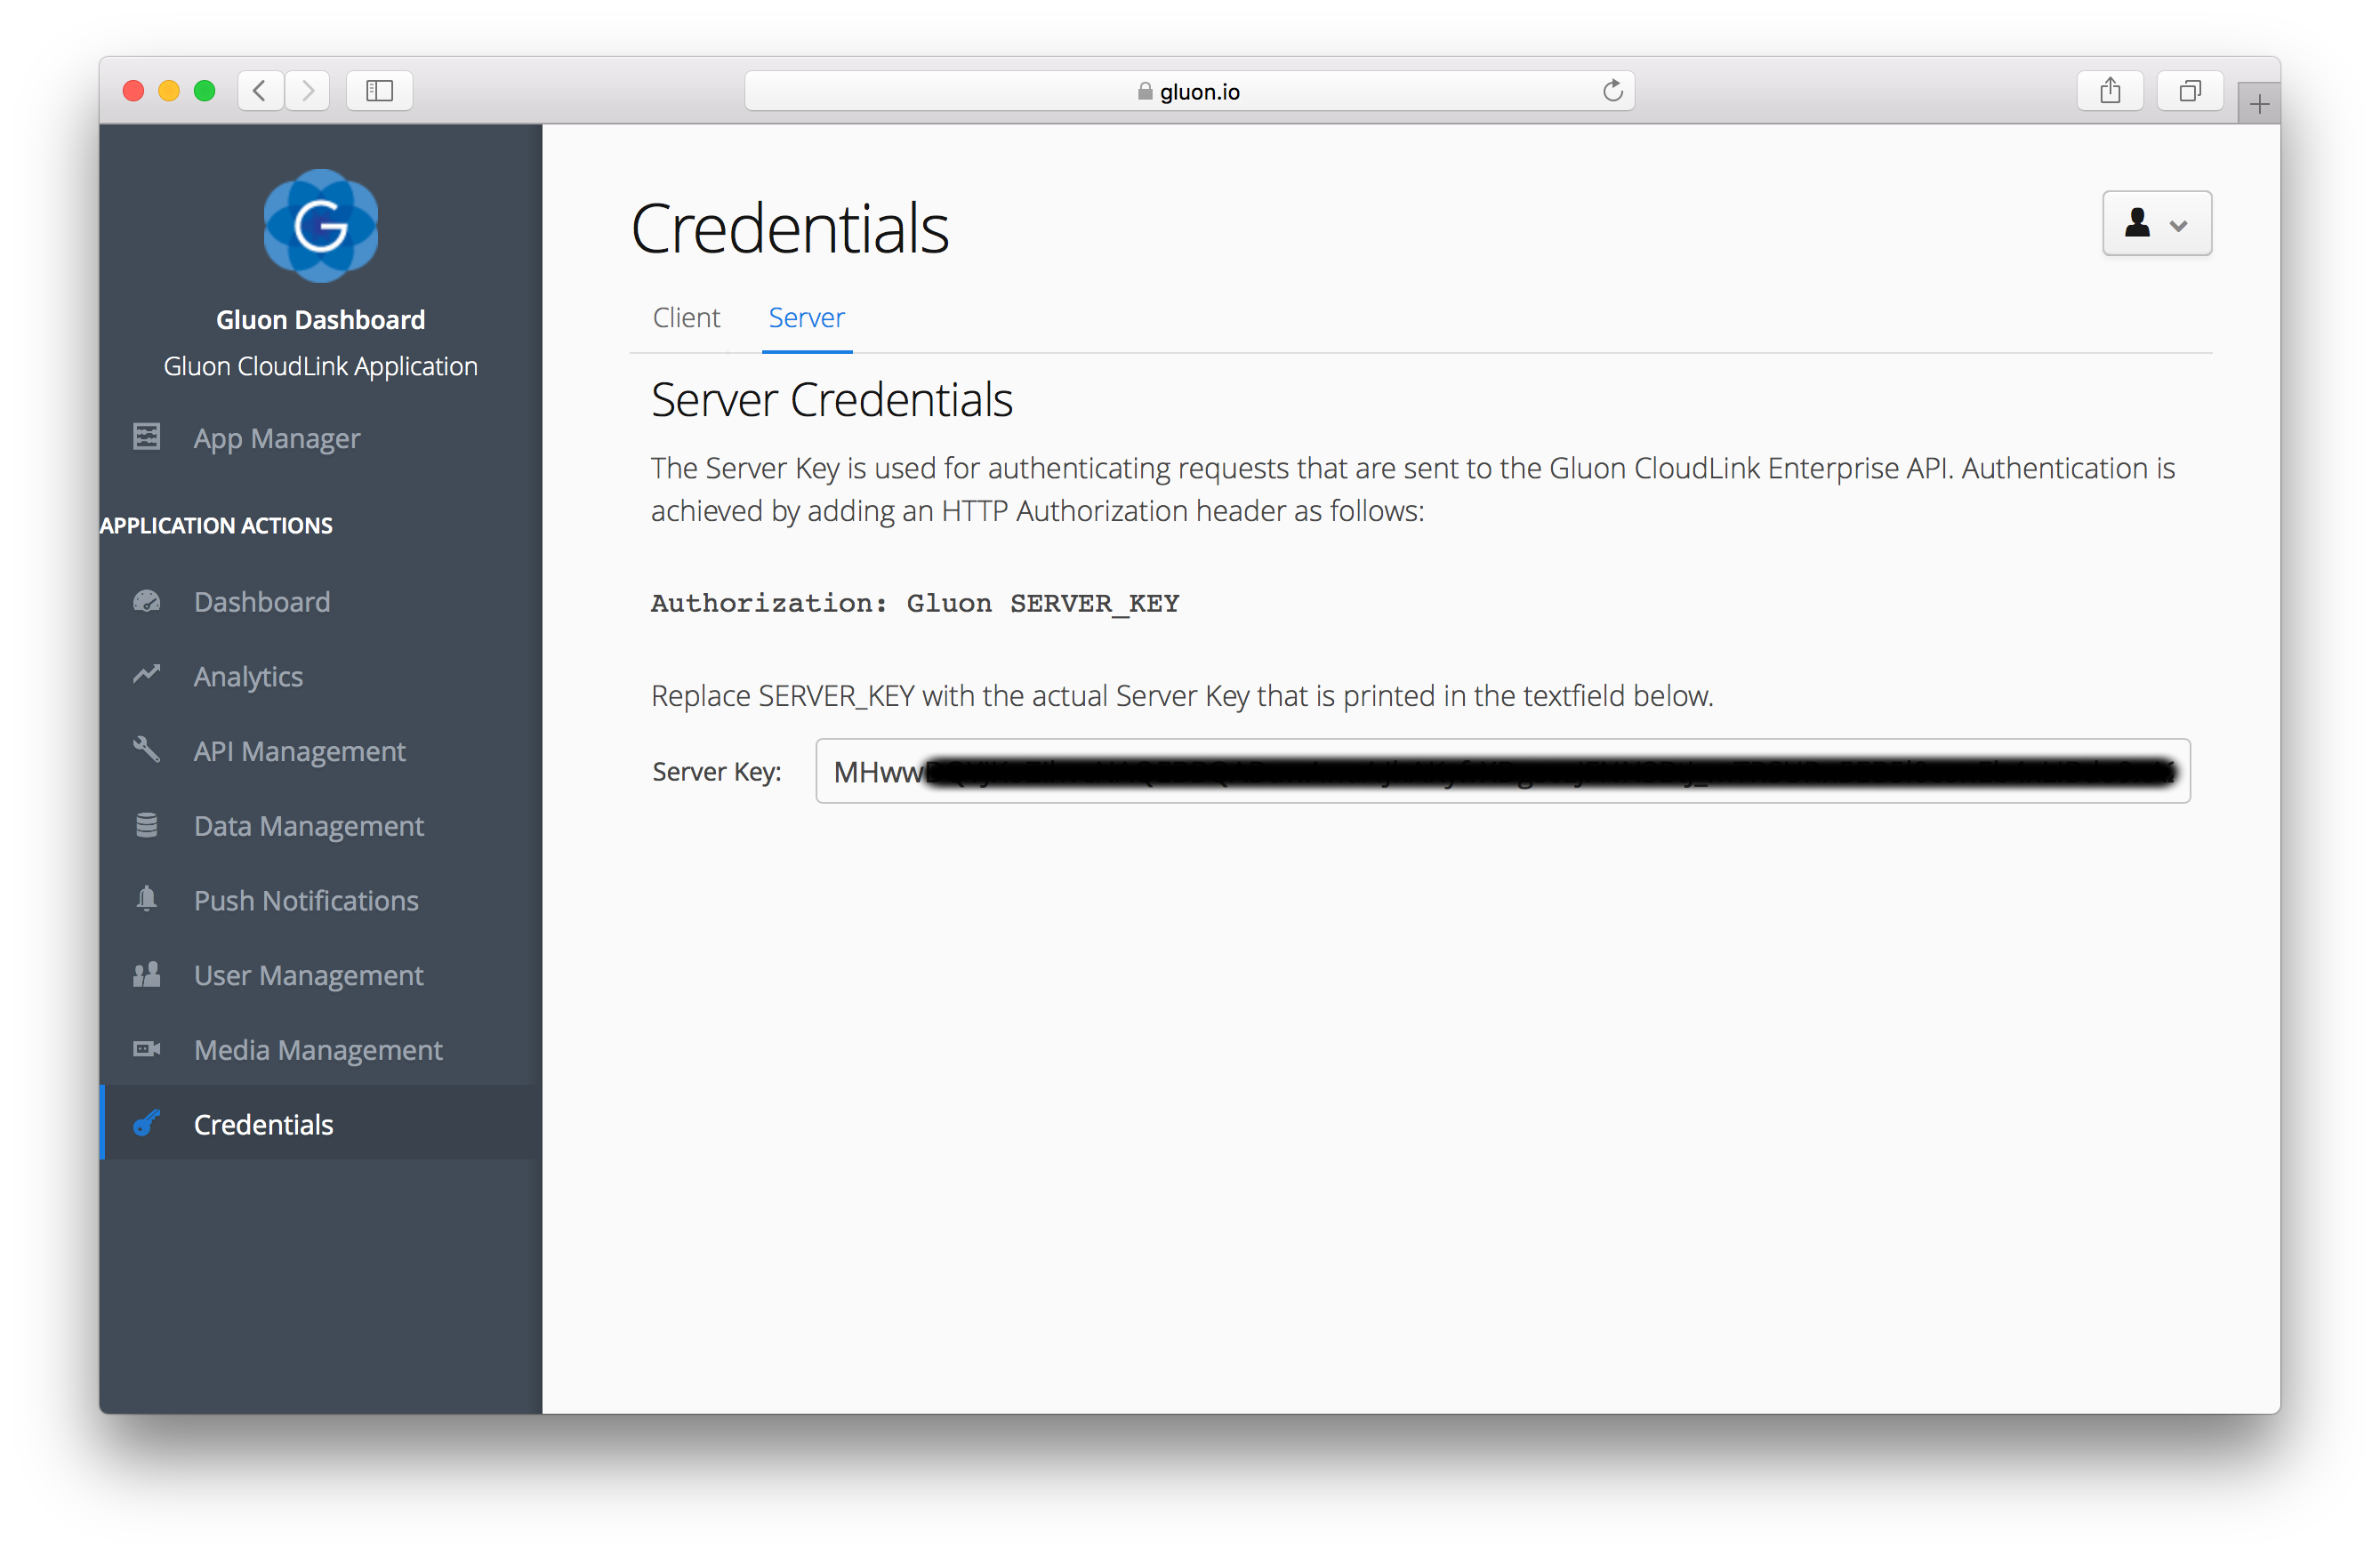
The REST endpoints themselves require an HTTP Authorization header that is used to authenticate the requests to Gluon CloudLink. The value of the Authorization header is as follows:
Authorization: Gluon MHwwXXXXXXXXXXXXXXXXXXXXXXXXXXXXXX
The SERVER_KEY needs to be replaced with the actual server key of your Gluon CloudLink
application and can be found in the Gluon Dashboard, in the Server tab of the Credentials
section.
JavaEE
When using the Java Client, authentication is done by providing the server key when you create an instance of the Java Client:
CloudLinkClientConfig config = new CloudLinkClientConig("MHwwXXXXXXXXXXXXXXXXXXXXXXXXXXXXXX");
CloudLinkClient client = new CloudLinkClient(config);
Alternatively, when running inside a CDI aware environment, you can inject an instance of the JavaEE client as follows:
@Inject
@CloudLinkConfig(serverKey = "MHwwXXXXXXXXXXXXXXXXXXXXXXXXXXXXXX")
private CloudLinkClient client;
Spring
Authentication with the Spring Client is done in the same way as the JavaEE Client:
CloudLinkClientConfig config = new CloudLinkClientConig("MHwwXXXXXXXXXXXXXXXXXXXXXXXXXXXXXX");
CloudLinkClient client = new CloudLinkClient(config);
When you are using Spring Boot, you can make use of autowiring to inject an instance of the Spring Client. An application property is then required that contains the server key of your Gluon CloudLink Application.
gluon.cloudlink.serverKey=MHwwXXXXXXXXXXXXXXXXXXXXXXXXXXXXXXprivate CloudLinkClient client;
@Autowired
public MyService(CloudLinkClient client) {
this.client = client;
}3.2.2. Client Configuration
The Gluon Mobile CloudLink Client is the component that is used for handling the communication between your Mobile Client application and Gluon CloudLink. It is automatically added as a dependency to the main Gluon Mobile artifact, but can also be added separately.
Gradle Configuration
Gluon Mobile projects use gradle as the build tool for building and provisioning a Gluon Mobile
application. The gradle project makes use of the JavaFX Mobile plugin
and the associated build.gradle file needs to be configured with the following dependencies
and Charm Down configuration.
repositories {
    maven {
        url 'https://nexus.gluonhq.com/nexus/content/repositories/releases/'
    }
}

dependencies {
    compile 'com.gluonhq:charm:4.3.7'
}

jfxmobile {
    downConfig {
        plugins 'device', 'push-notifications', 'storage'
    }
}
Authentication
Gluon Mobile uses the application specific credentials to sign all requests that are made to Gluon CloudLink. This allows Gluon CloudLink to know on behalf of which application the request is initiated.
To apply the client credentials to your Gluon Mobile project, create a JSON configuration file
called gluoncloudlink_config.json and save it under the directory src/main/resources. This
file will automatically be picked up by Gluon Mobile when needed. Insert the content below,
making sure that you replace the values for the applicationKey and applicationSecret with
the correct credentials for your application:
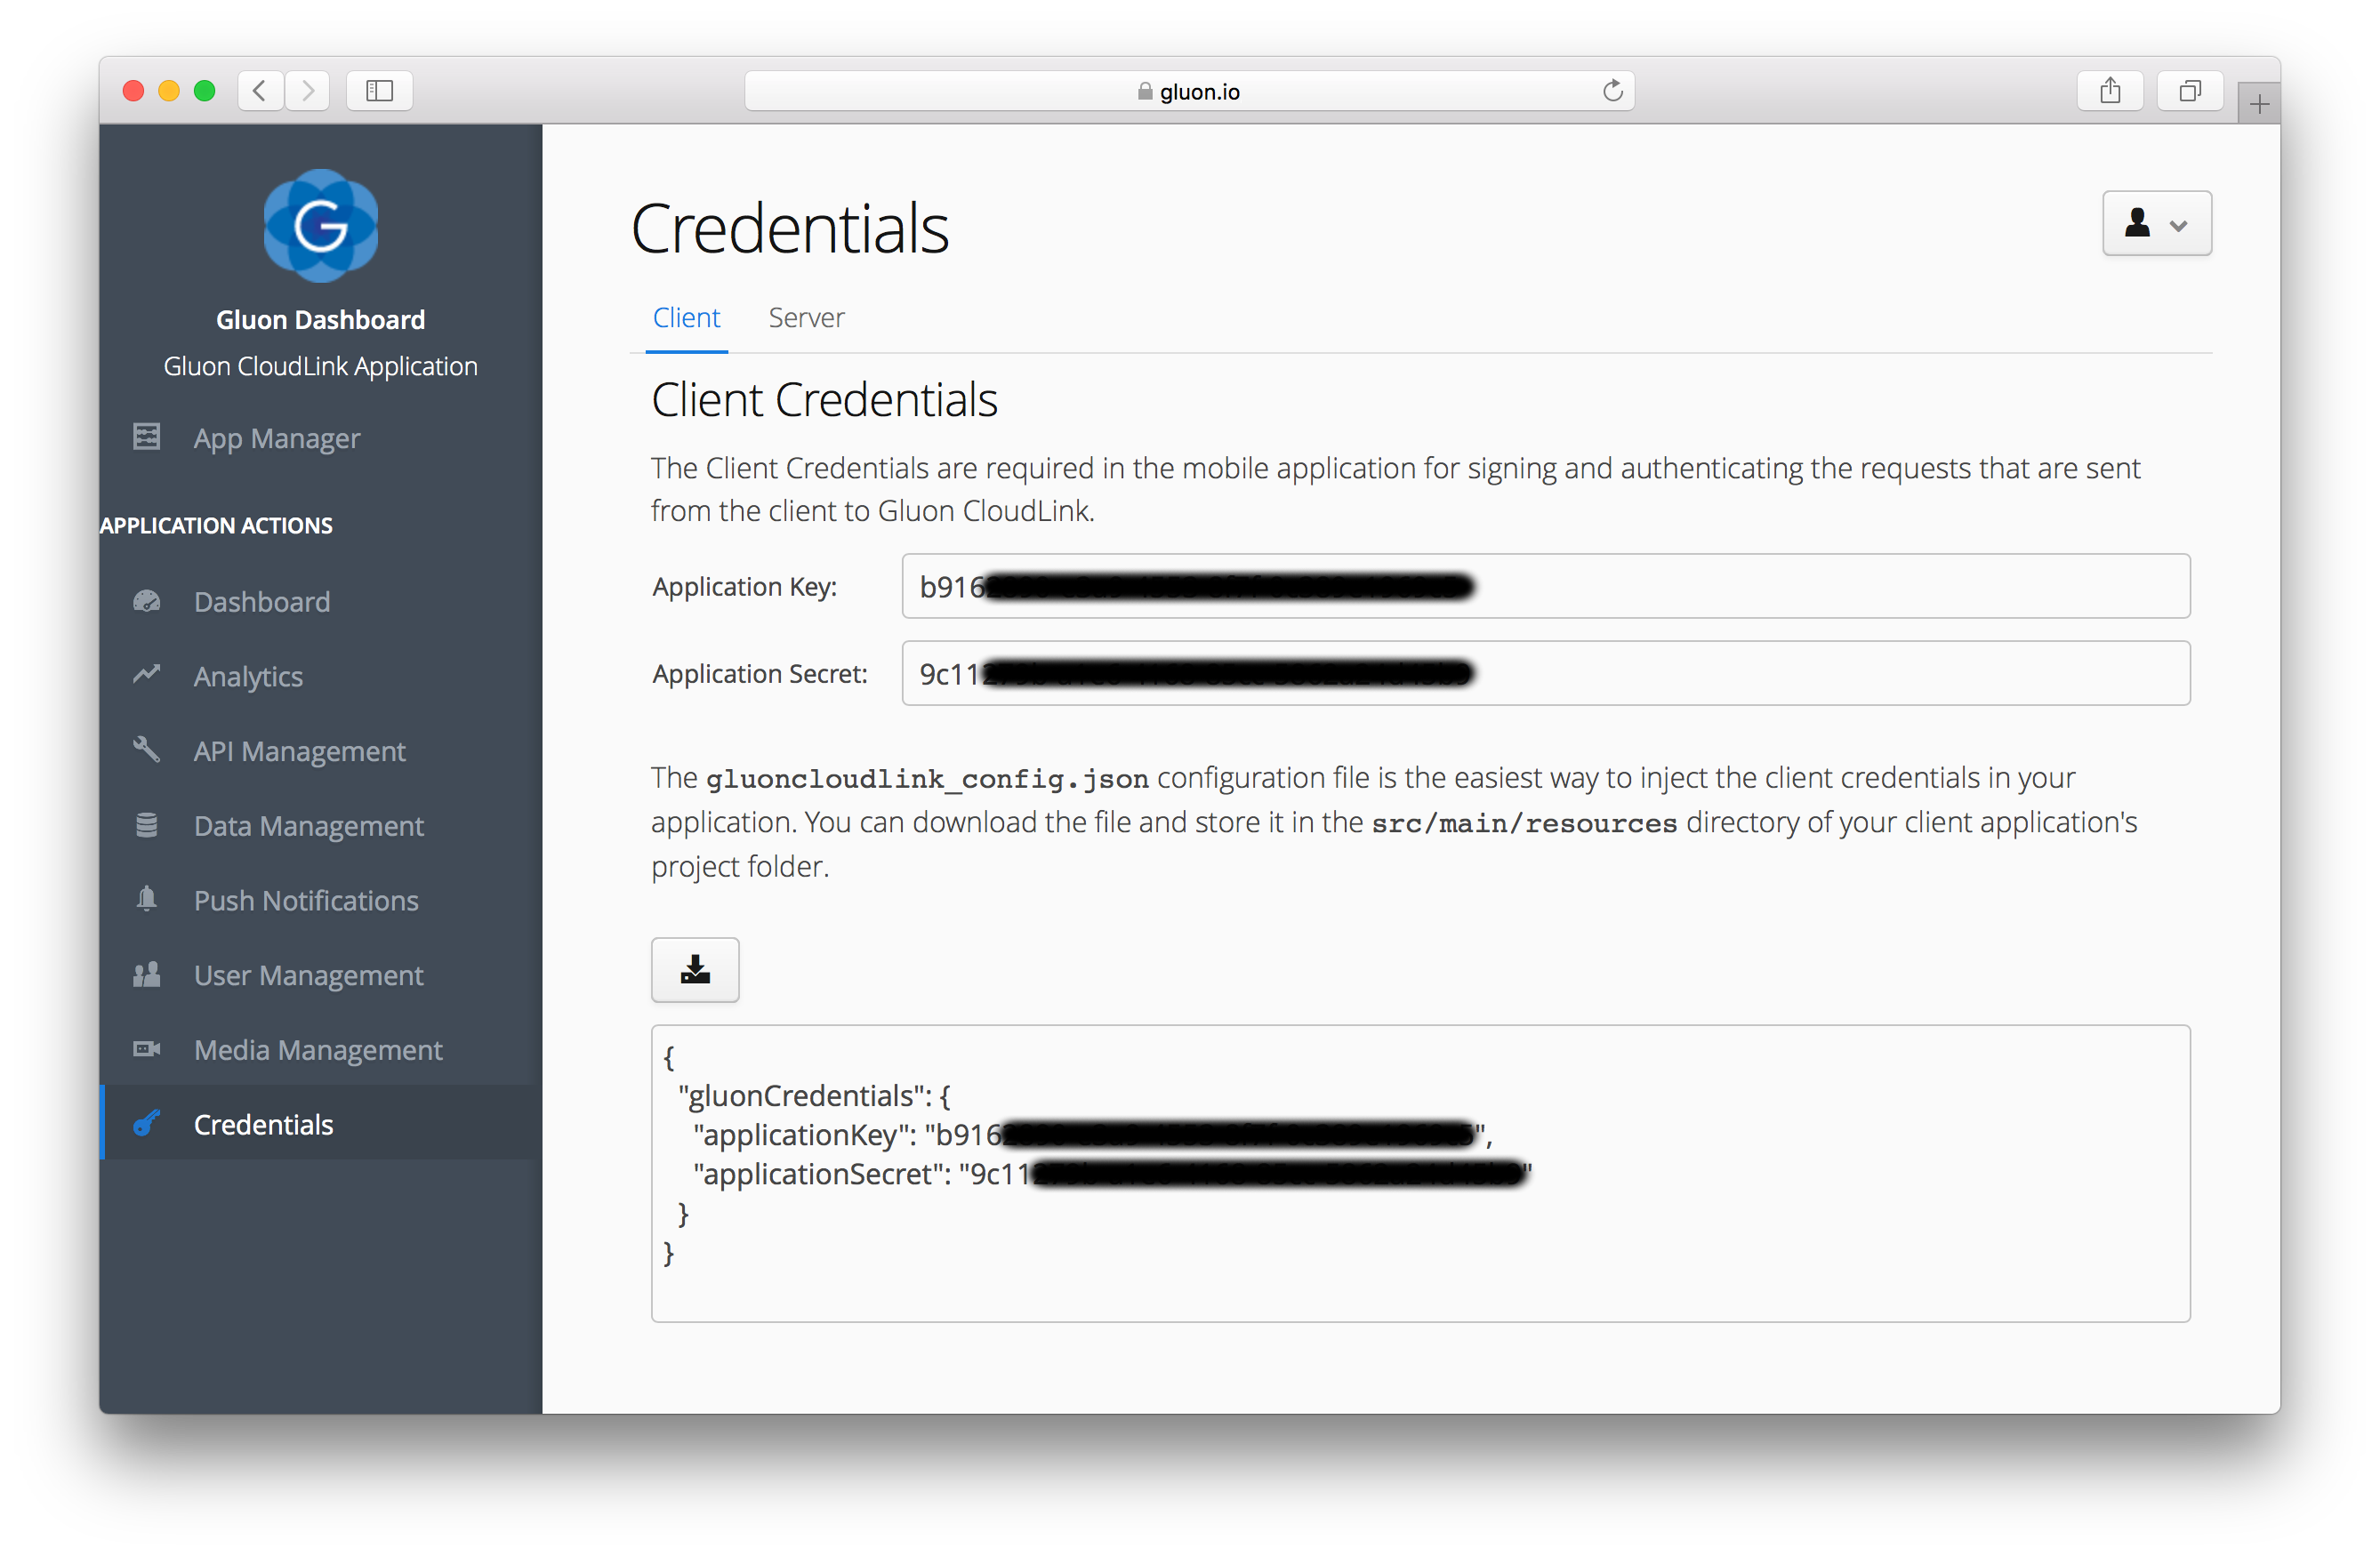
{
  "gluonCredentials": {
    "applicationKey": "b916XXXX-XXXX-XXXX-XXXX-XXXXXXXXXXXX",
    "applicationSecret": "9c11XXXX-XXXX-XXXX-XXXX-XXXXXXXXXXXX"
  }
}
From the Gluon Dashboard, select the Credentials item from the menu on the left. You will find
the key and secret tokens of your Gluon CloudLink application inside the Client tab. You can
either manually copy and paste them in the configuration file or you can directly download the
configuration file by clicking the download button.
4. Data Storage
Applications often use data that needs to be stored. Some data is only relevant to a specific instance of the application (i.e. local settings), other data is relevant to all instances of the application (i.e. chat data) and some data is relevant to some instances (i.e. user preferences for a user who has a number of devices).
Gluon CloudLink Client is the component that manages data on the client. It provides an API that allows users to store and synchronize data and provides a number of options for developers to choose from for each data entity:
-
should the data be stored on the device only?
-
should the data be stored in Gluon CloudLink?
-
should changes to data on the device propagate to Gluon CloudLink?
-
in case the data in Gluon CloudLink changes, does the local device copy needs to be synchronized immediately?
Gluon CloudLink Client communicates via an efficient protocol with Gluon CloudLink to achieve the different goals. Gluon CloudLink provides a scalable and persistent data store that is used to store data and to update clients when data changes.
Communication between your Gluon Mobile application and Gluon CloudLink works in two directions:
-
your mobile data is stored in the cloud when you want to, and
-
your mobile data is updated on the device whenever it is updated in the cloud.
In addition, Gluon CloudLink provides the ability to link your Gluon Mobile application with another back-end or cloud infrastructure by configuring one or more Connectors.
4.1. CloudLink Client
Gluon CloudLink makes sure your data is consistent across the different devices. Depending on your preferences, changes on one device propagate immediately to other devices. Or they might only be stored in Gluon CloudLink and the devices will manually request the latest version whenever they want.
4.1.1. DataClient
The DataClient
class is the access point to the Data Storage. You can get a reference to a DataClient instance by using
the DataClientBuilder:
DataClient dataClient = DataClientBuilder.create().build();Operation Mode
When working with the DataClient, there are currently three operation modes you can choose from:
-
CLOUD_ONLY: data will only be persisted on and retrieved from the Gluon CloudLink service -
LOCAL_ONLY: data will only be persisted on and retrieved from the local file system of the device where the application is running on -
CLOUD_FIRST: data will be persisted on and retrieved from the Gluon CloudLink service as the primary data source, but a local copy will be kept in sync
The default operation mode is CLOUD_FIRST, but can be explicitly specified when creating the DataClient instance:
// specify LOCAL_ONLY operation mode
DataClient dataClient = DataClientBuilder.create()
        .operationMode(OperationMode.LOCAL_ONLY)
        .build();
Authentication
You can configure the DataClient to link data with an authenticated user. The following authentication methods are currently available:
-
Facebook: authenticate users with Facebook Login
-
GitHub: authenticate users with GitHub
-
Google: authenticate users with Google Sign-In
-
Twitter: authenticate users with Twitter
-
Email and Password: authenticate users by letting them sign up and sign in with their personally chosen email address and password
See the documentation on User Management to read more about configuring user authentication.
To enable user authentication on the client, you need to provide a UserClient
instance when building the DataClient. The provided UserClient will ensure that an authenticated user is present
when the DataClient tries to access underlying data. Authentication is done by presenting the user with an
authentication view from which one of the configured login methods can be chosen.
// enable user authentication
UserClient authenticationClient = new UserClient();
DataClient dataClient = DataClientBuilder.create()
        .authenticateWith(authenticationClient)
        .build();

// the next statement will trigger the authentication view
GluonObservableList<Note> notes = DataProvider.retrieveList(dataClient.createListDataReader("notes", Note.class));
4.1.2. Data Storage
Once you have a DataClient reference, you can start storing and retrieving data. There are two different types of
data that can be managed in Gluon CloudLink:
-
single objects, and
-
lists of objects
Because these objects and lists are maintained remotely, we will call them remote entities. Every remote entity is identified by a unique string identifier.
Retrieving lists
For example, retrieving a remote list with the identifier notes can be done with the following code:
GluonObservableList<Note> notes = DataProvider.retrieveList(dataClient.createListDataReader("notes", Note.class));
ListView<Note> notesListView = new ListView<>(notes);
In its simplest form the createListDataReader
method returns an instance of GluonObservableList
without any synchronization flags.
You may have noticed that DataClient doesn’t provide a method for creating a new list. That is because a Gluon CloudLink list always exists. When a list is retrieved the first time, an empty list will automatically be created for you.
Retrieving objects
A remote object works a bit differently than a list, because in contrast to a list, an object does have the notion of existence.
This explains why we have three methods for managing remote objects:
createObjectDataReader, createObjectDataWriter and createObjectDataRemover.
// store the object
Note note = new Note();
note.setContent("This is the content for the note.");
GluonObservableObject<Note> gluonNote = DataProvider.storeObject(note, dataClient.createObjectDataWriter("a-single-note", Note.class));

// retrieve the object
GluonObservableObject<Note> gluonNote = DataProvider.retrieveObject(dataClient.createObjectDataReader("a-single-note", Note.class));

// remove the object
DataProvider.removeObject(gluonNote, dataClient.createObjectDataRemover());
GluonObservable ConnectState
All the operations on the DataProvider are asynchronous in nature and are executed in a separate background thread.
You can listen for changes on the stateProperty
of the returned GluonObservable object to monitor the progress of the background operation. To know when your object
or list is ready to be used, you can also listen for the initializedProperty instead.
Listed below you’ll find a number of common use cases when working with remote entities.
Create a remote object when it does not yet exist
When retrieving an object from Gluon CloudLink, you can detect if this object was already stored previously by using the following pattern:
GluonObservableObject<Note> gluonNote = DataProvider.retrieveObject(dataClient.createObjectDataReader("a-single-note", Note.class));
gluonNote.initializedProperty().addListener((observable, ov, nv) -> {
    if (nv) {
        if (gluonNote.get() == null) {
            // object not yet stored, initiate it now with a new object and store it
            gluonNote.set(new Note("This is some text for the note"));
            dataClient.push(gluonNote);
        } else {
            // object already stored previously
            Note note = gluonNote.get();
            System.out.println("Stored note: " + note.getContent());
        }
    }
});
Initialize an empty list with default objects
When you retrieve a list for the first time, an empty list will be created for you by the Gluon CloudLink service. Sometimes you wish to populate this empty list with default objects. You can do that with the following pattern:
GluonObservableList<Note> gluonNotes = DataProvider.retrieveList(dataClient.createListDataReader("notes", Note.class));
gluonNotes.initializedProperty().addListener((observable, ov, nv) -> {
    if (nv && gluonNotes.isEmpty()) {
        // initialize the list with some default notes
        gluonNotes.addAll(
                new Note("Text for note number 1."),
                new Note("Text for note number 2.")
        );
        dataClient.push(gluonNotes);
    }
});
Detecting failures when working with remote entities
If you notice that data isn’t stored or retrieved correctly, it might be that an exception occurred during the process.
You can check the exceptionProperty
on the GluonObservable object to see what exactly went wrong.
GluonObservableObject<Note> gluonNote = DataProvider.retrieveObject(dataClient.createObjectDataReader("a-single-note", Note.class));
gluonNote.stateProperty().addListener((observable, oldState, newState) -> {
    if (newState == ConnectState.FAILED) {
        if (gluonNote.getException() != null) {
            gluonNote.getException().printStackTrace();
        }
    }
});
4.1.3. Supported Data Types
The second parameter of the createListDataReader, createObjectDataReader and createObjectDataWriter methods on
DataClient specifies the type of data that is stored in the remote entity. Gluon CloudLink supports three different data types: String, Map and custom classes. Inside a Map and for the fields of a custom class, the following field types can be used:
-
booleanandBooleanProperty -
intandIntegerProperty -
longandLongProperty -
floatandFloatProperty -
doubleandDoubleProperty -
StringandStringProperty
The JavaFX Property types are a requirement when a remote entity is retrieved in combination with the OBJECT_WRITE_THROUGH synchronization flag. See the Data Synchronization section for more information on these flags.
String
The String data type is the most basic of the three supported types. It simply stores and retrieves instances of string.
Map
The Map represents a convenient key/value store in which you can store arbitrary data. It is the most flexible data type, but is less type safe. The keys of the map must be strings, while the value can be any of the supported field types that are listed above. If the map contains a value that is not supported, those values will be ignored when storing or retrieving data.
Custom Class
As a final option, you can define your data structure inside a Custom Class. The DataClient will inspect the provided class for all declared fields of which the type matches any of the supported field types. Note that only non-static fields and non-final primitive fields will be considered. All other field declarations will be ignored when storing or retrieving data.
4.1.4. Data Synchronization
By default, no synchronization flags are configured when calling any of the methods we mentioned above. To enable synchronization, you can pass any of the SyncFlag
enum constants to the method. There are four different types of SyncFlag:
-
OBJECT_READ_THROUGH: changes that occur on an object in Gluon CloudLink will be reflected to the fields on the local object -
OBJECT_WRITE_THROUGH: changes on JavaFX Property fields will be automatically written to the object in Gluon CloudLink -
LIST_READ_THROUGH: adding and removing objects on a list in Gluon CloudLink will be reflected to the local list -
LIST_WRITE_THROUGH: adding and removing objects locally will automatically add and remove them to the list in Gluon CloudLink
Note that the OBJECT_READ_THROUGH and LIST_READ_THROUGH flags don’t have any effect when used in combination with the LOCAL_ONLY operation mode.
Also note that the OBJECT_WRITE_THROUGH flag will only work on non-static Observable fields of a Custom Class.
As an example, the code snippet below retrieves an instance of GluonObservableList
that is configured with the list read through and list write through synchronization flags. This means that any changes
that are done on the client, either adding or removing items, are propagated back to Gluon CloudLink. The reverse is
true as well: all changes that occur in Gluon CloudLink will be reflected back to the local list on the device. Changes
that occur on the objects inside the list won’t be propagated.
GluonObservableList<Note> notes = DataProvider.retrieveList(dataClient.createListDataReader("notes", Note.class, SyncFlag.LIST_READ_THROUGH, SyncFlag.LIST_WRITE_THROUGH));4.2. Integration with Enterprise and Cloud Systems
One of the features of Gluon CloudLink is to link it with an existing back end infrastructure. There are two main ways for linking Gluon CloudLink with such a back end infrastructure.
-
Call into the Gluon CloudLink REST endpoints from an enterprise system to retrieve and manage data. You can either directly call the REST endpoints or use an implementation of the Gluon CloudLink Enterprise SDK that best suits your existing enterprise environment.
-
Use Connectors to let Gluon CloudLink automatically push and/or pull data to and from an enterprise system.
4.2.1. REST endpoints
Get object
Retrieve an object from the data service.
Path Parameters
| Name | Description |
|---|---|
objectIdentifier |
The unique identifier of the object to retrieve. |
Curl sample
curl -X GET "https://cloud.gluonhq.com/3/data/enterprise/object/sample-object" \
     -H "Authorization: Gluon YOUR_SERVER_KEY"
Java Client
CloudLinkConfig config = new CloudLinkConfig(YOUR_SERVER_KEY);
CloudLinkClient client = new JavaEECloudLinkClient(config);

SampleType sampleObject = client.getObject("sample-object", SampleType.class);
Add object
Add a new object into the data service with the defined payload.
Path Parameters
| Name | Description |
|---|---|
objectIdentifier |
The unique identifier of the object to add. |
Body
The body of the request must be a UTF-8 encoded JSON string and will be used as the payload for the newly added object.
Curl sample
curl -X POST "https://cloud.gluonhq.com/3/data/enterprise/object/sample-object/add" \
     -H "Authorization: Gluon YOUR_SERVER_KEY" \
     -H "Content-Type: application/json; charset=utf-8" \
     --data '{"text":"someField","number":123}'
Java Client
CloudLinkConfig config = new CloudLinkConfig(YOUR_SERVER_KEY);
CloudLinkClient client = new JavaEECloudLinkClient(config);

SampleType sampleObject = new SampleType("someField", 123);
SampleType storedObject = client.addObject("sample-object", sampleObject);
Update object
Update an existing object in the data service with the defined payload.
Path Parameters
| Name | Description |
|---|---|
objectIdentifier |
The unique identifier of the object to update. |
Body
The body of the request must be a UTF-8 encoded JSON string and will be used as the payload for the object that is being updated.
Curl sample
curl -X POST "https://cloud.gluonhq.com/3/data/enterprise/object/sample-object/update" \
     -H "Authorization: Gluon YOUR_SERVER_KEY" \
     -H "Content-Type: application/json; charset=utf-8" \
     --data '{"text":"someOtherText","number":321}'
Java Client
CloudLinkConfig config = new CloudLinkConfig(YOUR_SERVER_KEY);
CloudLinkClient client = new JavaEECloudLinkClient(config);

SampleType sampleObject = new SampleType("someField", 123);
SampleType storedObject = client.addObject("sample-object", sampleObject);
storedObject.setText("someOtherText");
storedObject.setNumber(321);
SampleType updateObject = client.updateObject("sample-object", storedObject);
Remove object
Remove an existing object from the data service.
Path Parameters
| Name | Description |
|---|---|
objectIdentifier |
The unique identifier of the object to remove. |
Curl sample
curl -X POST "https://cloud.gluonhq.com/3/data/enterprise/object/sample-object/remove" \
     -H "Authorization: Gluon YOUR_SERVER_KEY"
Java Client
CloudLinkConfig config = new CloudLinkConfig(YOUR_SERVER_KEY);
CloudLinkClient client = new JavaEECloudLinkClient(config);

client.removeObject("sample-object");
Get list
Retrieve a list of objects from the data service.
Path Parameters
| Name | Description |
|---|---|
listIdentifier |
The unique identifier of the list to retrieve. |
Curl sample
curl -X GET "https://cloud.gluonhq.com/3/data/enterprise/list/sample-list" \
     -H "Authorization: Gluon YOUR_SERVER_KEY"
Java Client
CloudLinkConfig config = new CloudLinkConfig(YOUR_SERVER_KEY);
CloudLinkClient client = new JavaEECloudLinkClient(config);

List<SampleType> sampleList = client.getList("sample-list", SampleType.class);
Add object to list
Add an object to a list in the data service.
Path Parameters
| Name | Description |
|---|---|
listIdentifier |
The unique identifier of the list to add the object into. |
objectIdentifier |
The unique identifier of the object to add to the list. |
Body
The body of the request must be a UTF-8 encoded JSON string and will be used as the payload for the object that is being added into the list.
Curl sample
curl -X POST "https://cloud.gluonhq.com/3/data/enterprise/list/sample-list/add/sample-object-1" \
     -H "Authorization: Gluon YOUR_SERVER_KEY" \
     -H "Content-Type: application/json; charset=utf-8" \
     --data '{"text":"someField","number":123}'
Java Client
CloudLinkConfig config = new CloudLinkConfig(YOUR_SERVER_KEY);
CloudLinkClient client = new JavaEECloudLinkClient(config);

SampleType sampleObject1 = new SampleType("someField", 123);
SampleType addedSampleObject1 = client.addToList("sample-list", "sample-object-1", sampleObject1);
Update object in list
Update an object in a list in the data service.
Path Parameters
| Name | Description |
|---|---|
listIdentifier |
The unique identifier of the list where the object to update is stored. |
objectIdentifier |
The unique identifier of the object to update in the list. |
Body
The body of the request must be a UTF-8 encoded JSON string and will be used as the payload for the object that is being updated in the list.
Curl sample
curl -X POST "https://cloud.gluonhq.com/3/data/enterprise/list/sample-list/update/sample-object-1" \
     -H "Authorization: Gluon YOUR_SERVER_KEY" \
     -H "Content-Type: application/json; charset=utf-8" \
     --data '{"text":"someOtherText","number":321}'
Java Client
CloudLinkConfig config = new CloudLinkConfig(YOUR_SERVER_KEY);
CloudLinkClient client = new JavaEECloudLinkClient(config);

SampleType sampleObject1 = new SampleType("someField", 123);
SampleType addedSampleObject1 = client.addToList("sample-list", "sample-object-1", sampleObject1);
addedSampleObject1.setText("someOtherText");
addedSampleObject1.setNumber(321);
SampleType updatedSampleObject1 = client.updateInList("sample-list", "sample-object-1", addedSampleObject1);
Remove object from list
Remove an object from a list in the data service.
Path Parameters
| Name | Description |
|---|---|
listIdentifier |
The unique identifier of the list where the object to remove is stored. |
objectIdentifier |
The unique identifier of the object to remove from the list. |
Curl sample
curl -X POST "https://cloud.gluonhq.com/3/data/enterprise/list/sample-list/remove/sample-object-1" \
     -H "Authorization: Gluon YOUR_SERVER_KEY"
Java Client
CloudLinkConfig config = new CloudLinkConfig(YOUR_SERVER_KEY);
CloudLinkClient client = new JavaEECloudLinkClient(config);

client.removeFromList("sample-list", "sample-object-1");
4.2.2. Connectors
A Connector can be used for automatic pushing and pulling of data from Gluon CloudLink to an enterprise back end system.
-
push: data that is updated in Gluon CloudLink is sent through to the enterprise back end
-
pull: data is requested from the enterprise back end by Gluon CloudLink
Different connector implementations are provided by Gluon CloudLink out of the box. Depending on the configured Connector, some extra code will be required on the back end application as well. E.g. when linking to Gluon CloudLink with the REST Connector, a handler must exist on the back end application that listens for HTTP requests that are called by Gluon CloudLink.
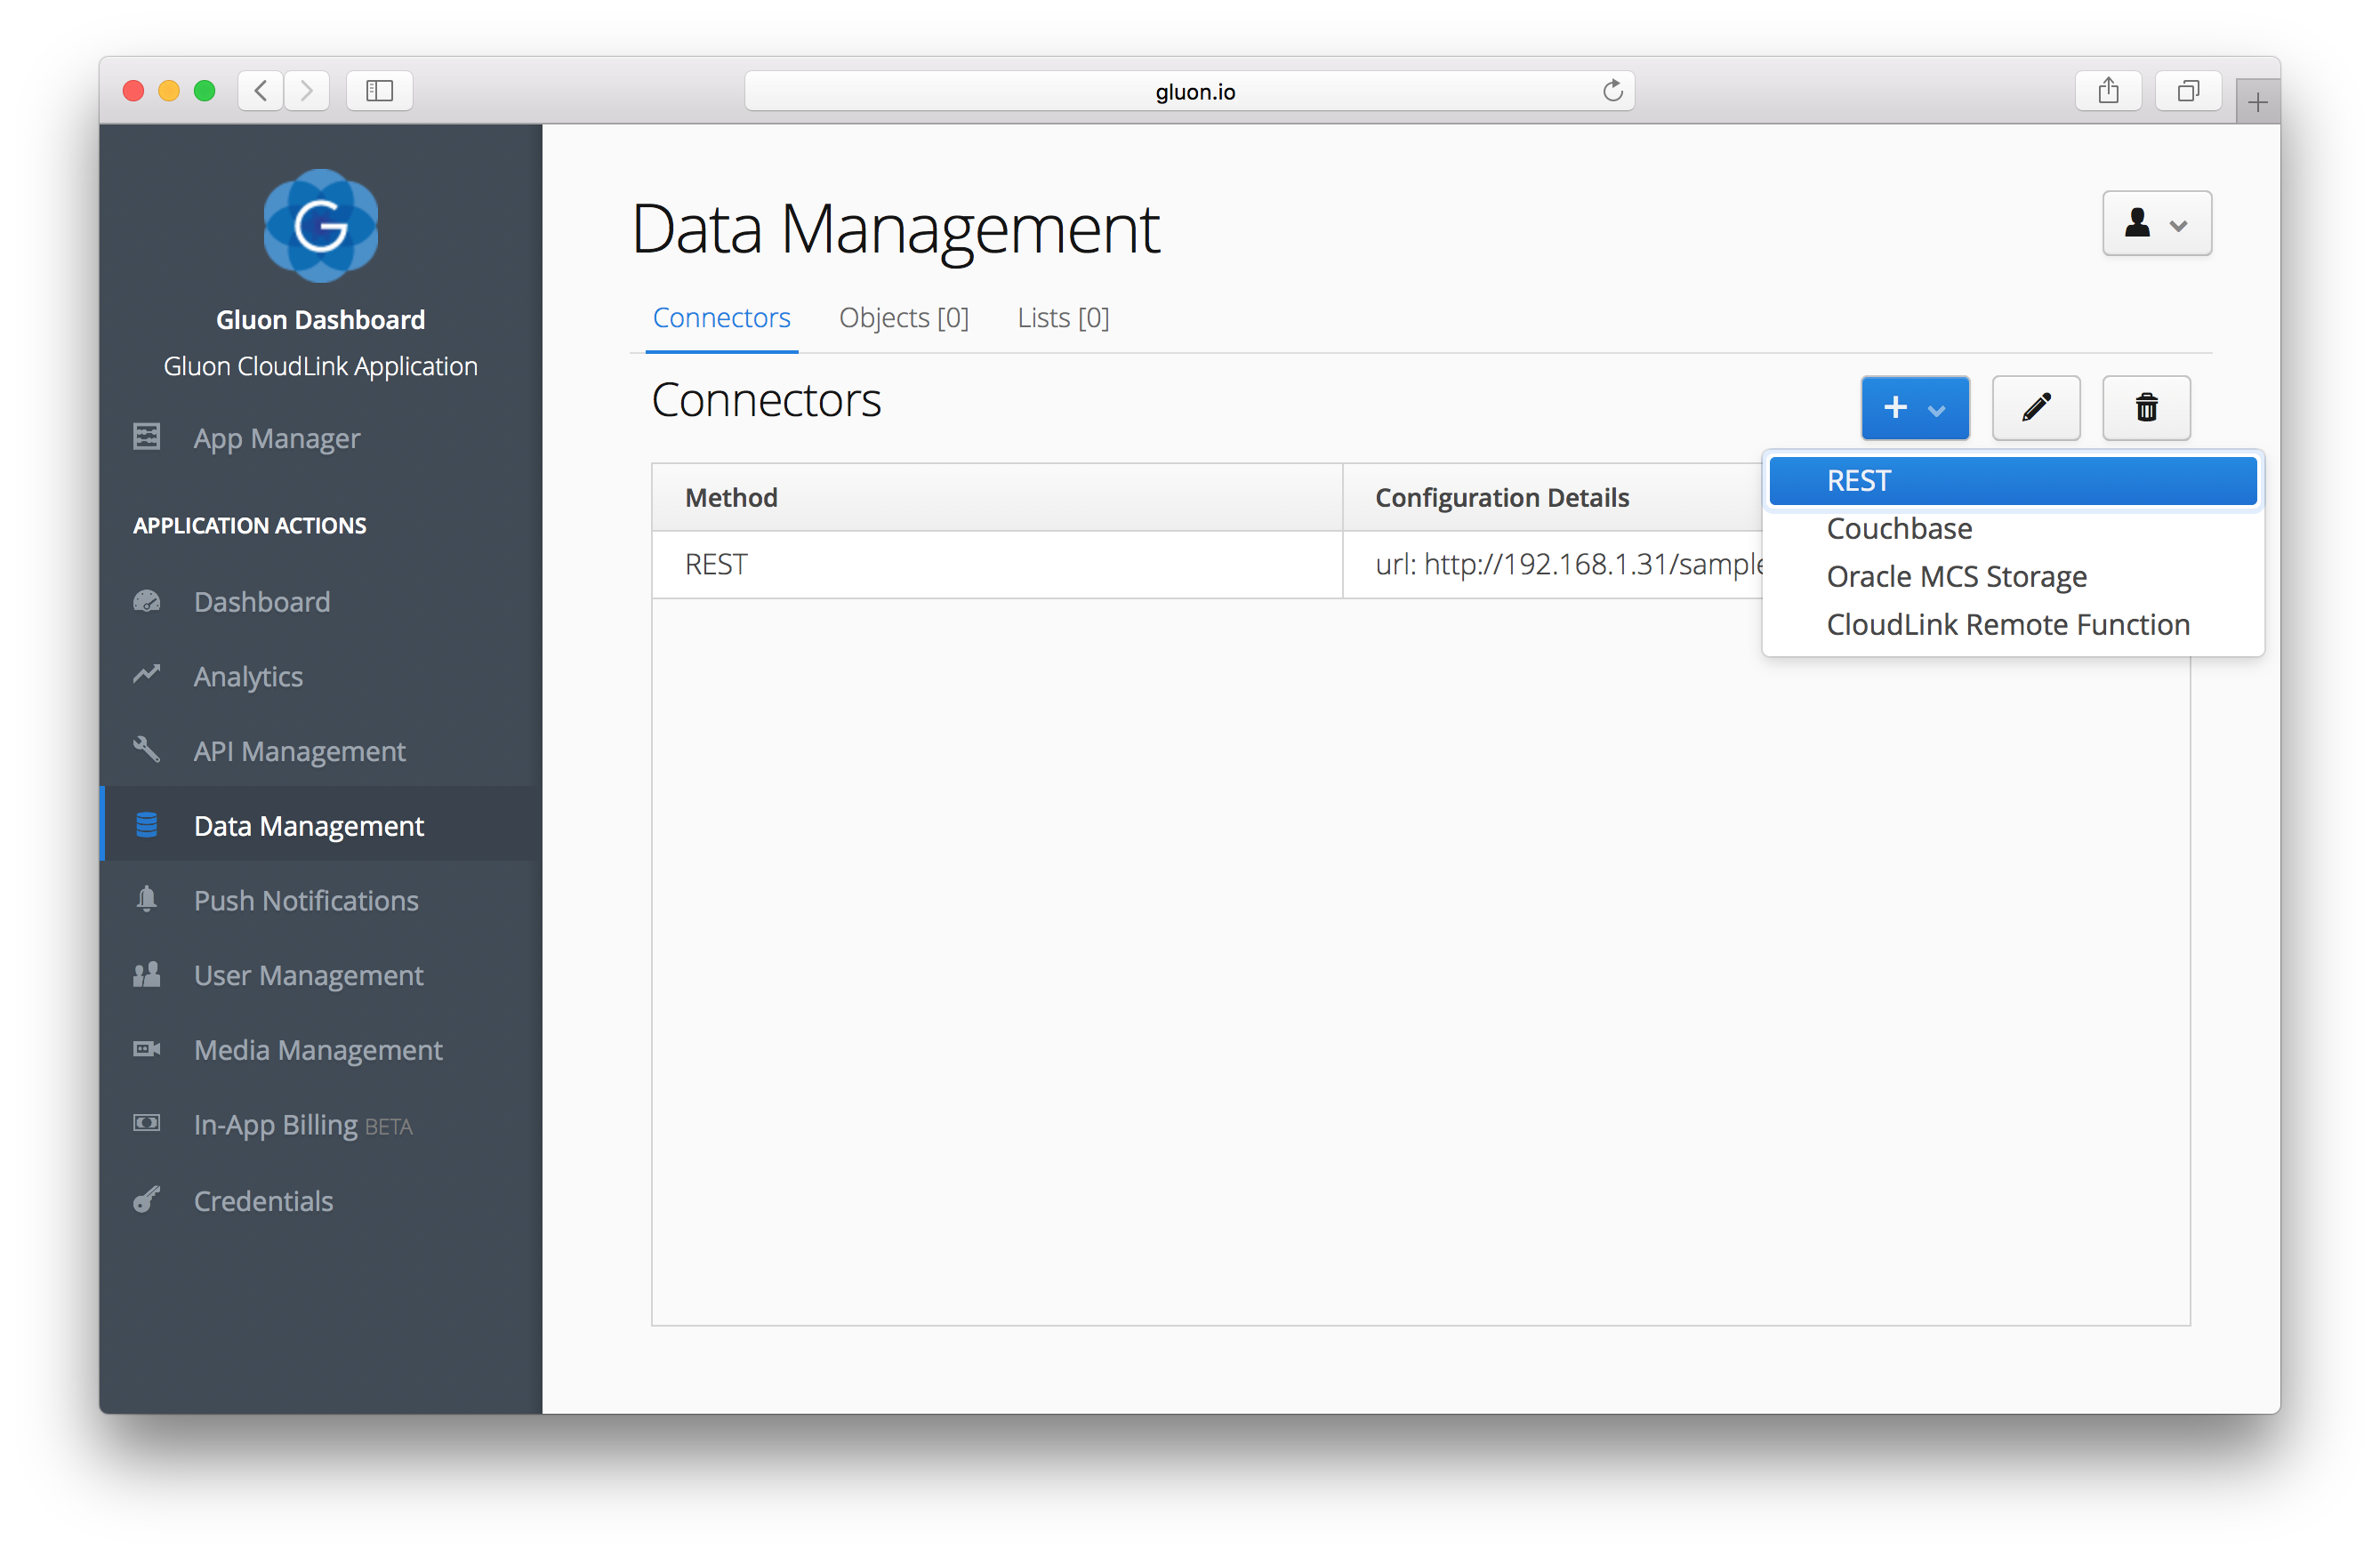
Configuring a Connector for a Gluon CloudLink Application is done in the Gluon Dashboard. The following Connectors are available for use within Gluon CloudLink. If you have a specific requirement for a custom Connector, please let us know.
Connector name |
Description |
This is the most generic connector and allows synchronization data to any enterprise or cloud system that can talk REST. |
|
This connector invokes a remote function that is defined in your CloudLink application. |
|
This connector specifically synchronizes data from and to your Couchbase server. Ideally suited if you have an existing Couchbase installation that you want to unlock to mobile devices. |
REST Connector
The REST Connector sends and receives data over a network connection using the standard HTTP protocol.
The connector can be set from the Gluon Dashboard, Data Management, Connectors tab.
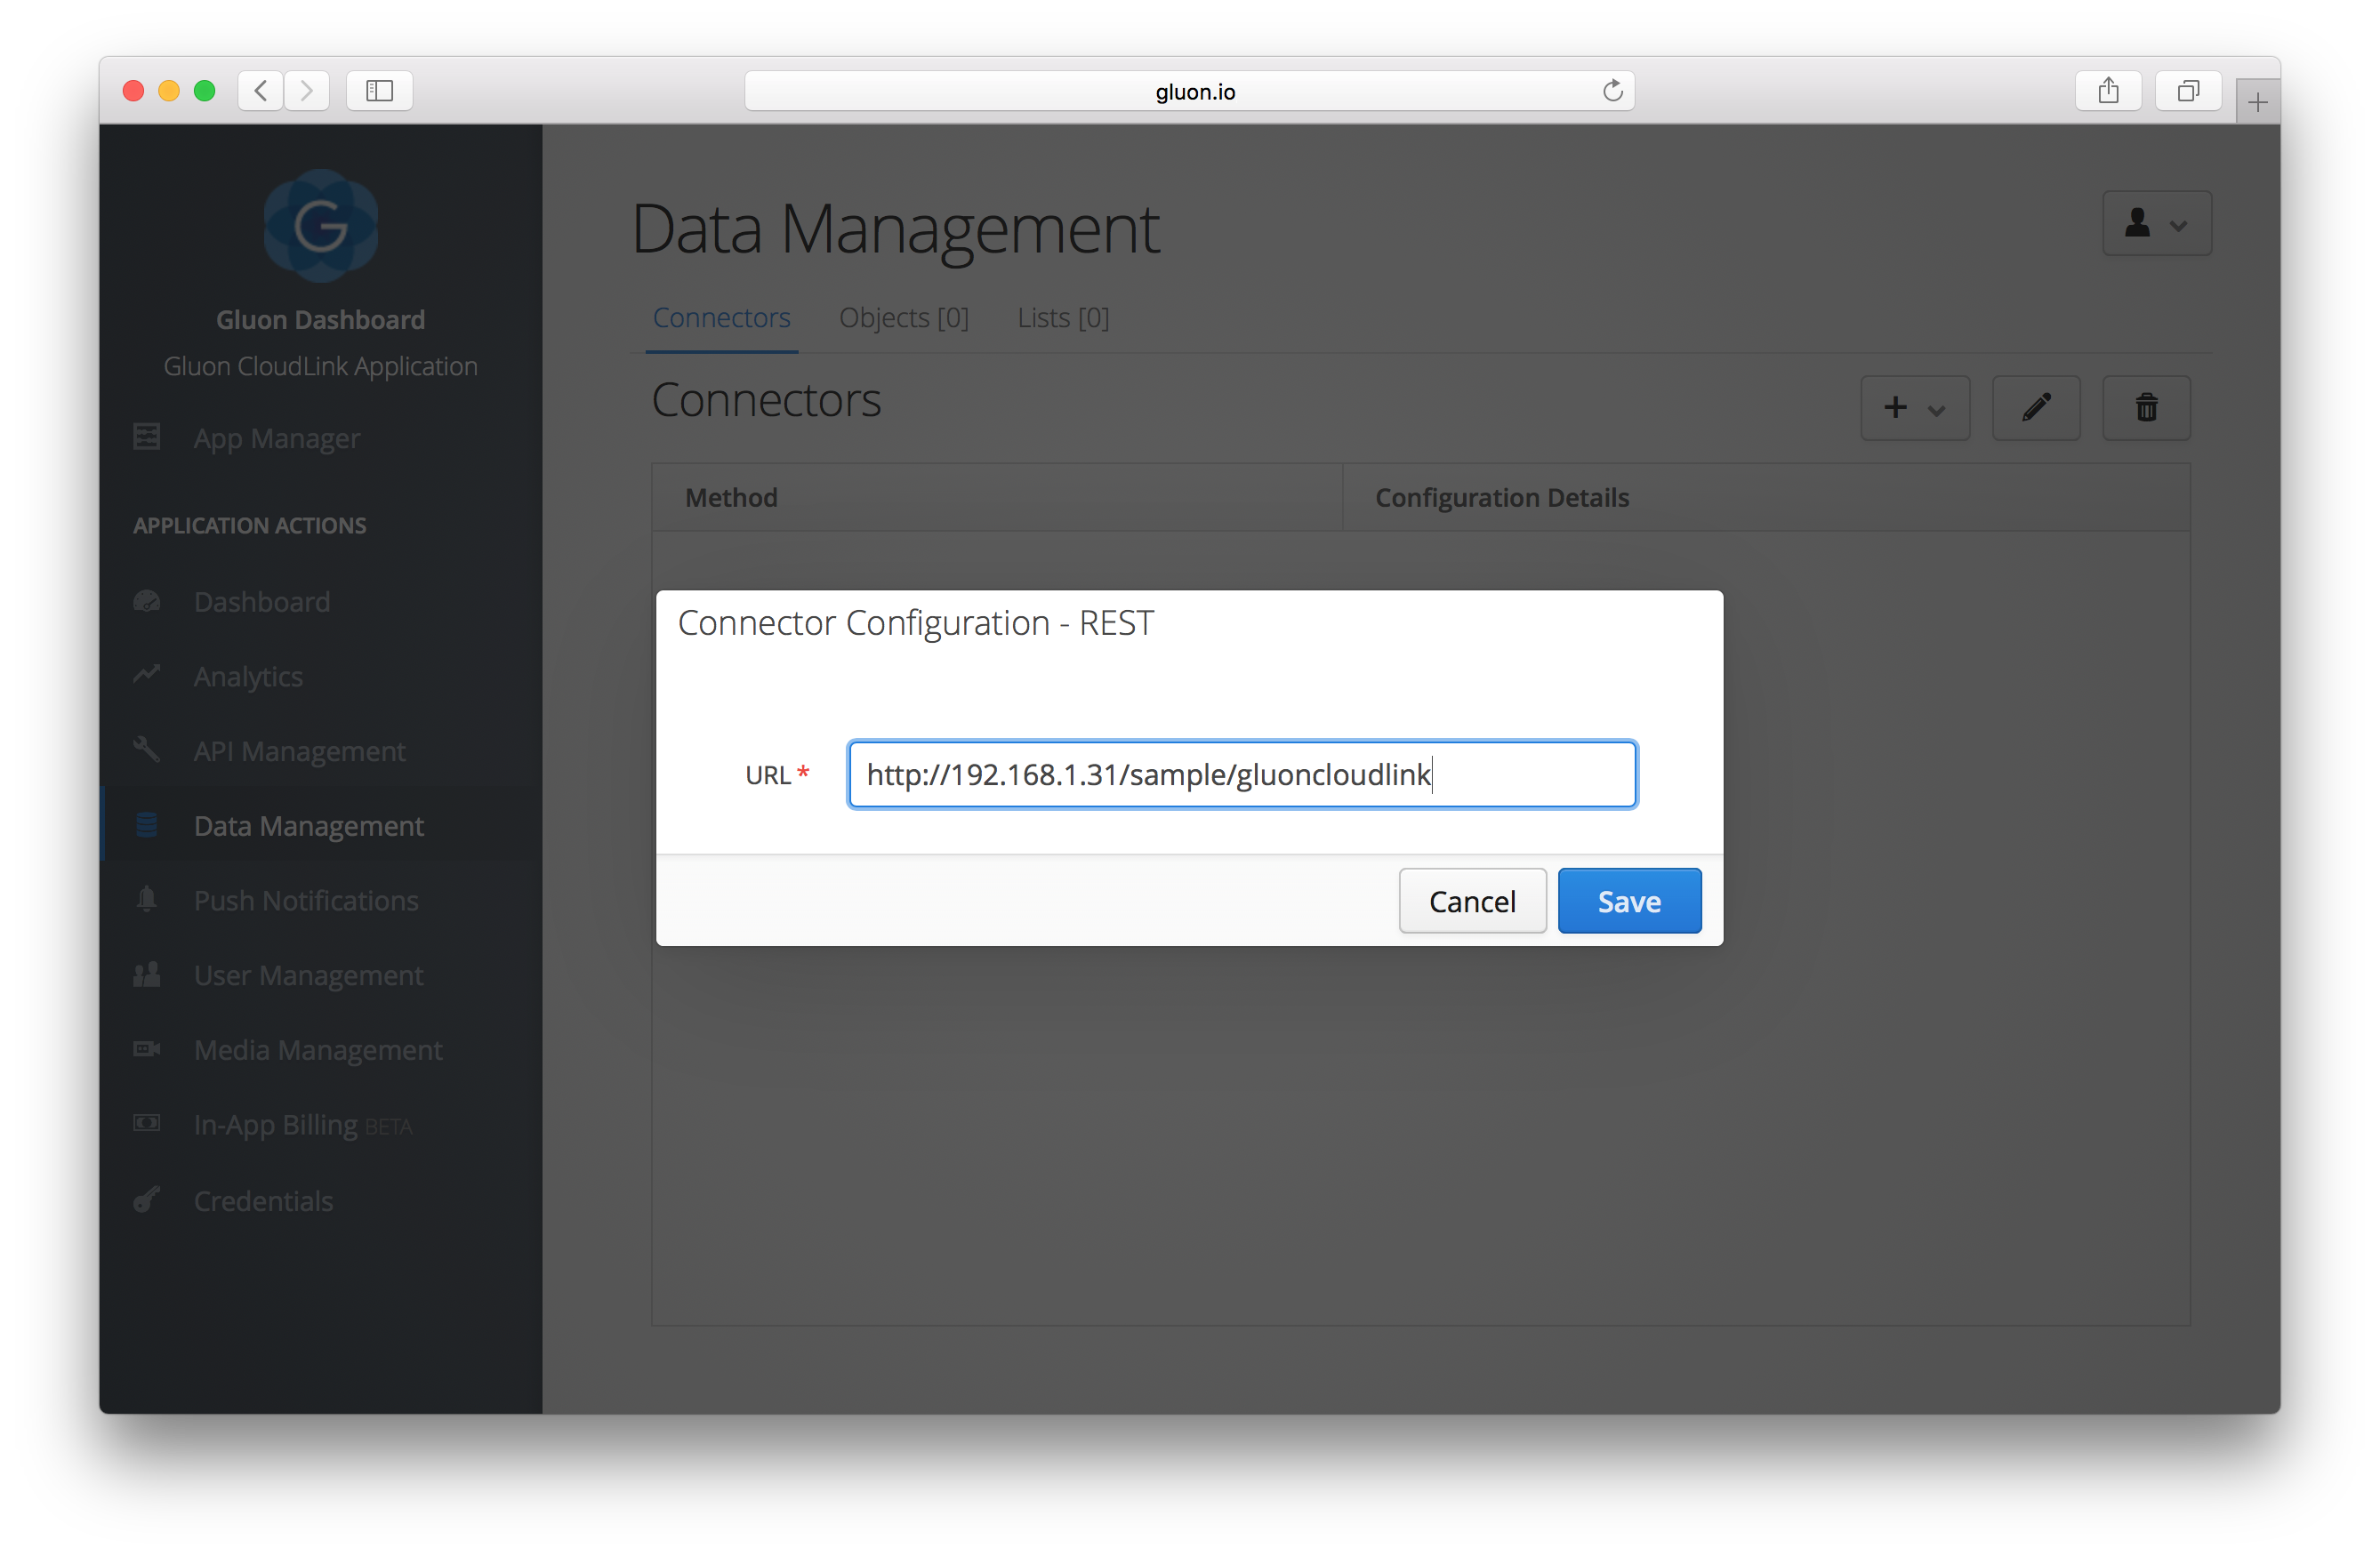
When using the REST Connector to link to a back end system, the Gluon CloudLink Application only needs to be configured with the URL where the requests from Gluon CloudLink need to be sent to.
Push endpoints
When a client application requests data to be added, updated or removed from Gluon CloudLink, those requests will be mapped with the REST Controller by making an HTTP request to one of the following six endpoints. Each of them should be implemented on the back end application to be able to handle the request.
URL |
/object/{objectIdentifier}/add |
Method |
POST |
Request Body |
JSON payload of the new object. If the object is a |
Description |
A new object is added to Gluon CloudLink. The |
URL |
/object/{objectIdentifier}/update |
Method |
POST |
Request Body |
JSON payload of the updated object |
Description |
An existing object is updated in Gluon CloudLink. The |
URL |
/object/{objectIdentifier}/remove |
Method |
POST |
Request Body |
The request body is empty |
Description |
An existing object is removed from Gluon CloudLink. The |
URL |
/list/{listIdentifier}/add/{objectIdentifier} |
Method |
POST |
Request Body |
JSON payload of object that is being added to the list |
Description |
A new object is added to a list. The |
URL |
/list/{listIdentifier}/update/{objectIdentifier} |
Method |
POST |
Request Body |
JSON payload of object that is being updated in the list |
Description |
An existing object in the list is updated. The |
URL |
/list/{listIdentifier}/remove/{objectIdentifier} |
Method |
POST |
Request Body |
The request body is empty |
Description |
An existing object is removed from a list. The |
Pull endpoints
When a client application requests an object or a list that is not yet known inside Gluon CloudLink, Gluon CloudLink calls one of the following two endpoints on the back end application to retrieve the initial object or list information.
URL |
/object/{objectIdentifier} |
Method |
GET |
Response Body |
JSON payload of the object to retrieve |
Description |
A new object is being requested from the client application with the specified |
URL |
/list/{listIdentifier} |
Method |
GET |
Response Body |
JSON payload of the list to retrieve. The payload is a JSON array containing a list of zero or more JSON
objects. Each JSON object in the array defines two keys: |
Description |
A new list is being requested from the client application with the specified |
CloudLink Remote Function Connector
The CloudLink Remote Function Connector sends data changes by invoking a Remote Function that is configured in your CloudLink application.
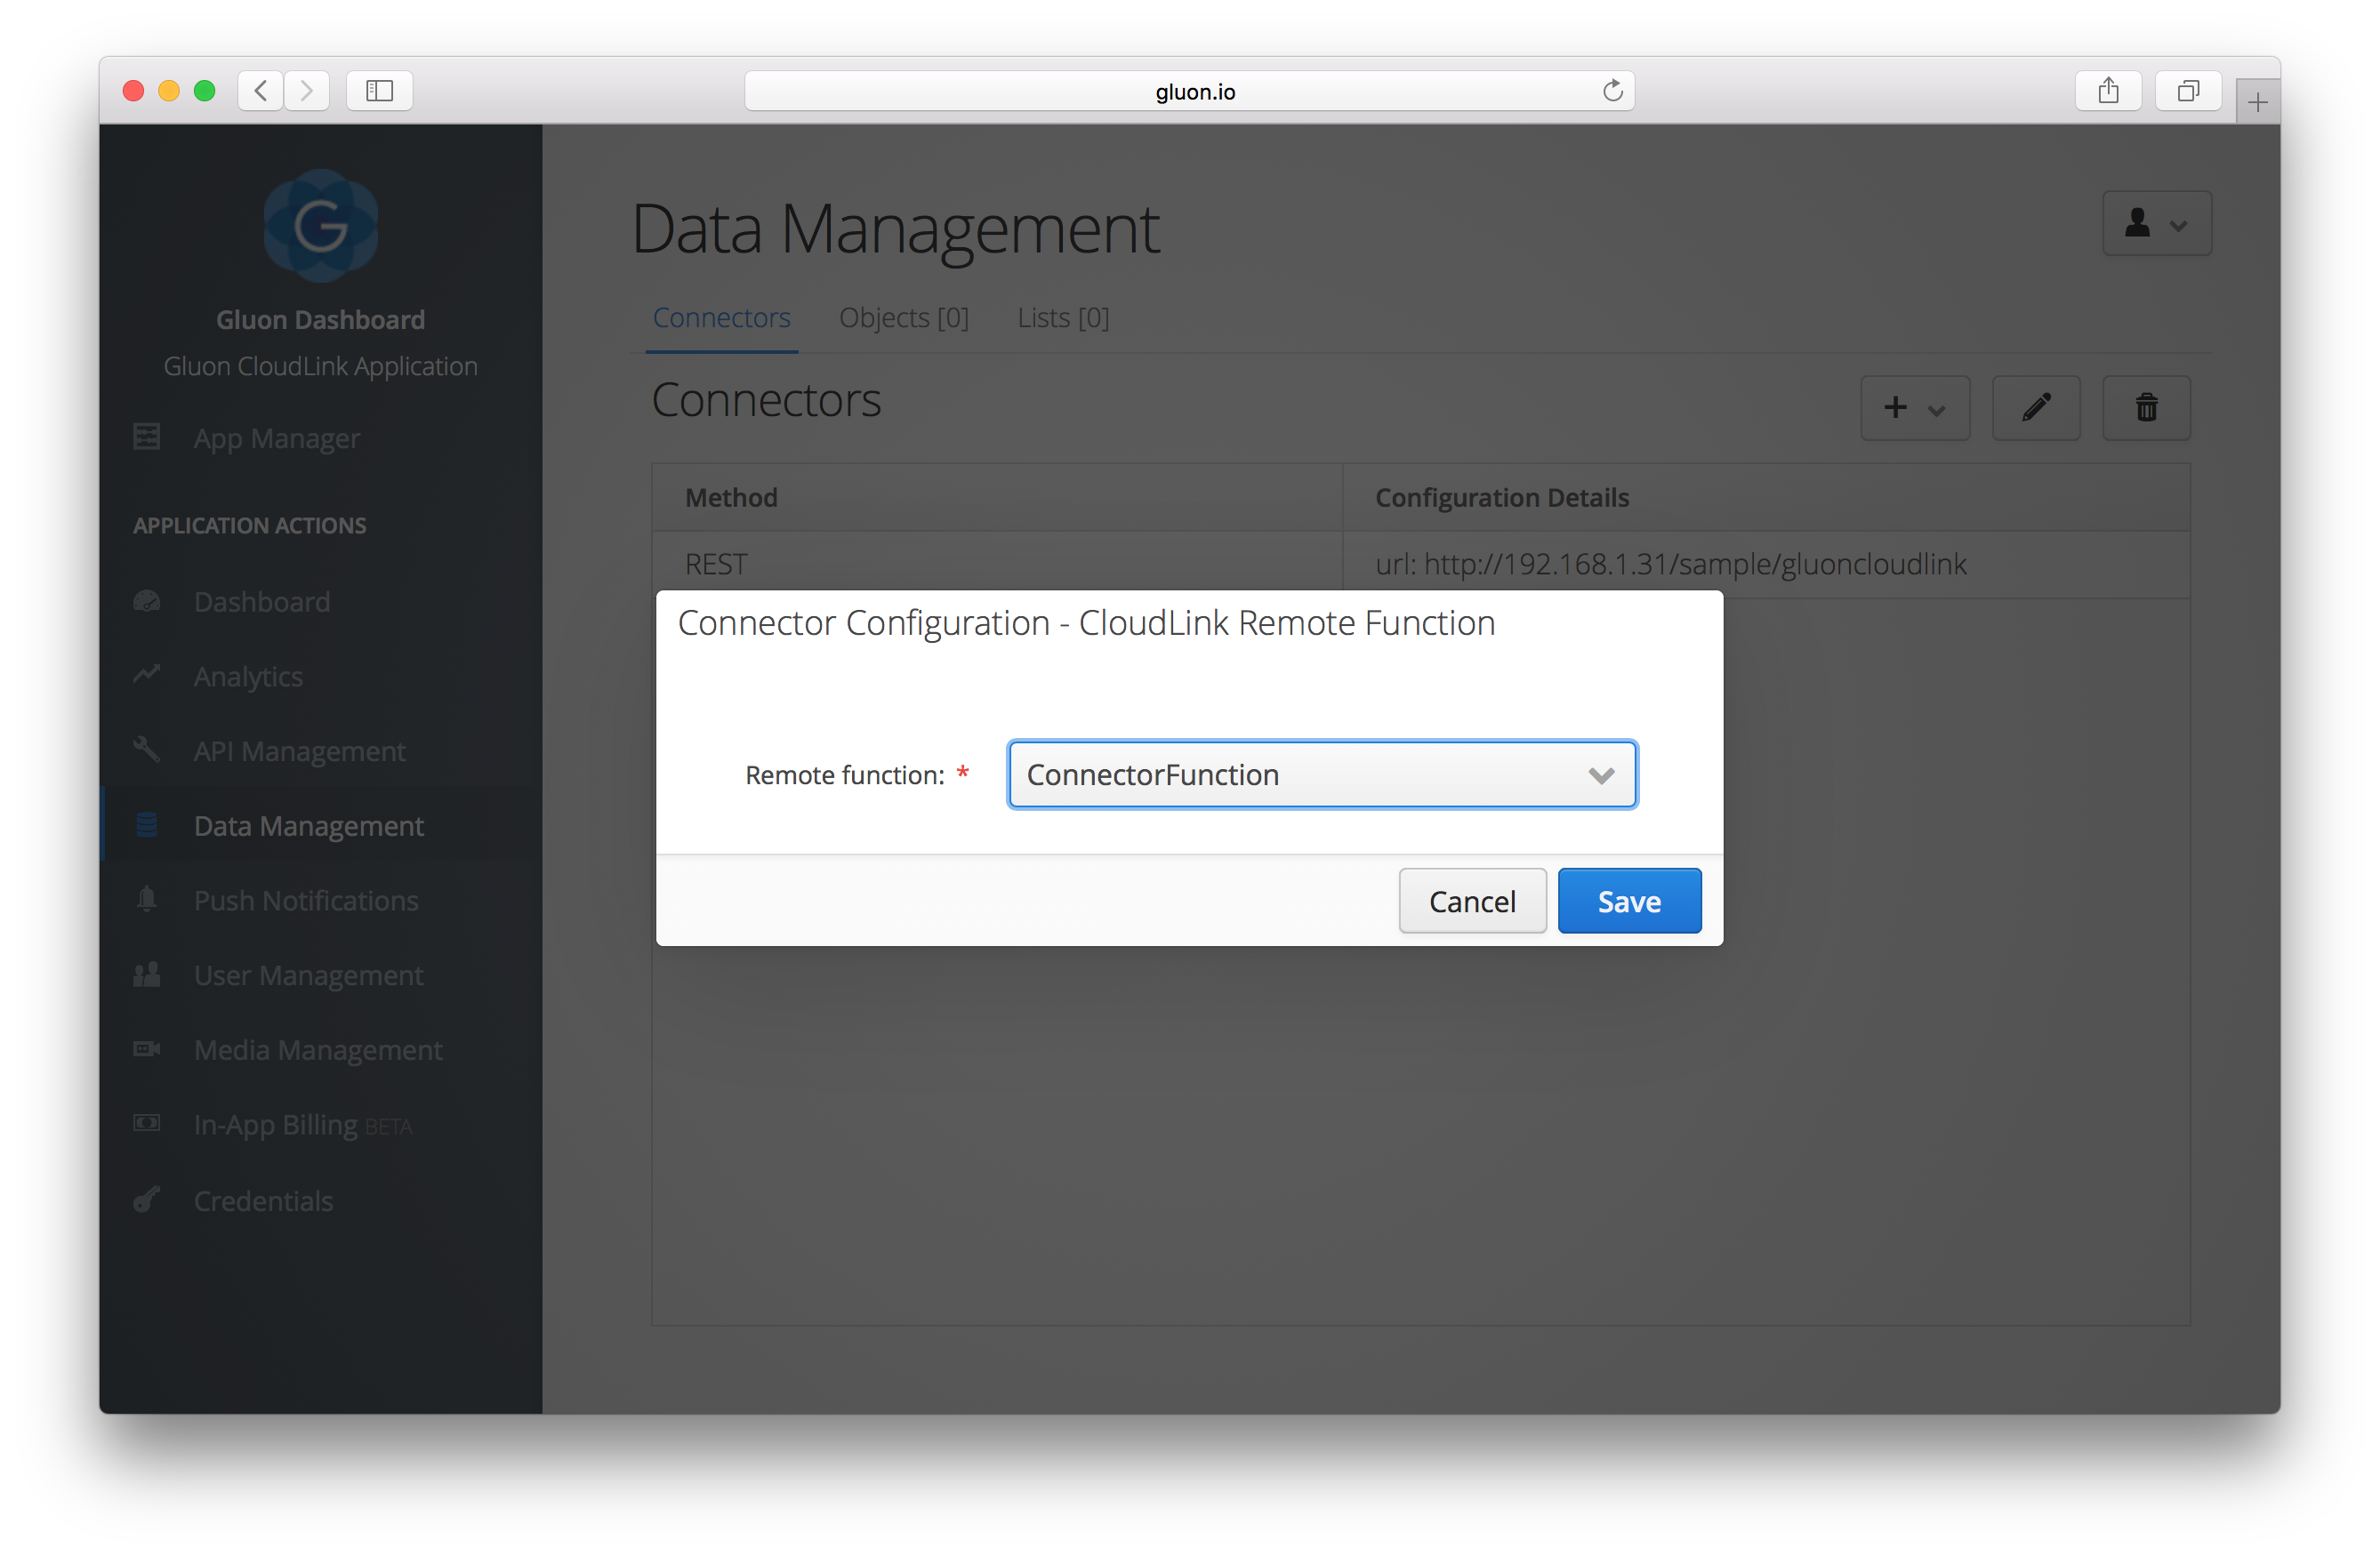
When a client application requests data to be added, updated or removed from Gluon CloudLink, those requests will be provided with the remote function invocation as a JSON string. For instance, when invoking a REST Remote Function, the payload is provided as the raw body of a POST request.
Pushing Objects
{
    "operation": "objectAdded",
    "objectIdentifier": "01234567-89ab-cdef-0123-456789abcdef",
    "payload" : "{\"firstName\":\"John\",\"lastName\":\"Doe\"}"
}
{
    "operation": "objectUpdated",
    "objectIdentifier": "01234567-89ab-cdef-0123-456789abcdef",
    "payload" : "{\"firstName\":\"Jane\",\"lastName\":\"Doe\"}"
}
{
    "operation": "objectRemoved",
    "objectIdentifier": "01234567-89ab-cdef-0123-456789abcdef"
}
Pushing Lists
{
    "operation": "itemAddedToList",
    "listIdentifier": "fedcba98-7654-3210-fedc-ba9876543210",
    "objectIdentifier": "01234567-89ab-cdef-0123-456789abcdef",
    "payload" : "{\"firstName\":\"John\",\"lastName\":\"Doe\"}"
}
{
    "operation": "itemUpdatedInList",
    "listIdentifier": "fedcba98-7654-3210-fedc-ba9876543210",
    "objectIdentifier": "01234567-89ab-cdef-0123-456789abcdef",
    "payload" : "{\"firstName\":\"Jane\",\"lastName\":\"Doe\"}"
}
{
    "operation": "itemRemovedFromList",
    "listIdentifier": "fedcba98-7654-3210-fedc-ba9876543210",
    "objectIdentifier": "01234567-89ab-cdef-0123-456789abcdef"
}
Couchbase Connector
The Couchbase Connector is able to send data to an existing Couchbase Server. The only requirement on the Couchbase Server is an existing bucket that will hold the lists and/or objects from Gluon CloudLink.
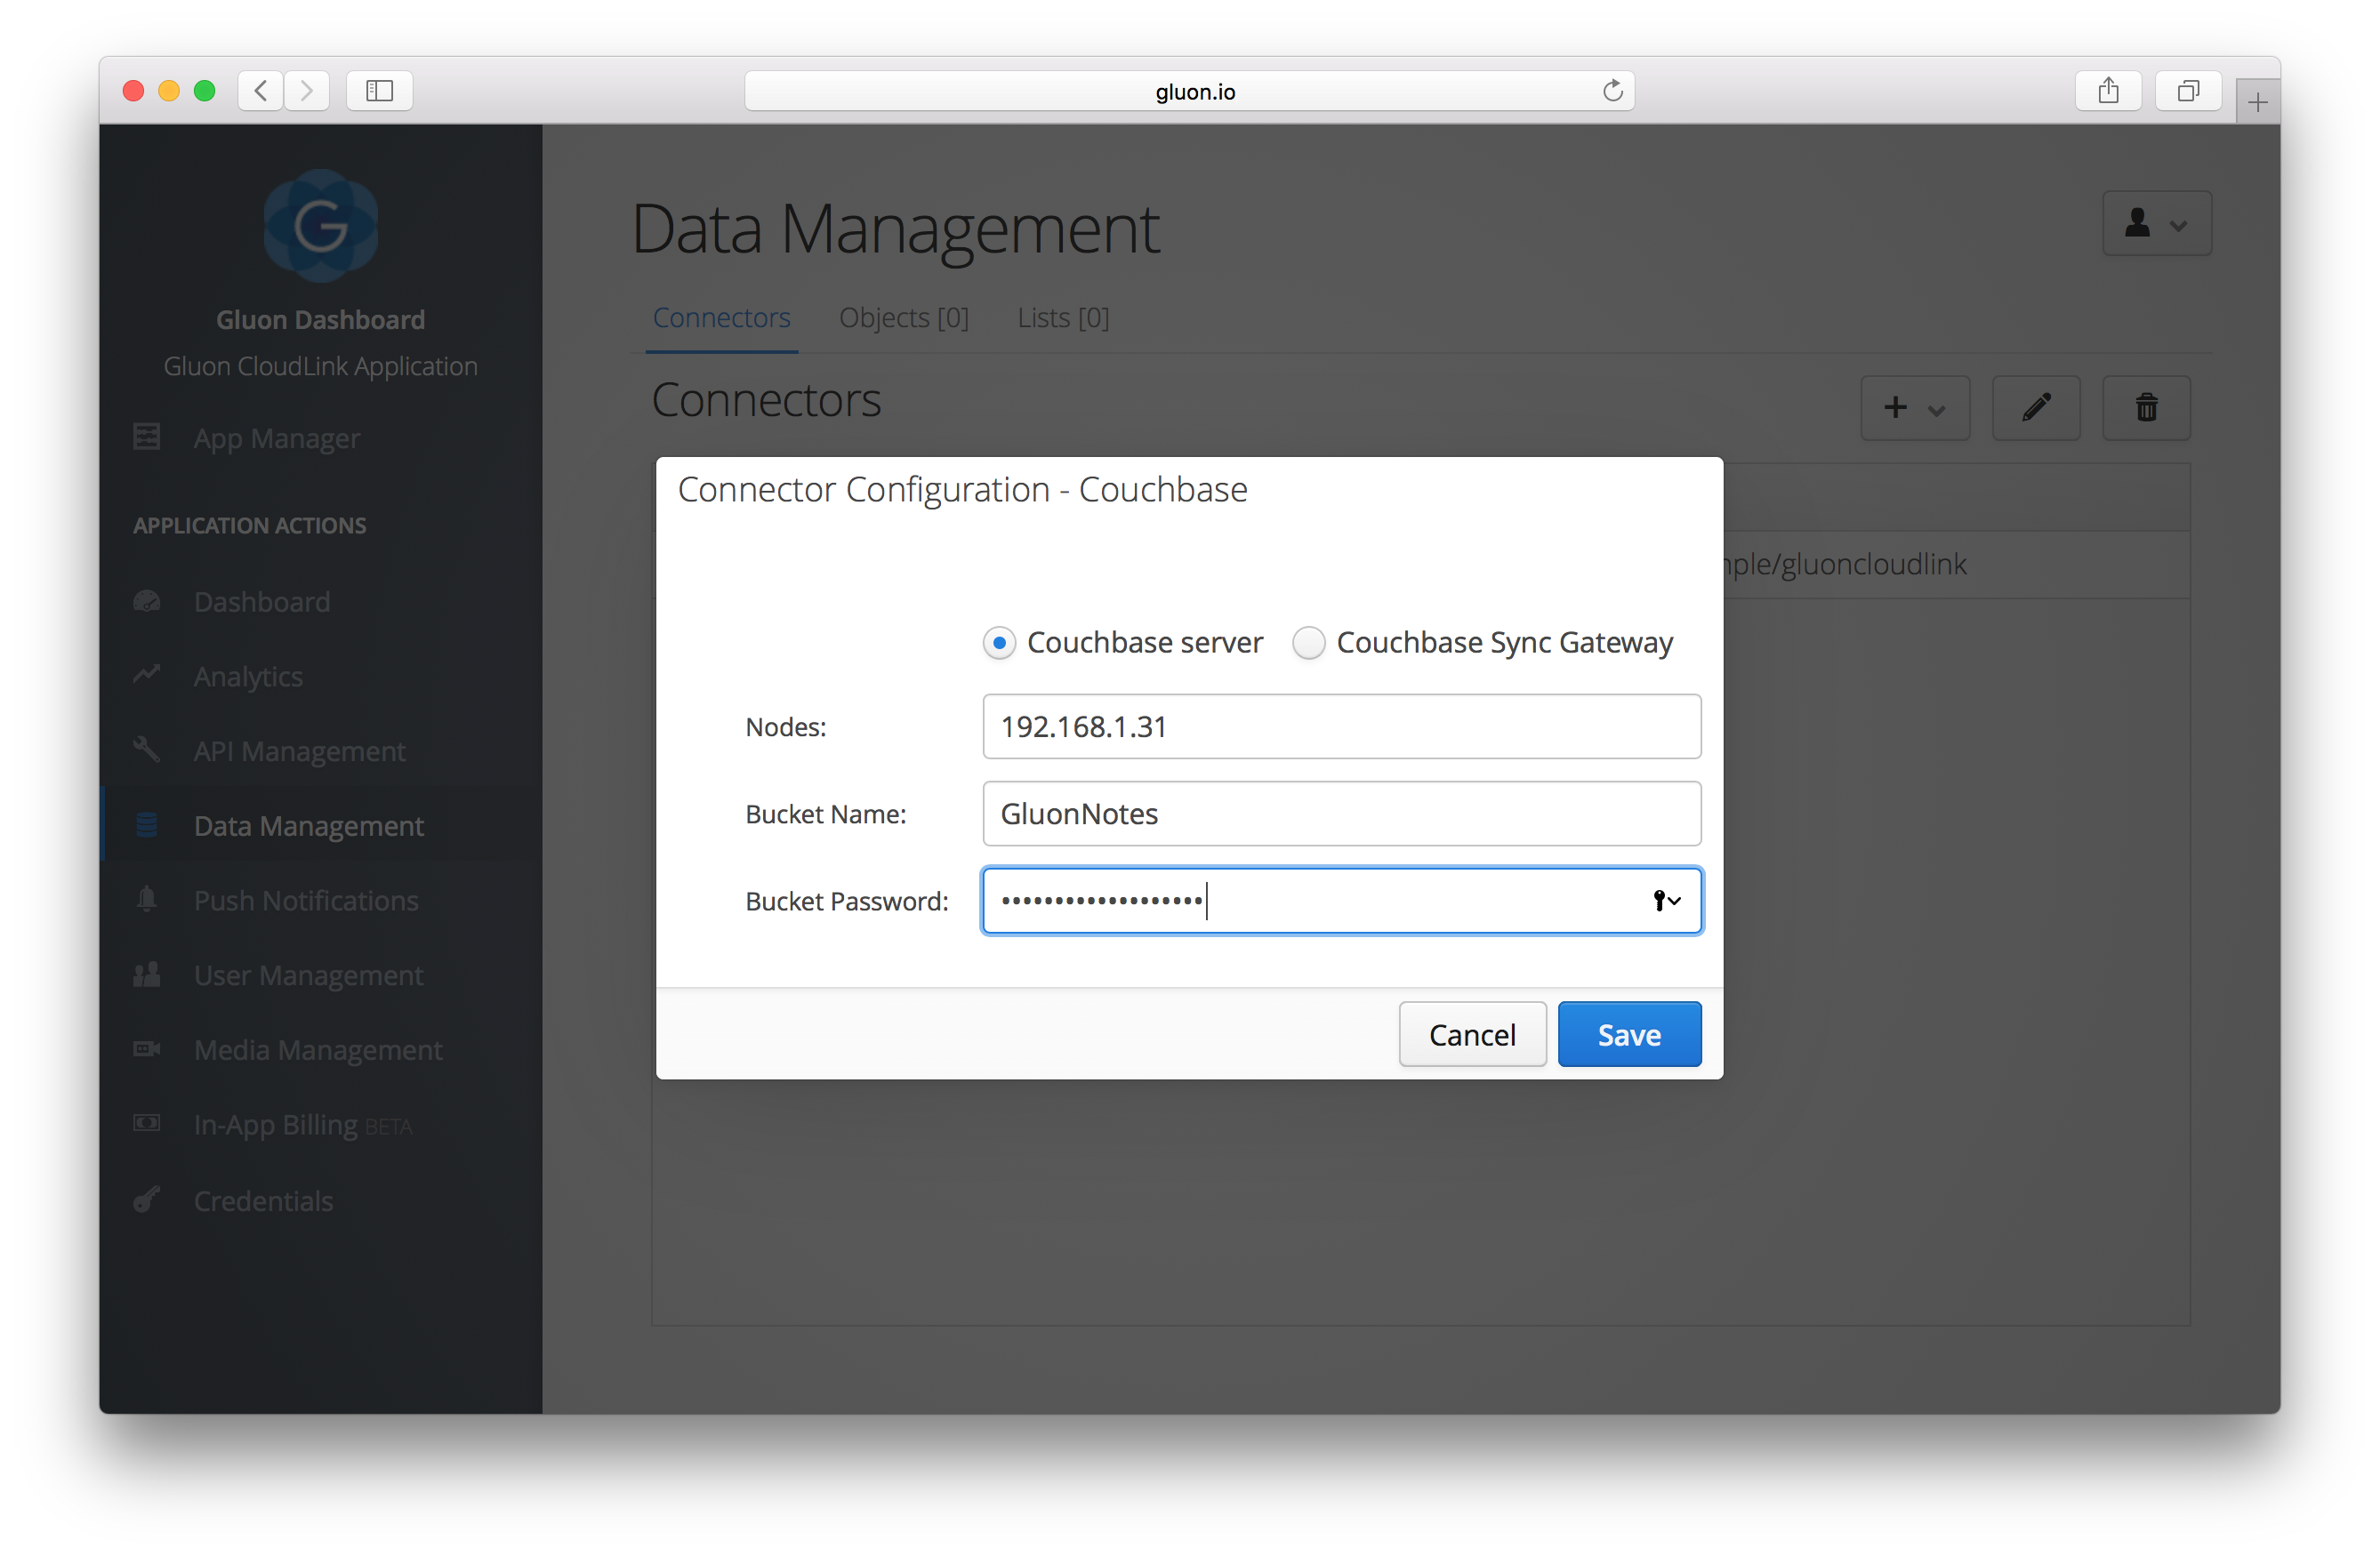
When activating the Couchbase Connector inside the Dashboard, you will need to provide the following information to let Gluon CloudLink be able to setup a connection with the Couchbase Server:
-
Nodes: a list of nodes that the Couchbase Client on Gluon CloudLink uses to setup the connection to a Couchbase Cluster. You can specify more than one node, by separating them with a semicolon.
-
Bucket Name: the name of the Couchbase bucket that will hold the lists and/or objects
-
Bucket Password: the password of that Couchbase bucket
Pushing Objects
Objects are stored in the Couchbase bucket using a key named objects/{objectIdentifier}, where objectIdentifier
is the identifier that is passed in by the client application when storing or retrieving the object.
The document itself will be a JSON document that represents the JSON payload of the object. An example of such an object can be seen below:
{
  "fontSize": 10,
  "sortingId": 2,
  "ascending": true,
  "showDate": false
}
Pushing Lists
Lists are also stored as a document with a key named lists/{listIdentifier}, where listIdentifier is the identifier
that is passed in by the client application when retrieving the list.
For each object in the list, the document will contain a key that matches the identifier of the object. The value that is mapped to that key is a JSON document that represents the JSON payload of the object. Below is an example of a list that contains two objects:
{
  "af52f4c6-a64b-4823-b9fb-3cbef79d7577": {
    "creationDate": 1463062055,
    "title": "new note",
    "text": "sample 2"
  },
  "f880774a-20e9-11e6-b67b-9e71128cae77": {
    "creationDate": 1463054952,
    "title": "another note",
    "text": "and also another sample text"
  }
}
Pulling Data
Gluon CloudLink can also pull data from the same Couchbase Server when a list and/or object is retrieved that is not
yet known within the Gluon CloudLink data store. It will try to retrieve a list or object from the configured bucket,
by using the same identifiers as described in the push section above: lists/{listIdentifier} for lists and
objects/{objectIdentifier} for objects. The format of the documents stored inside the Couchbase bucket must also
follow the same format as described in the previous section.
5. Remote Functions
Almost all mobile applications that exist today interact with a back end infrastructure for managing their data. In theory, an application can directly make requests to these back ends, but there are a number of drawbacks for doing this:
-
Mobile devices are not always connected to the internet. It takes lots of boilerplate code to check connectivity and handle rescheduling of requests when connectivity is restored.
-
Applications on mobile devices have specific lifecycles and need to behave according to specific policies. Some resources are conditionally available. The battery might be low, the application might be running in the background, the device is connected with a paid cellular network, etc. Depending on those conditions, an application must behave differently.
-
Mobile devices have less resources than the regular server, and those resources need to shared with other applications.
CloudLink provides Remote Functions to give the application a reliable and secure way for linking with existing back end systems.
5.1. Managing Remote Functions
Managing remote functions is done in the API Management section of the Gluon Dashboard. Each remote function is uniquely identified by a name. This name will be used in the client application when it makes a call to the defined remote function.
Sign in to the Gluon Dashboard and navigate to API Management. You will find the following sections:
-
Functions: this is where the remote functions are configured
-
Authentication: in here different authentication schemes can be created that are used when authentication is required by a remote function
-
Call Log: logging information for calls that are made to a remote function
5.1.1. Remote Function Types
We currently support the following types to choose from when creating a new remote function:
-
HTTP Request: executes an HTTP request based on the configured parameters
-
Amazon AWS Lambda: calls an Amazon AWS Lambda function
-
Azure Function: calls a Microsoft Azure Function
-
Fn Project Function: invoke a function on Fn
-
Gluon Function: invoke a function that is running on Gluon CloudLink
5.1.2. Create Remote Functions - HTTP Request
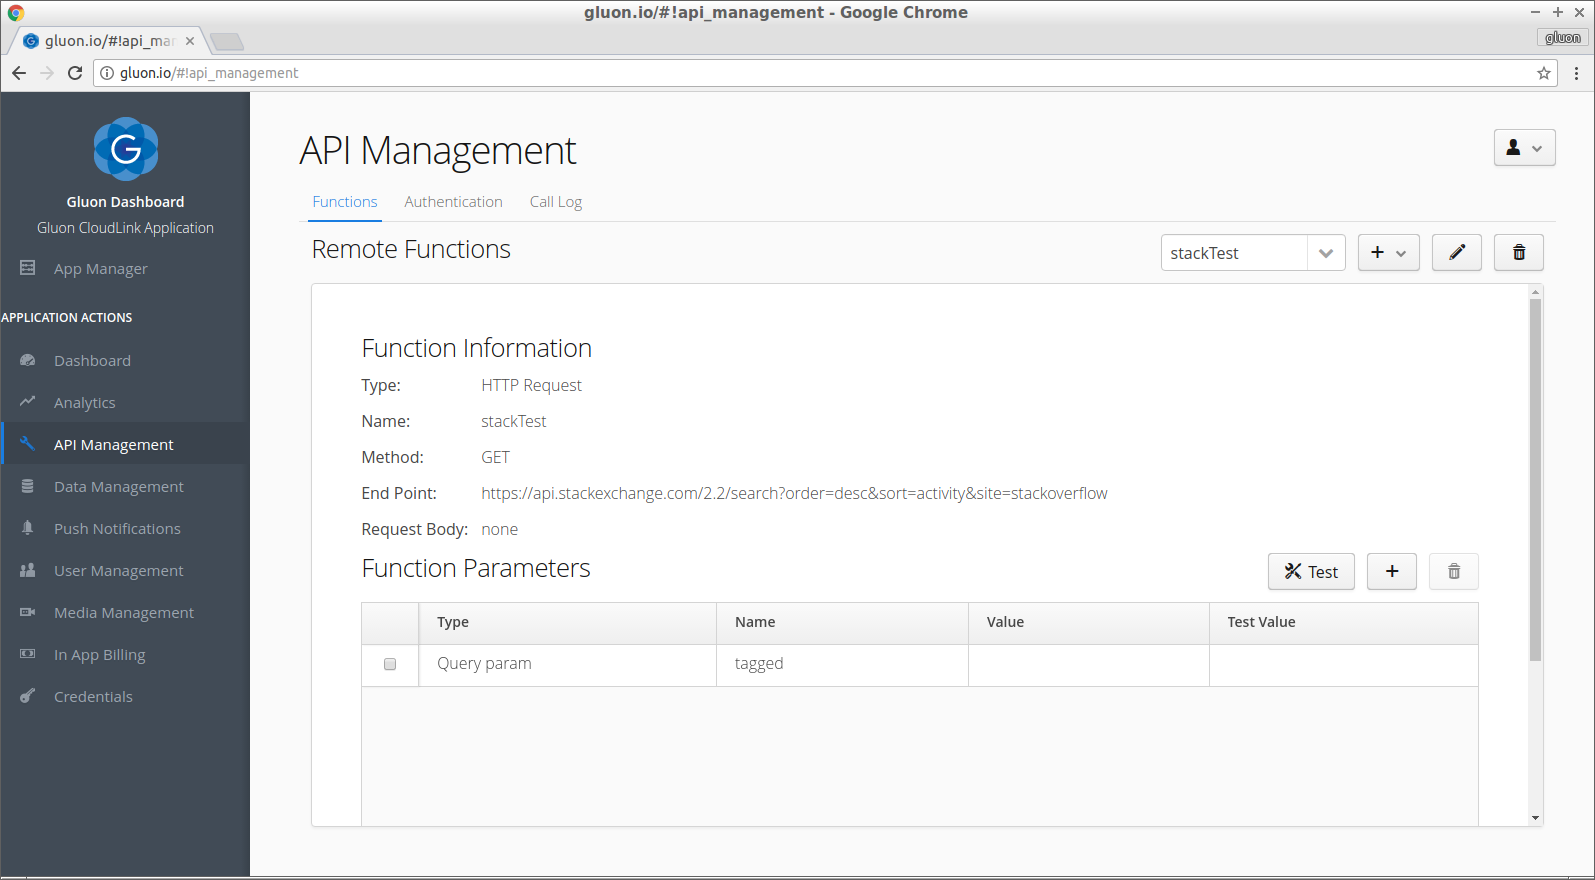
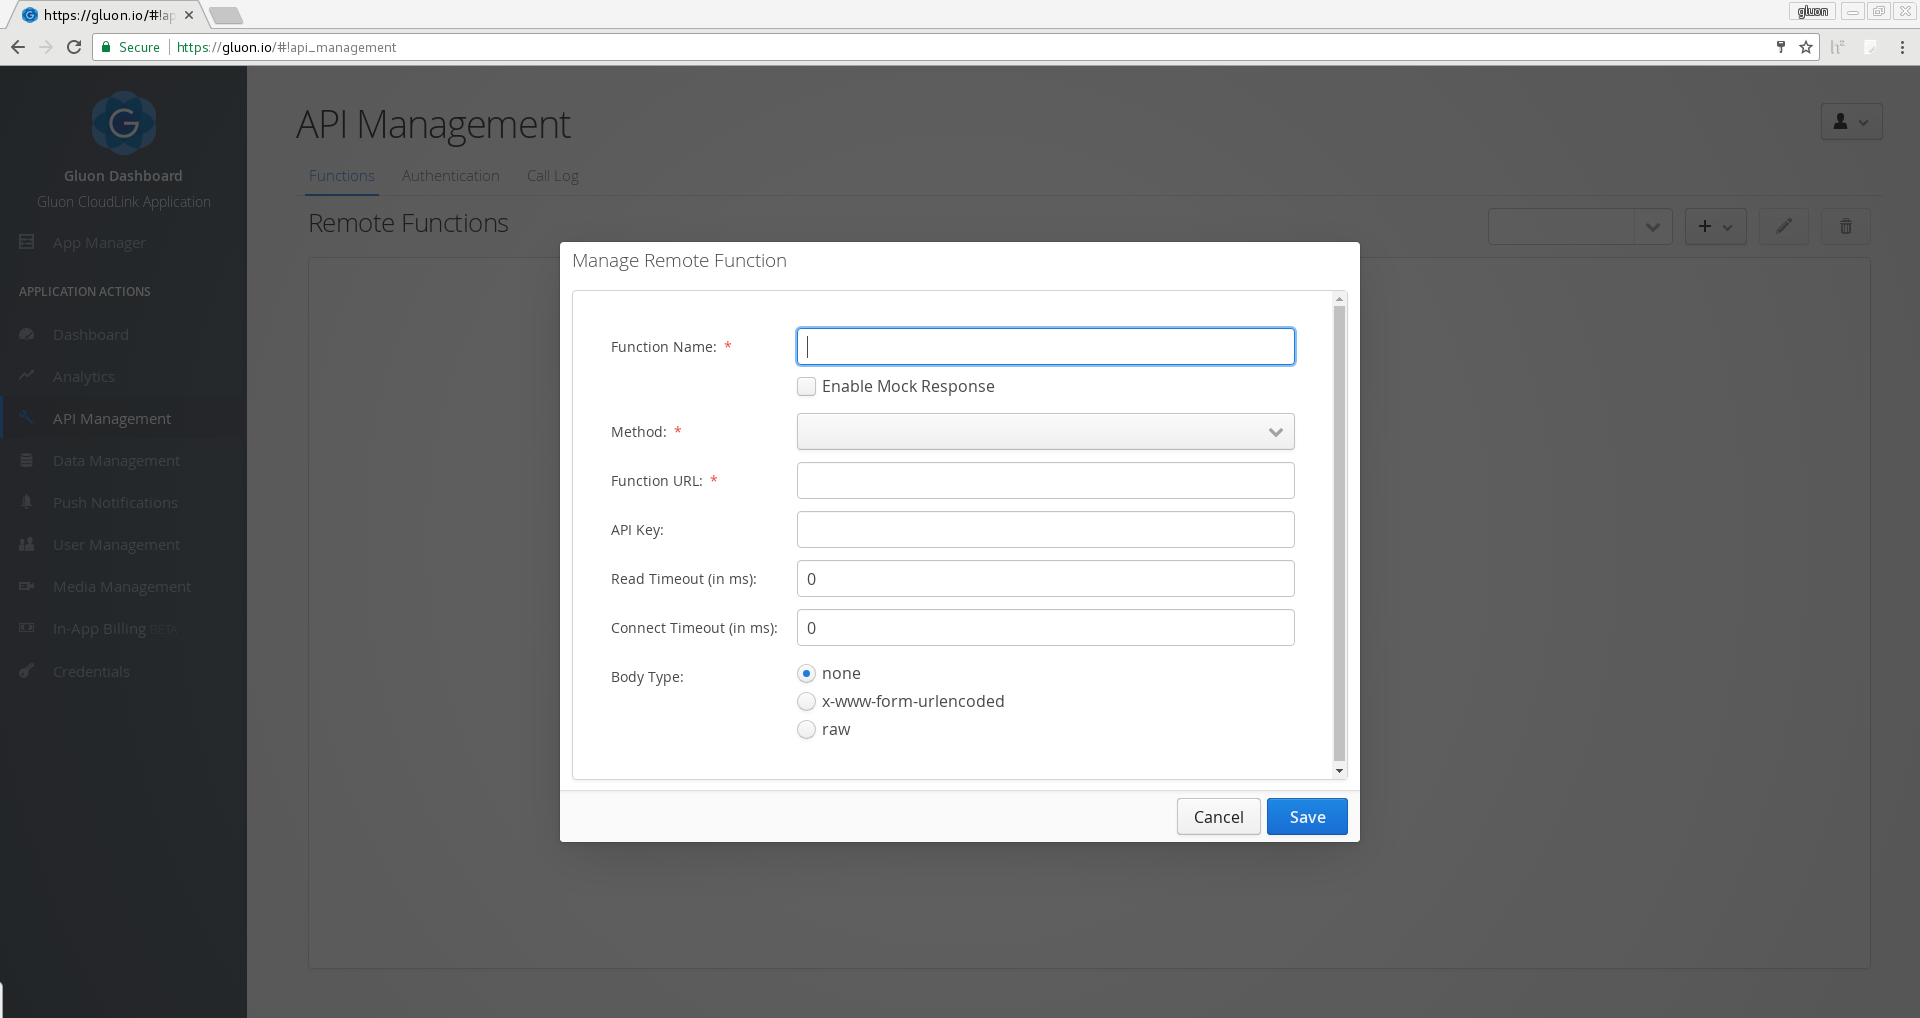
Click the + button to add a new remote function and choose HTTP Request. A dialog will be shown where the following components can be configured:
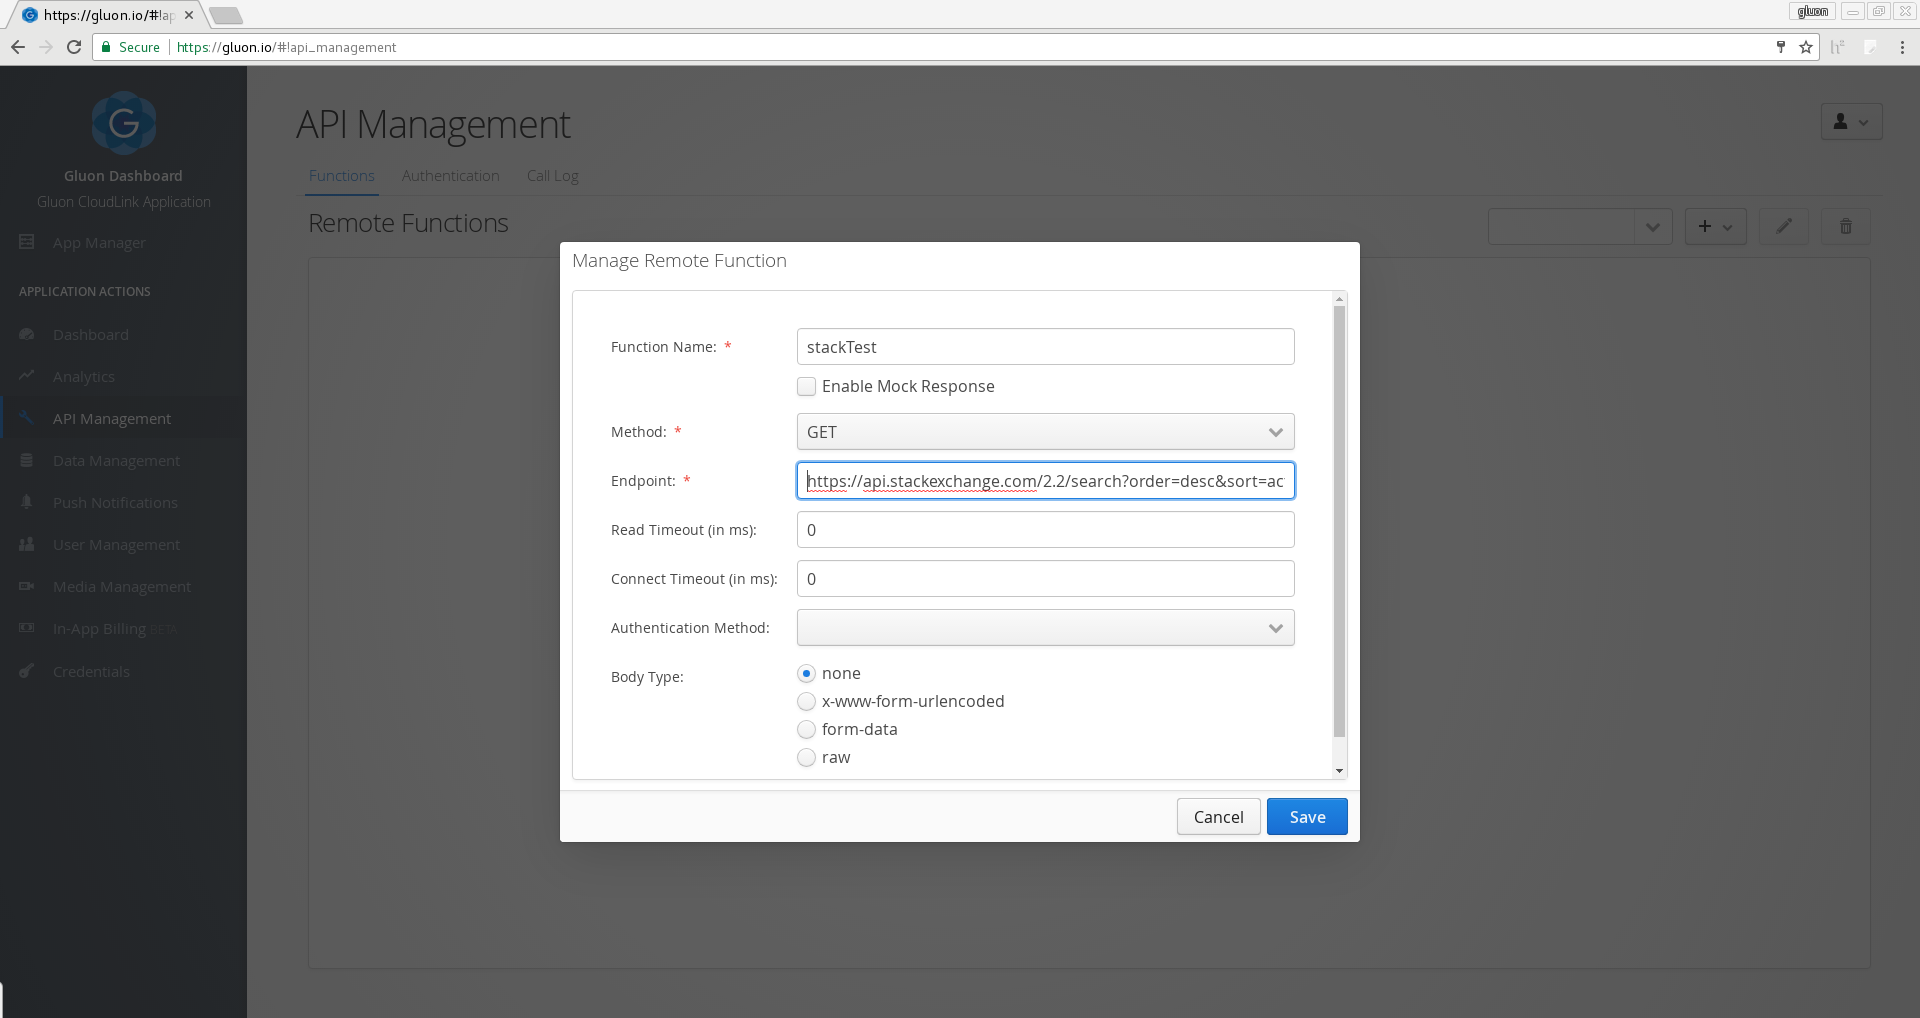
Function Name
The function name is a unique identifier for the remote function. The name is used in the client application when a call needs to be triggered to the remote function.
Enable Mock Response
Mock responses can be enabled for testing purposes. When mocking is enabled, a call to the remote function will not create a request to the actual configured endpoint, but respond directly with the data that is defined for the mock response.
Method
The method defines what HTTP method to use when creating the request. The following methods are supported: GET, POST, PUT and DELETE.
Endpoint
The endpoint is the URI to use when creating the request.
Read Timeout
Specify the timeout, in milliseconds, for reading from the remote function endpoint. If the value is zero, the default timeout will be used.
Connect Timeout
Specify the timeout, in milliseconds, for connecting to the remote function endpoint. If the value is zero, the default timeout will be used.
Authentication Method
Specifies the authentication method that must be used when executing the request to the remote function. The authentication method can be selected from a list of authentication methods that are configured in the Authentication section.
Body Type
The body type can be specified when the POST or PUT method is selected. The body type defines what kind of data will be sent to the remote function. The following types are supported:
-
none: the request will be sent without a request body
-
x-www-form-urlencoded: for sending form url encoded requests
-
form-data: for sending form data multipart requests
-
raw: for sending raw text, i.e a json string
When the raw body type is chosen, two extra fields will be available to specify the data and the media type of the raw body content.
Caching Enabled
If caching is enabled, CloudLink caches each successful response from invocations to the remote function for one hour. CloudLink caching rules are based on standard HTTP caching mechanisms. In closer detail, two HTTP response headers are currently inspected:
-
ETag: if an entity tag is provided, it will be used in any subsequent request to the configured endpoint for cache validation.
-
Cache-Control: if cache control contains the words
privateorno-store, the response is not cached. If it containspublic(default value) or amax-agevalue, the response is cached for the specified duration.
Both HTTP response headers can be combined to improve the caching mechanism.
5.1.3. Create Remote Functions - Amazon AWS Lambda
Before you can create a remote function for an AWS Lambda function, you need to add customer credentials that point to a valid Amazon AWS access key. Navigate to the Credentials section in Gluon Dashboard and choose the Customer tab. Add new credentials by clicking the + button and choose AWS Access Key. Enter the required information.
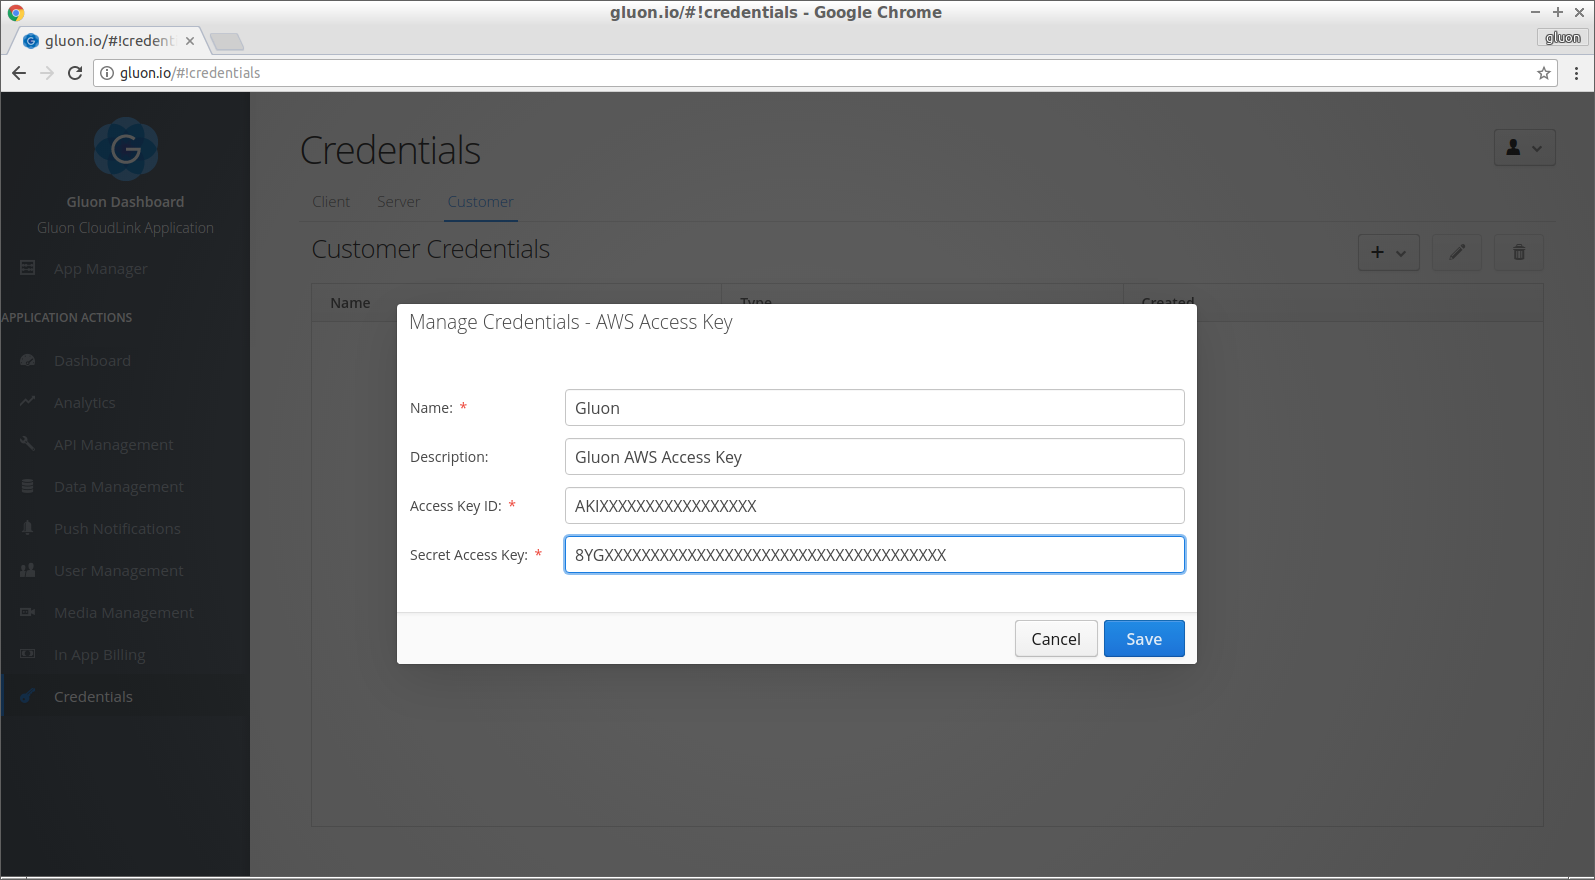
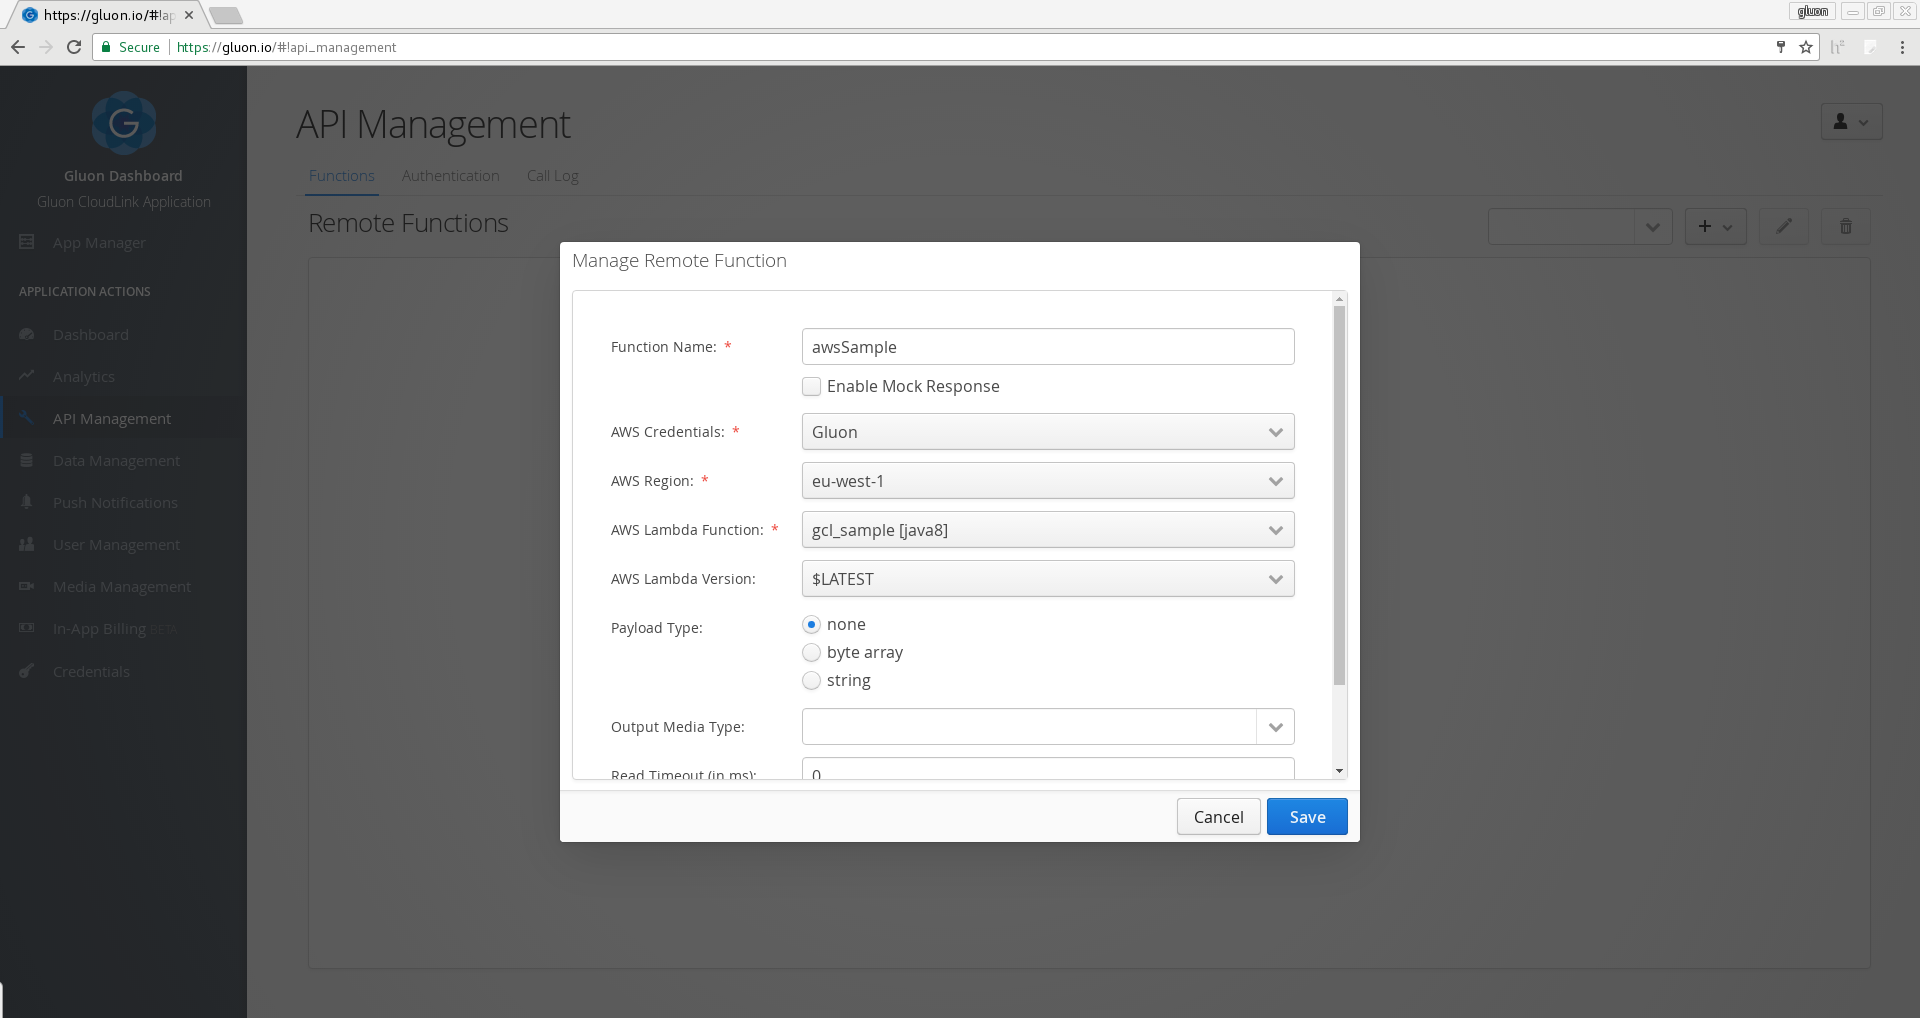
Navigate back to the API Management section and click the + button to add a new remote function while choosing Amazon AWS Lambda. A dialog will be shown where the following components can be configured:
Function Name
The function name is a unique identifier for the remote function. The name is used in the client application when a call needs to be triggered to the remote function.
Enable Mock Response
Mock responses can be enabled for testing purposes. When mocking is enabled, a call to the remote function will not create a request to the actual configured endpoint, but respond directly with the data that is defined for the mock response.
AWS Credentials
The AWS Access Key to use when listing the available AWS Lambda functions.
AWS Region
The AWS region where the AWS Lambda functions must be listed from.
AWS Lambda Function
The actual AWS Lambda function to link with this remote function.
AWS Lambda Version
An optional specific version of the AWS Lambda function that must be executed. Leaving this empty will use the default $LATEST version of the chosen AWS Lambda function.
Payload Type
An optional payload that should be sent along when executing the AWS Lambda function. The following types are supported:
-
none: no payload will be sent with the call
-
byte array: sends an array of raw bytes encoded as a Base64 string, useful when sending binary data from the client
-
string: useful for sending plain text
Payload Variable Name
When the selected payload type is string or byte array, you can specify the variable name of the payload. The payload is passed down to the AWS Lambda function as a JSON object containing the variable name as a key. When the payload type is string, the value mapped with the key will be the JSON value that is loaded from the Payload string that can be specified in the text area below. If the payload type is byte array, then the JSON value will be a Base64 encoded string of the passed in array of bytes.
Payload
When the string payload type is chosen, an extra text area will be available to specify the data for the string content. The resulting data string must be valid JSON. If this is not the case, the request to the remote function will be aborted with a Bad Request status.
Output Media Type
Defines the expected media type of the response from the AWS Lambda function. If left empty, the default value of text/plain will be used instead.
Read Timeout
Specify the timeout, in milliseconds, for reading from the remote function endpoint. If the value is zero, the default timeout will be used.
Connect Timeout
Specify the timeout, in milliseconds, for connecting to the remote function endpoint. If the value is zero, the default timeout will be used.
5.1.4. Create Remote Functions - Azure Function
Configure a remote function that can invoke a Microsoft Azure function with an http trigger. Click the + button to add a new remote function and choose Azure Function. A dialog will be shown in which the following components can be configured:
Function Name
The function name is a unique identifier for the remote function. The name is used in the client application when a call needs to be triggered to the remote function.
Enable Mock Response
Mock responses can be enabled for testing purposes. When mocking is enabled, a call to the remote function will not create a request to the actual configured endpoint, but respond directly with the data that is defined for the mock response.
Method
The method defines what HTTP method to use when creating the request. The following methods are supported: GET, POST, PUT and DELETE.
Function URL
The Function URL that points to the Azure function.
API Key
Define the Function Key to use for authorizing the invocation to the Azure function. The key is passed down to the function using the x-functions-key HTTP header. Make sure that you copy the value of the Function Key and not its name. Azure functions using Anonymous authorization can leave this field empty.
Read Timeout
Specify the timeout, in milliseconds, for reading from the remote function endpoint. If the value is zero, the default timeout will be used.
Connect Timeout
Specify the timeout, in milliseconds, for connecting to the remote function endpoint. If the value is zero, the default timeout will be used.
Body Type
The body type can be specified when the POST or PUT method is selected. The body type defines what kind of data will be sent to the remote function. The following types are supported:
-
none: the request will be sent without a request body
-
x-www-form-urlencoded: for sending form url encoded requests
-
raw: for sending raw text, i.e a json string
When the raw body type is chosen, two extra fields will be available to specify the data and the media type of the raw body content.
5.1.5. Create Remote Functions - Fn Project Function
These are remote functions that are configured to run on the Fn Project platform. Your Fn function must be available from a public registry on Docker Hub. Click the + button to add a new remote function and choose Fn Project Function. A dialog will be shown in which the following components can be configured:
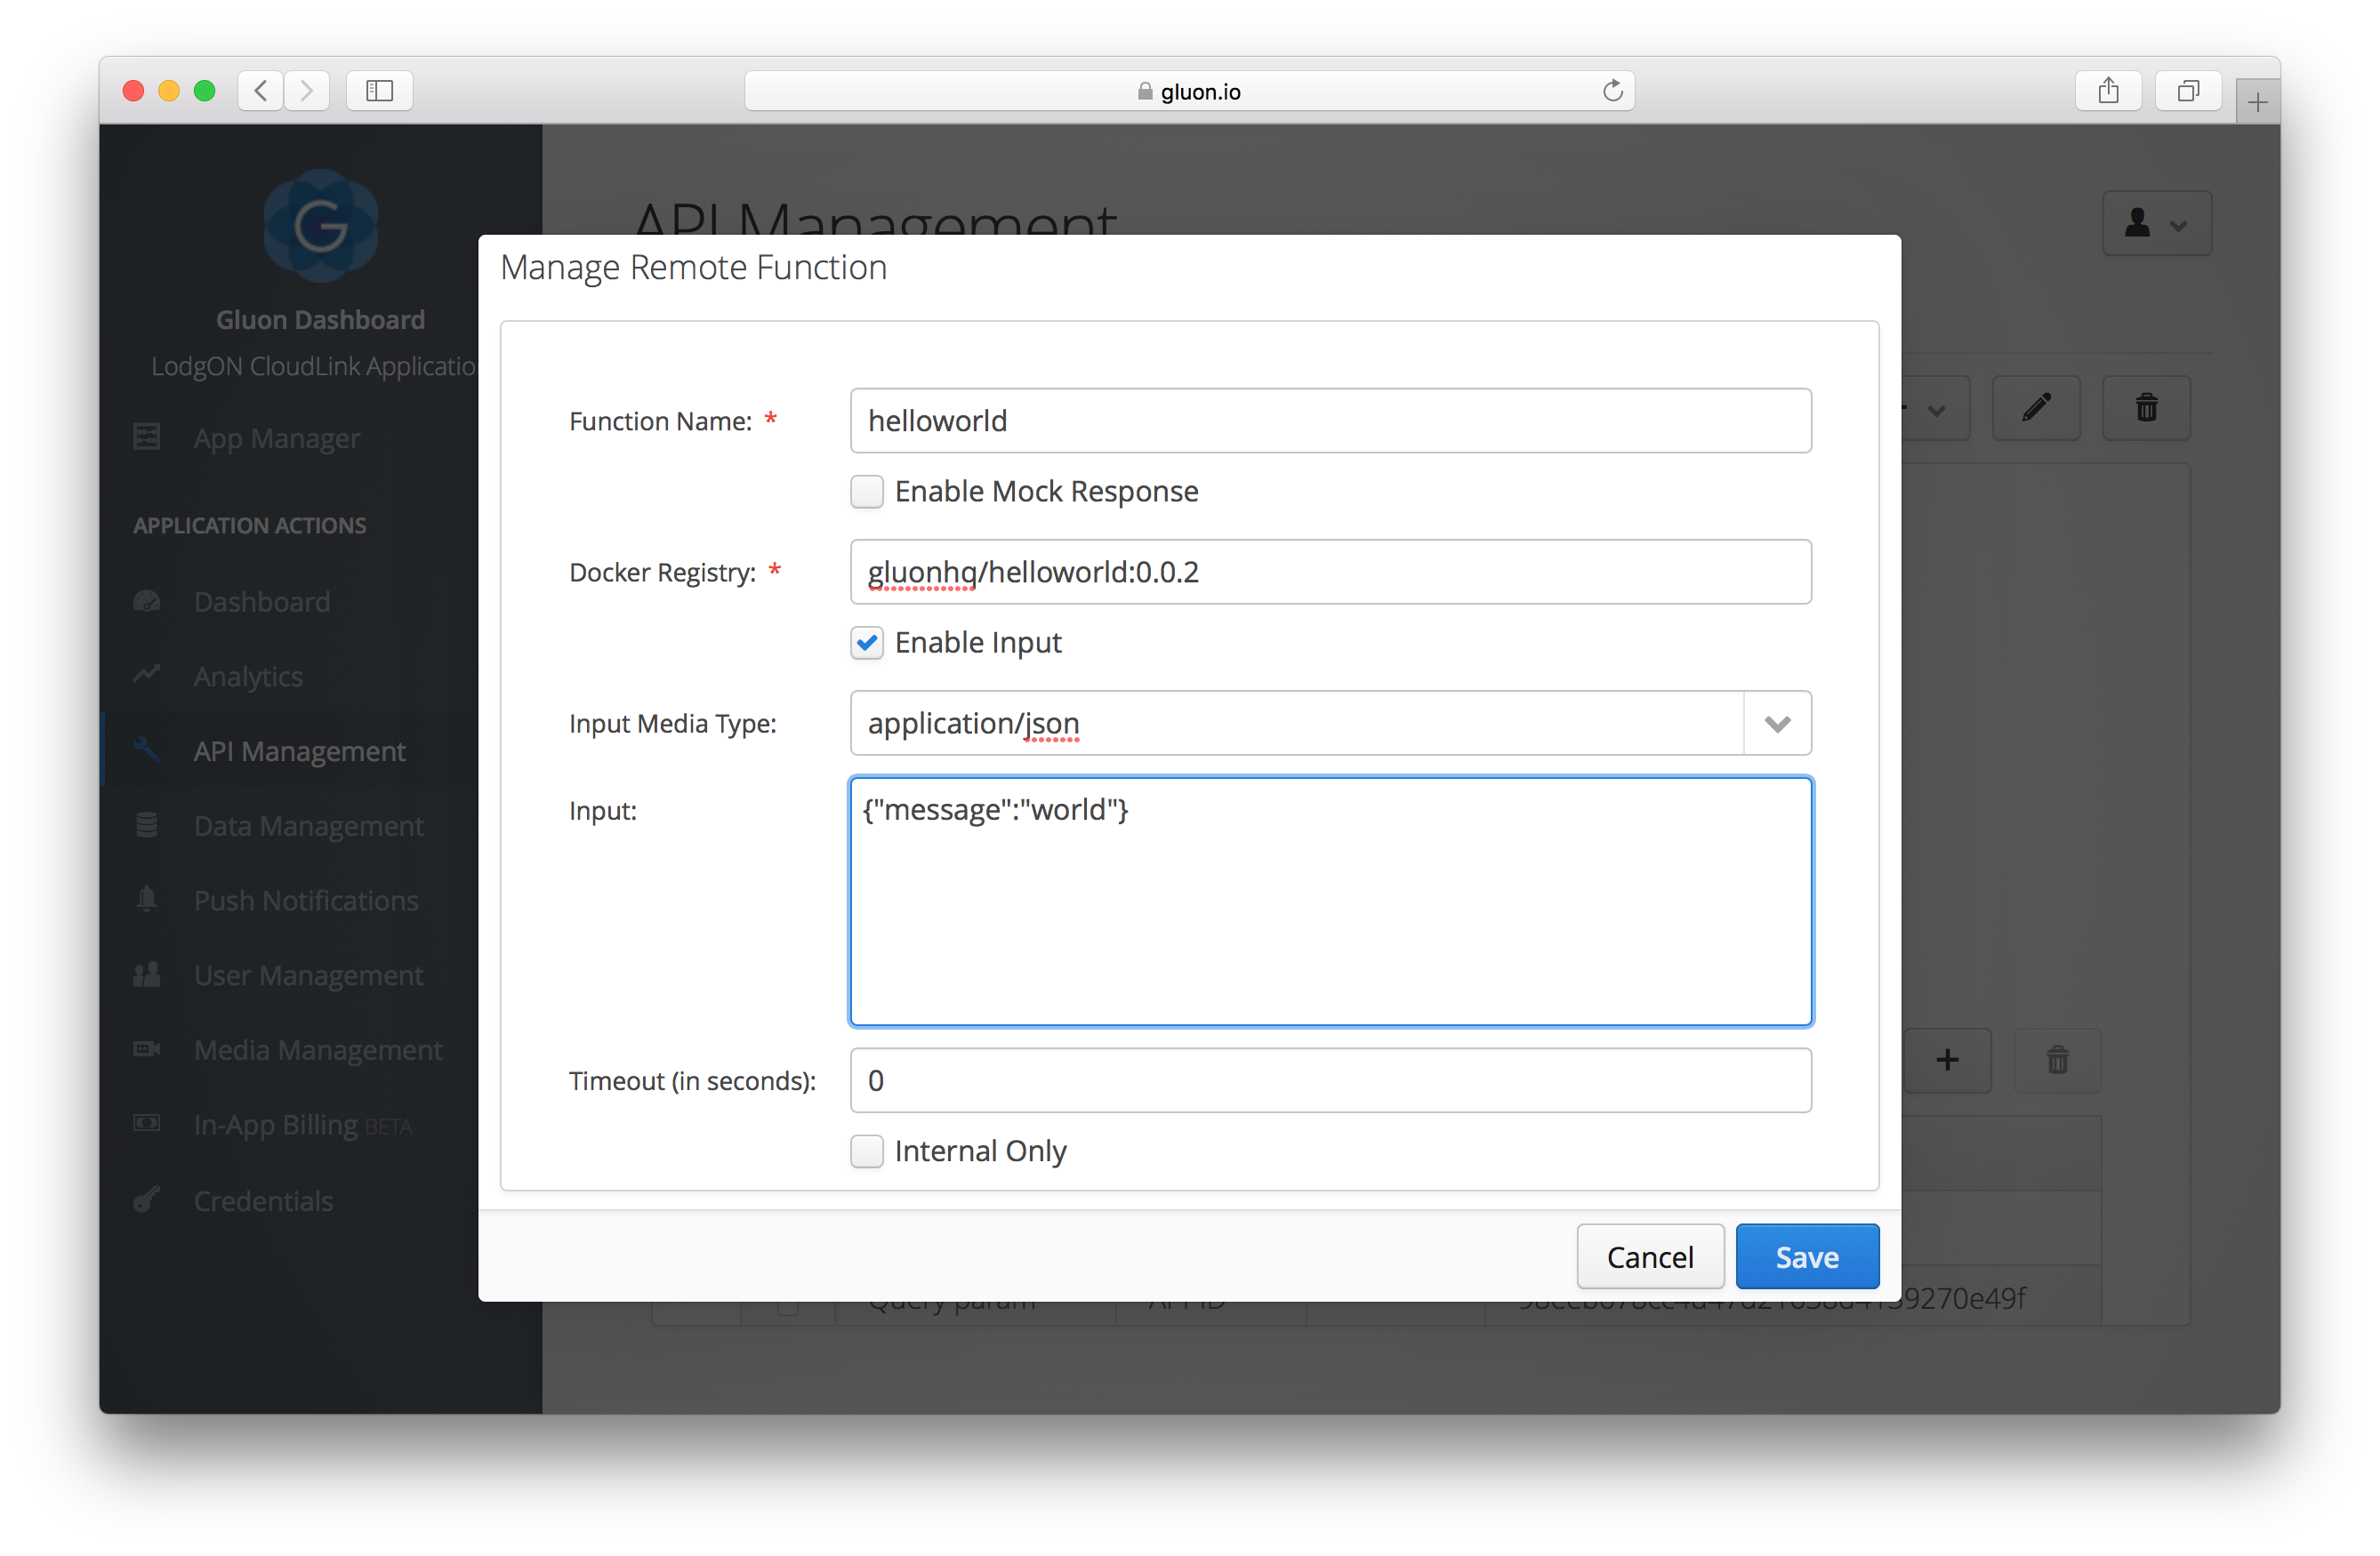
Function Name
The function name is a unique identifier for the remote function. The name is used in the client application when a call needs to be triggered to the remote function.
Enable Mock Response
Mock responses can be enabled for testing purposes. When mocking is enabled, a call to the remote function will not create a request to the actual configured endpoint, but respond directly with the data that is defined for the mock response.
Docker Registry
The name of the docker image as it has been pushed to Docker Hub. You can optionally specify a tag for the image, for instance: gluonhq/helloworld:0.0.2.
Enable Input
When input is enabled, two extra fields will be available to specify the data and the media type of the input. The content of the text area will be passed down to the Fn Function during invocation.
Timeout
Specify the timeout, in seconds, for executing the remote function on the Fn Project platform. If the value is zero, the default timeout will be used.
5.1.6. Create Remote Functions - Gluon Function
Gluon Functions allow you to run Java functions inside a serverless platform that is managed by Gluon CloudLink itself. All you need is a zip file that bundles all the runtime jar files that are needed for running the function. The Gluon IDE plugins assist you with creating and deploying of your Gluon Remote Functions.
Click the + button to add a new remote function and choose Gluon Function. A dialog will be shown in which the following components can be configured:
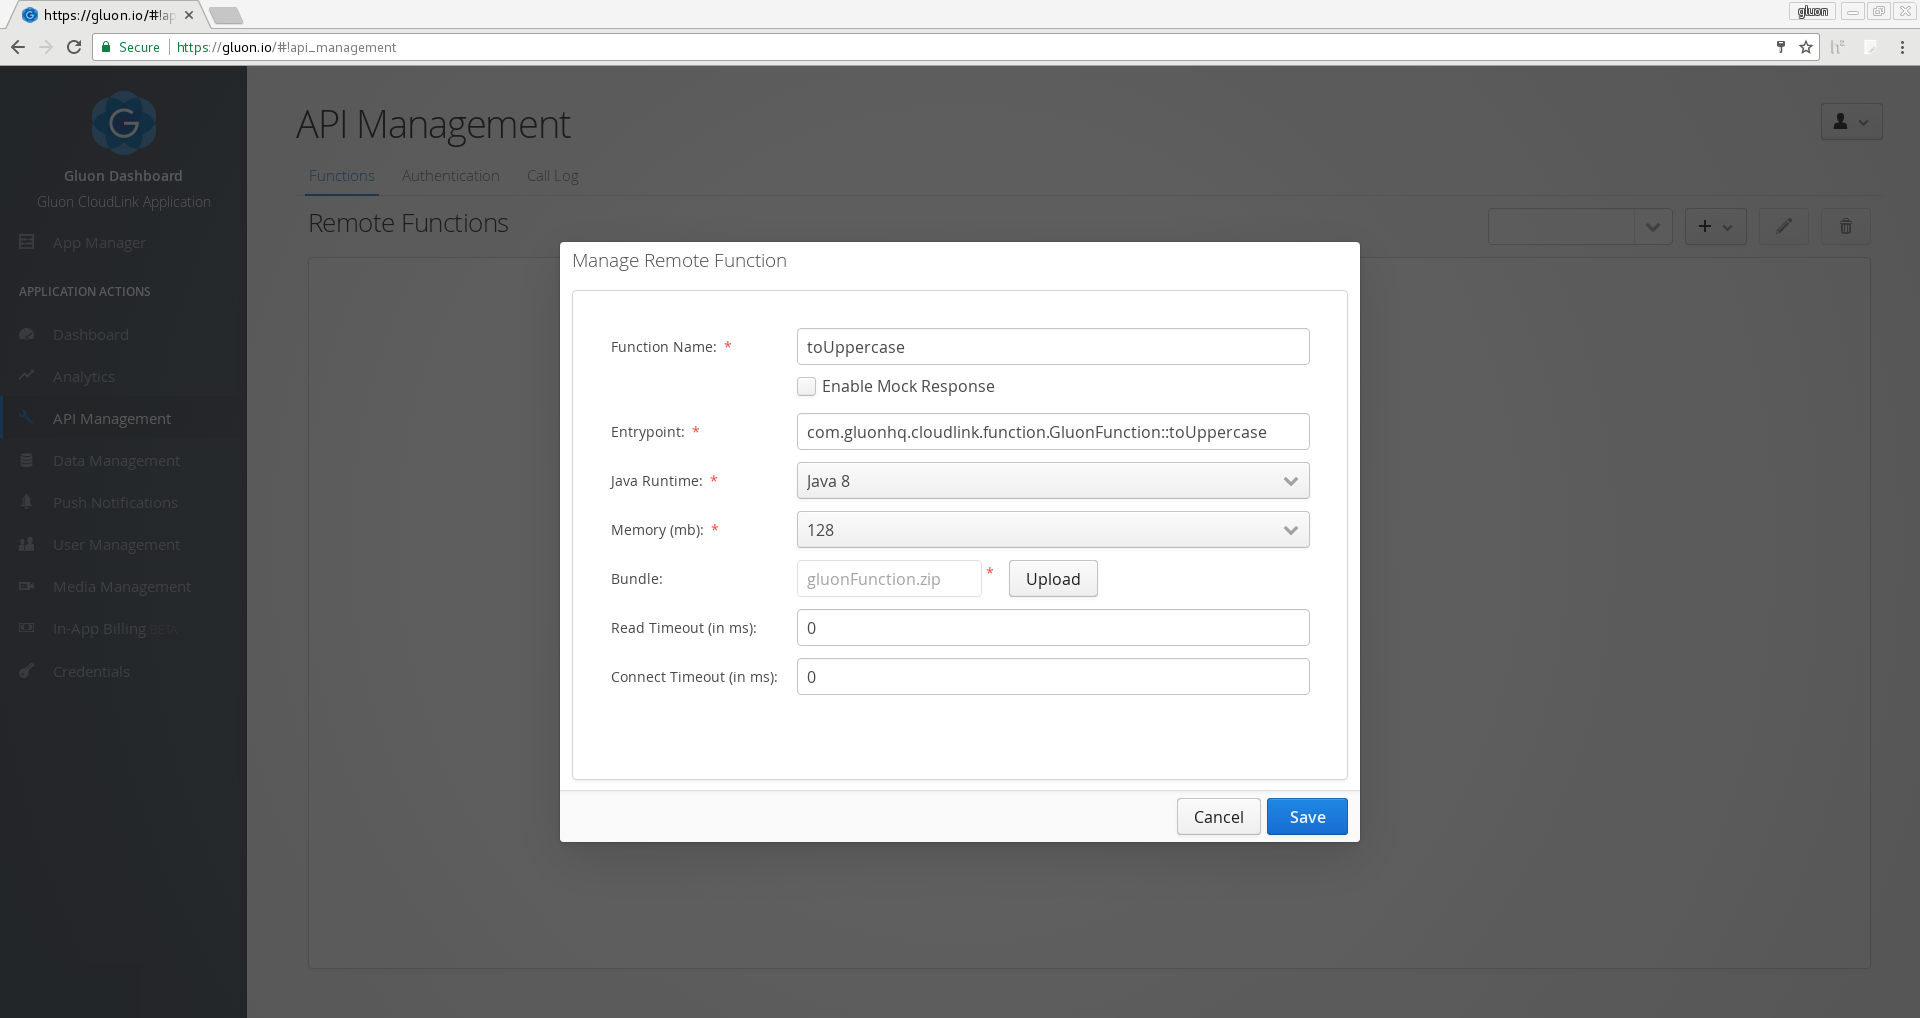
Function Name
The function name is a unique identifier for the remote function. The name is used in the client application when a call needs to be triggered to the remote function.
Enable Mock Response
Mock responses can be enabled for testing purposes. When mocking is enabled, a call to the remote function will not create a request to the actual configured endpoint, but respond directly with the data that is defined for the mock response.
Entrypoint
The entrypoint defines what method should be invoked when the Gluon Function is triggered. The
syntax consists of the fully qualified class name and the method name to be invoked, separated
with a double colon, i.e.: com.gluonhq.sample.function.GluonFunction::methodName
Java Runtime
Specify the Java Runtime environment that must be used for running the Gluon Function. You can choose between Java 8 and Java 9.
Memory
Define the maximum amount of memory that should be provided when running the Gluon Function. You can choose a value between 128MB and 1GB with intervals of 128MB.
Bundle
The bundle contains the actual classes that are needed for executing the Gluon Function. The bundle is a zip file containing one or more jar files that will be added to the classpath of the Gluon Function.
Read Timeout
Specify the timeout, in milliseconds, for reading from the remote function endpoint. If the value is zero, the default timeout will be used.
Connect Timeout
Specify the timeout, in milliseconds, for connecting to the remote function endpoint. If the value is zero, the default timeout will be used.
5.1.7. Parameters
Each remote function can be configured with additional parameters. Each parameter consists
of a type, a name and optional default and test values. The name is used by the client
application to define the value for the parameter that will be passed on when building the
request for the remote function. In the image below, a query parameter is configured with
the name tagged.
Double clicking inside the grid will activate the edit view for the selected function parameter.
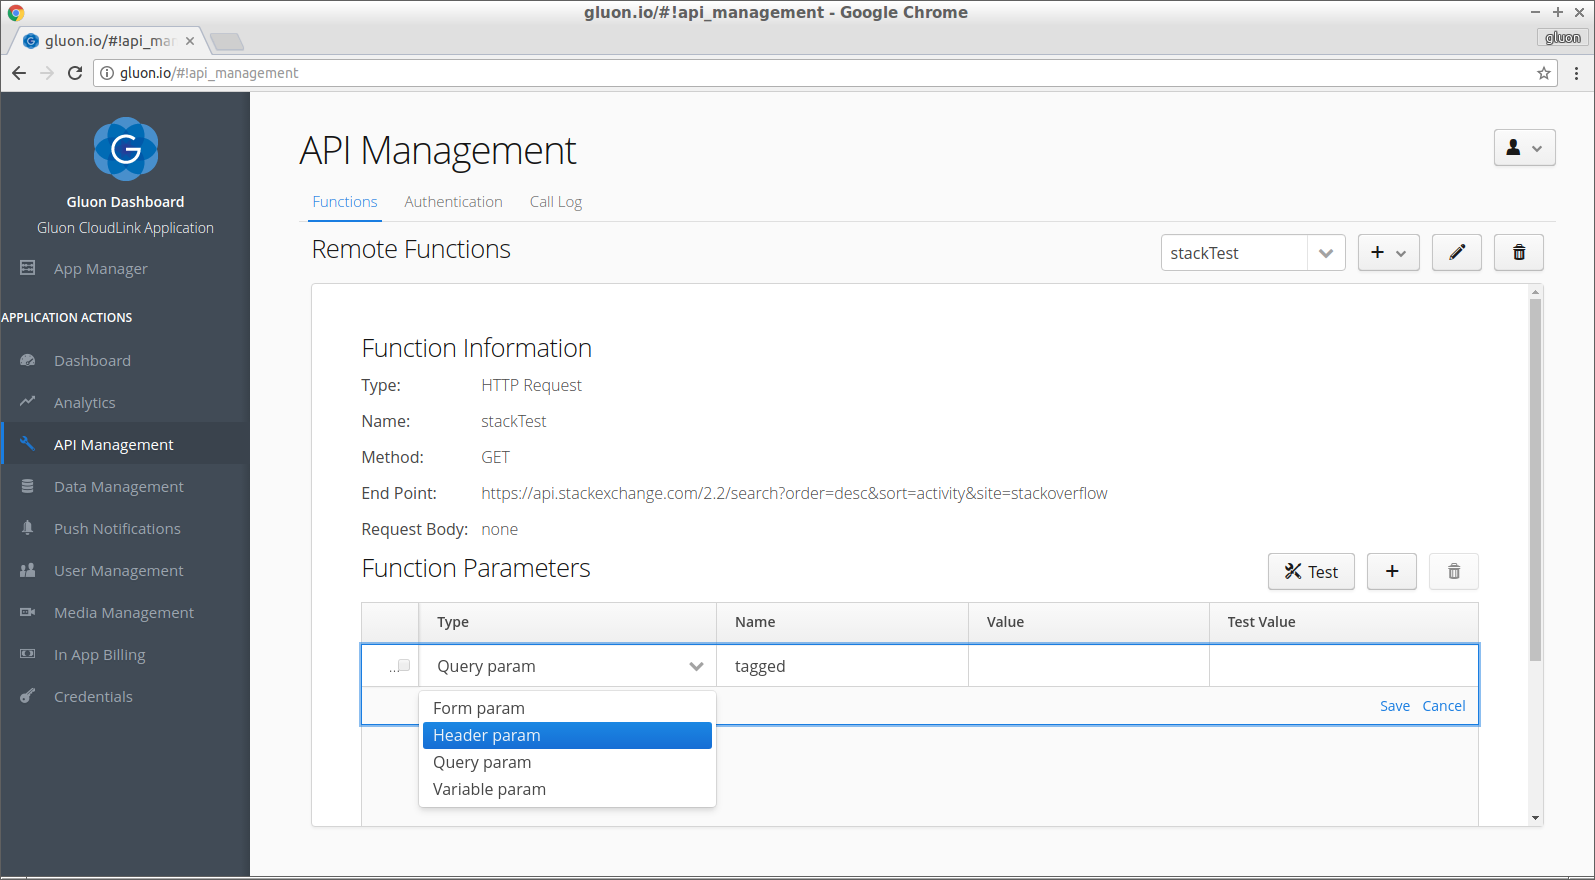
Four different types of parameters are currently supported.
Query
A query parameter will be sent as part of the query string. The query string is the part of the URI that comes after the question mark.
Note: only supported for remote functions of type HTTP Request
Form
A form parameter can be chosen for remote functions that are configured with the POST method. Form parameters are sent as form url encoded parameters in the body of the request.
Note: only supported for remote functions of type HTTP Request
Header
A header parameter can be used to send custom HTTP request headers when building the request for the remote function.
Note: only supported for remote functions of type HTTP Request
Variable
Variable parameters can be used to add custom variables to certain fields of a remote function. Remote functions of type HTTP Request can have custom variables in the Endpoint and Raw Data fields; Remote functions of type Amazon AWS Lambda can have custom variables in the Payload field. Also, each custom variable that is added to an Amazon AWS Lambda Remote Function will be passed along with the JSON payload as well.
For example, the following URI endpoint contains a single variable called userIdentifier:
https://foo.bar/user/$userIdentifier. The variable will be replaced with the value that
was passed on by the client application, before the actual request is executed.
5.2. Authentication
The endpoint of a remote function sometimes requires that the request is authenticated. The Authentication section provides three different authentication mechanisms that can be used together with a remote function.
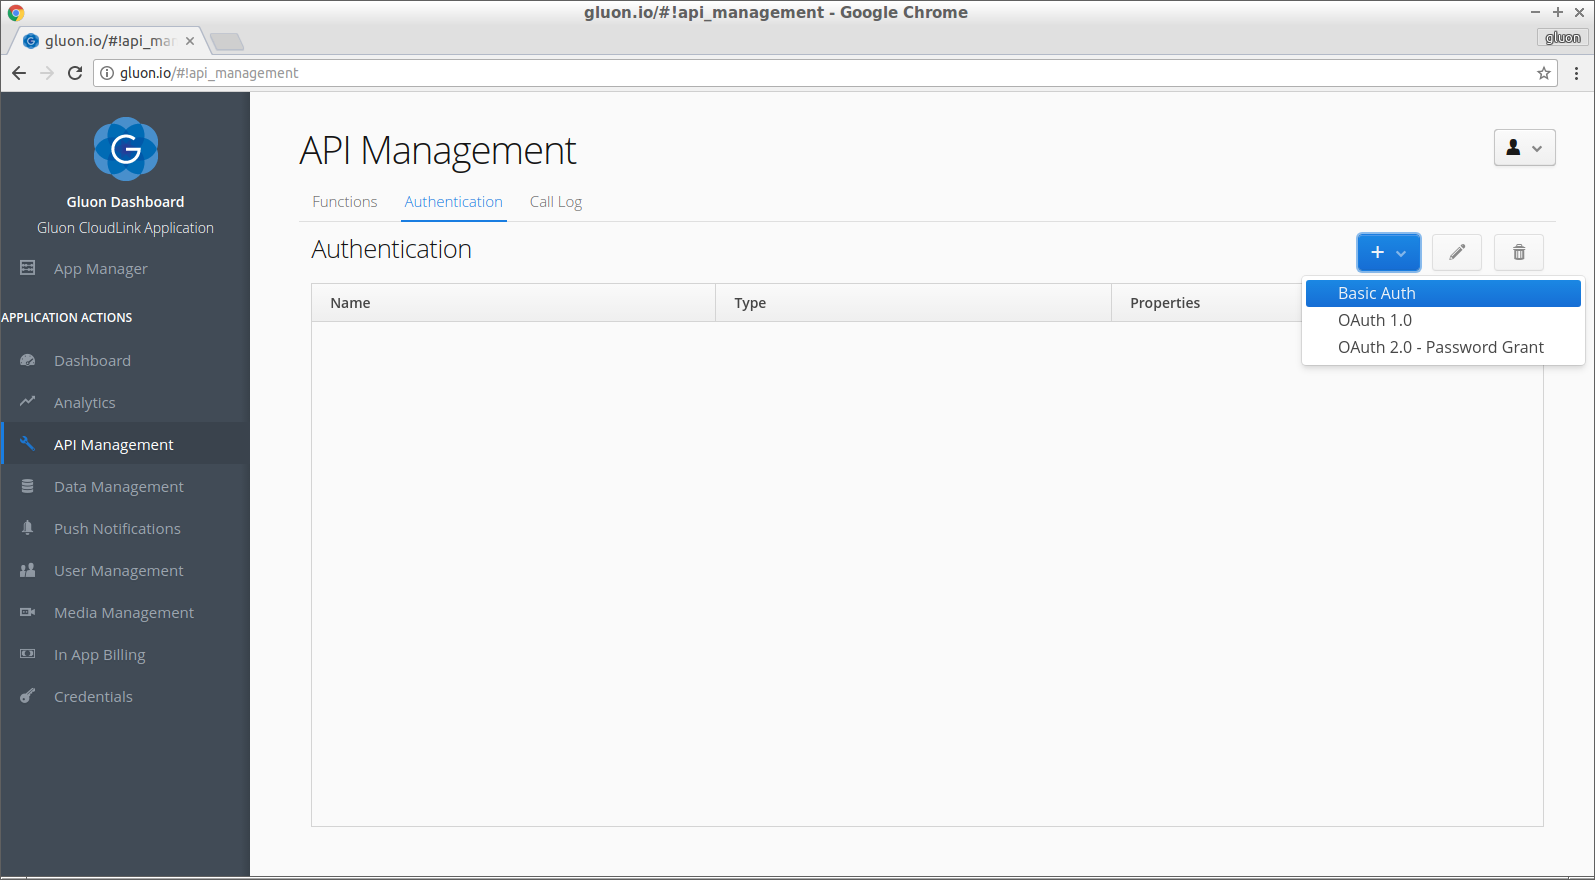
5.2.1. Basic Authentication
This will add a basic Authorization HTTP header when creating the request to the remote function. The username and password are both required.
5.2.2. OAuth 1.0 with Consumer Credentials
This authentication method will sign each request with the provided consumer key and secret using the HMAC-SHA1 signature method. See the OAuth 1.0 documentation on signing requests for more details: https://oauth.net/core/1.0a/#signing_process.
A token key and secret can be provided as well when necessary, but can be left empty if the endpoint only requires that the request must be signed with consumer credentials.
5.2.3. OAuth 2.0 with Password Credentials Grant
This authentication method will apply the Resource Owner Password Credentials authorization grant as defined in the OAuth 2.0 specificiation: https://tools.ietf.org/html/rfc6749#section-4.3.
When making a request to the defined endpoint of the remote function, it will first try to get an access token using the configuration details of the authentication method. The access token will then be passed along with the actual request to the endpoint of the remote function.
5.3. Calling Remote Functions
5.3.1. Testing
Each remote function can be tested from within Gluon Dashboard to ensure the configuration is valid. Each configured parameter has an optional test value that will be used when testing the remote function. When no test value is provided, the default value will be used instead.
When testing the remote function, the response of the endpoint will be printed so it can be verified against the expected value.
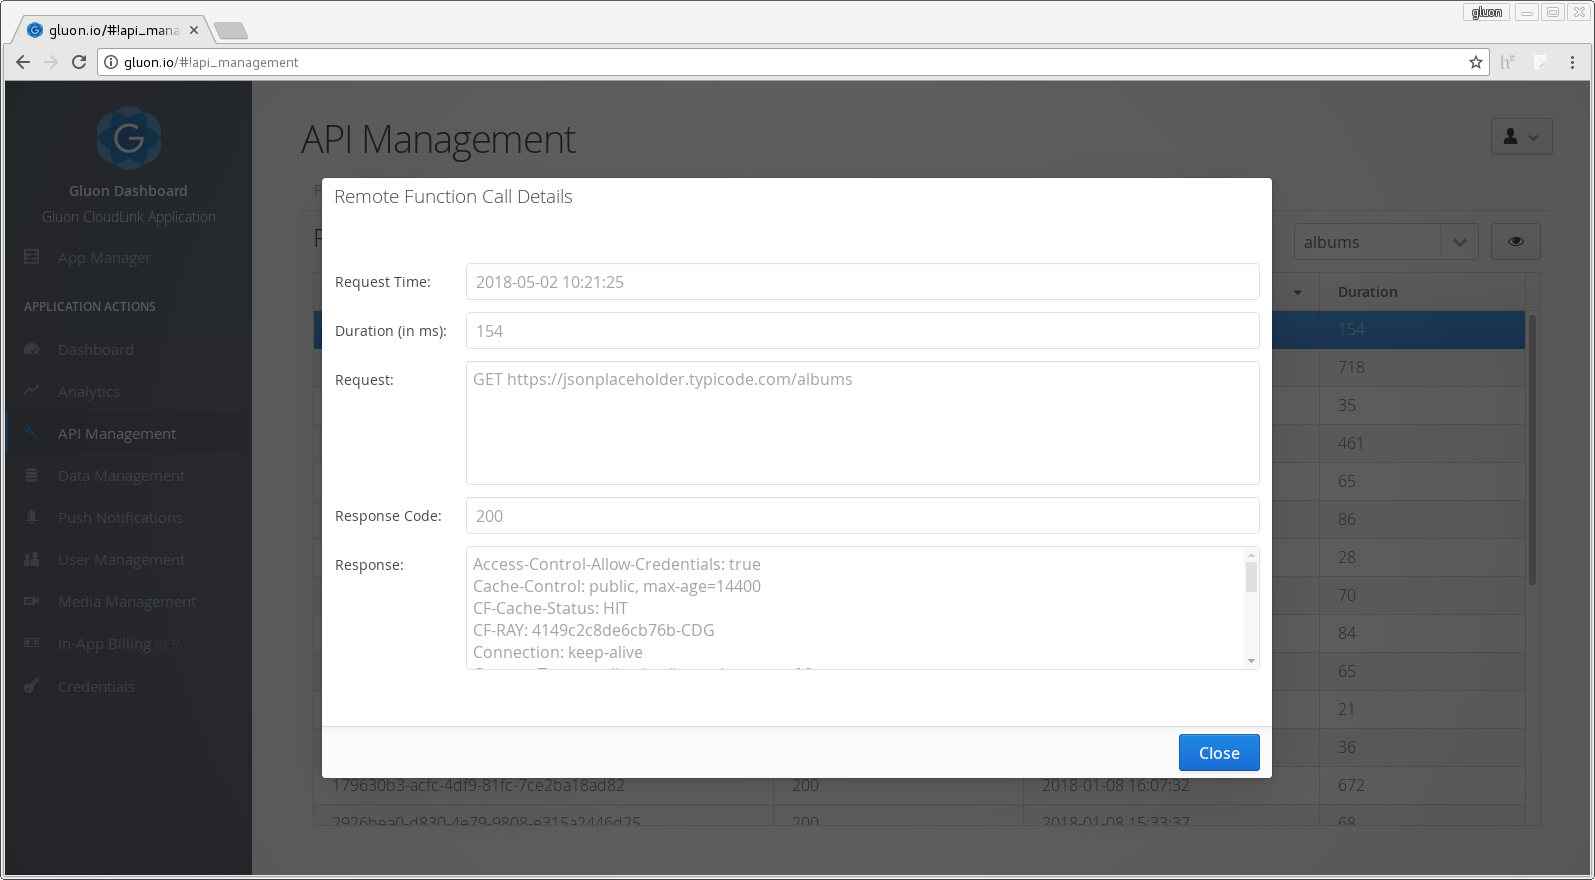
5.3.2. Call Log
Useful information from each call that is being invoked by a remote function is stored in the Call Log and can be accessed in Gluon Dashboard. Each request records the response code, the request and response timestamps and the body of the request and response. The body is capped at 8k.
5.3.3. CloudLink Client
For calling a remote function from the client application we use the RemoteFunctionBuilder. The
RemoteFunctionBuilder can generate three different implementations of a RemoteFunction, each
handling the response of the call to the remote function in their own way:
-
RemoteFunctionObject: the response is converted and wrapped into a GluonObservableObject
-
RemoteFunctionList: the response is converted into a list of objects, contained in a GluonObservableList
-
RemoteFunctionChunkedList: the response of the function is a continuous stream of chunks, where each chunk is converted and added to a GluonObservableList
Basic Remote Functions
To start calling remote functions, we first need to build an instance by using the
RemoteFunctionBuilder
builder class. Each built RemoteFunction instance can then be triggered by calling the call method.
// create an instance of remote function
RemoteFunctionList remoteFunction = RemoteFunctionBuilder.create("myFunction")
        .param("myParameter", "parameterValue")
        .list();

// call the remote function to fetch an observable list
GluonObservableList<MyResponse> responses = remoteFunction.call(MyResponse.class);
Local Caching
Every response that is returned by a call to a remote function will by default be cached locally in the private storage of the device. The next time the remote function is called, it will first load and return the cached data before making the actual call to the remote function in Gluon CloudLink. This allows the application to already present the user with data from the last time the remote function was called. When the response from the call to the actual remote function in Gluon CloudLink is completed, it will overwrite the cached data with the data from the new response.
Caching can be explicitly disabled when building the remote function:
// create an instance of remote function without caching locally
RemoteFunctionObject remoteFunction = RemoteFunctionBuilder.create("anotherFunction")
        .cachingEnabled(false)
        .object();
The cached data itself can also be cleared by using the clearCache() method:
// clear the locally cached data
remoteFunction.clearCache();

// the GluonObservableObject instance will no longer receive
// the cached data as it was cleared
GluonObservableObject<Sample> sample = remoteFunction.call(Sample.class);
Chunked Remote Functions
By default, Gluon CloudLink will close the call to the endpoint that is configured for a
remote function after 60 seconds. However, the connection will be kept open when the remote
function uses chunked transfer encoding. This is handled automatically, when the remote
function specifies the Transfer-Encoding response header with the value chunked in its
response. In other words, there is nothing special that needs to be configured in your
Remote Function definition on Gluon Dashboard.
At the client side, you do need to use a different implementation of RemoteFunction that is able to
handle chunked encoding: RemoteFunctionChunkedList.
// create an instance of a chunked remote function
RemoteFunctionChunkedList chunkedFunction = RemoteFunctionBuilder.create("chunkedFunction")
        .param("myParameter", "parameterValue")
        .chunkedList();

// call the remote function to fetch an observable list. Gluon CloudLink will add a
// new item to this list, for each chunk it receives from the remote function
GluonObservableList<MyChunk> responses = chunkedFunction.call(MyChunk.class);
Remote Functions with binary data
Writing binary data with a remote function can be done by defining the remote function in
Gluon Dashboard with the raw body type. In the client application, a byte array is
provided as the raw body when building the remote function.
// retrieve bytes from a classpath resource
byte[] rawBody = {};
try (ByteArrayOutputStream os = new ByteArrayOutputStream();
     InputStream is = Main.class.getResourceAsStream("/sample.wav")) {
    byte[] bytes = new byte[4096];
    int read;
    while ((read = is.read(bytes)) != -1) {
        os.write(bytes, 0, read);
    }
    rawBody = os.toByteArray();
} catch (IOException e) {
    // handle exception
}

// create an instance of remote function with raw bytes
RemoteFunctionObject playSoundFunction = RemoteFunctionBuilder.create("playSound")
        .rawBody(rawBody)
        .object();

// call the remote function passing on the raw bytes
GluonObservableObject<Void> response = playSoundFunction.call(Void.class);
response.stateProperty().addListener((obs, ov, nv) -> {
    if (nv == ConnectState.SUCCEEDED) {
        System.out.println("Sound uploaded successfully.");
    }
});
5.4. End to End Guide
You can find end to end guides on working with different cloud servers with Gluon Cloudlink below:
6. User Management
The User Management service enables user authentication in your Gluon Mobile application. It supports email and password based authentication and signing in with most popular identity providers like Facebook, Google and more. Each of these authentication types is called a Login Method in Gluon CloudLink.
Here is an overview of the login methods that are currently supported by Gluon CloudLink:
-
Facebook Login
-
Google Sign-In
-
Twitter
-
GitHub
-
Email and Password
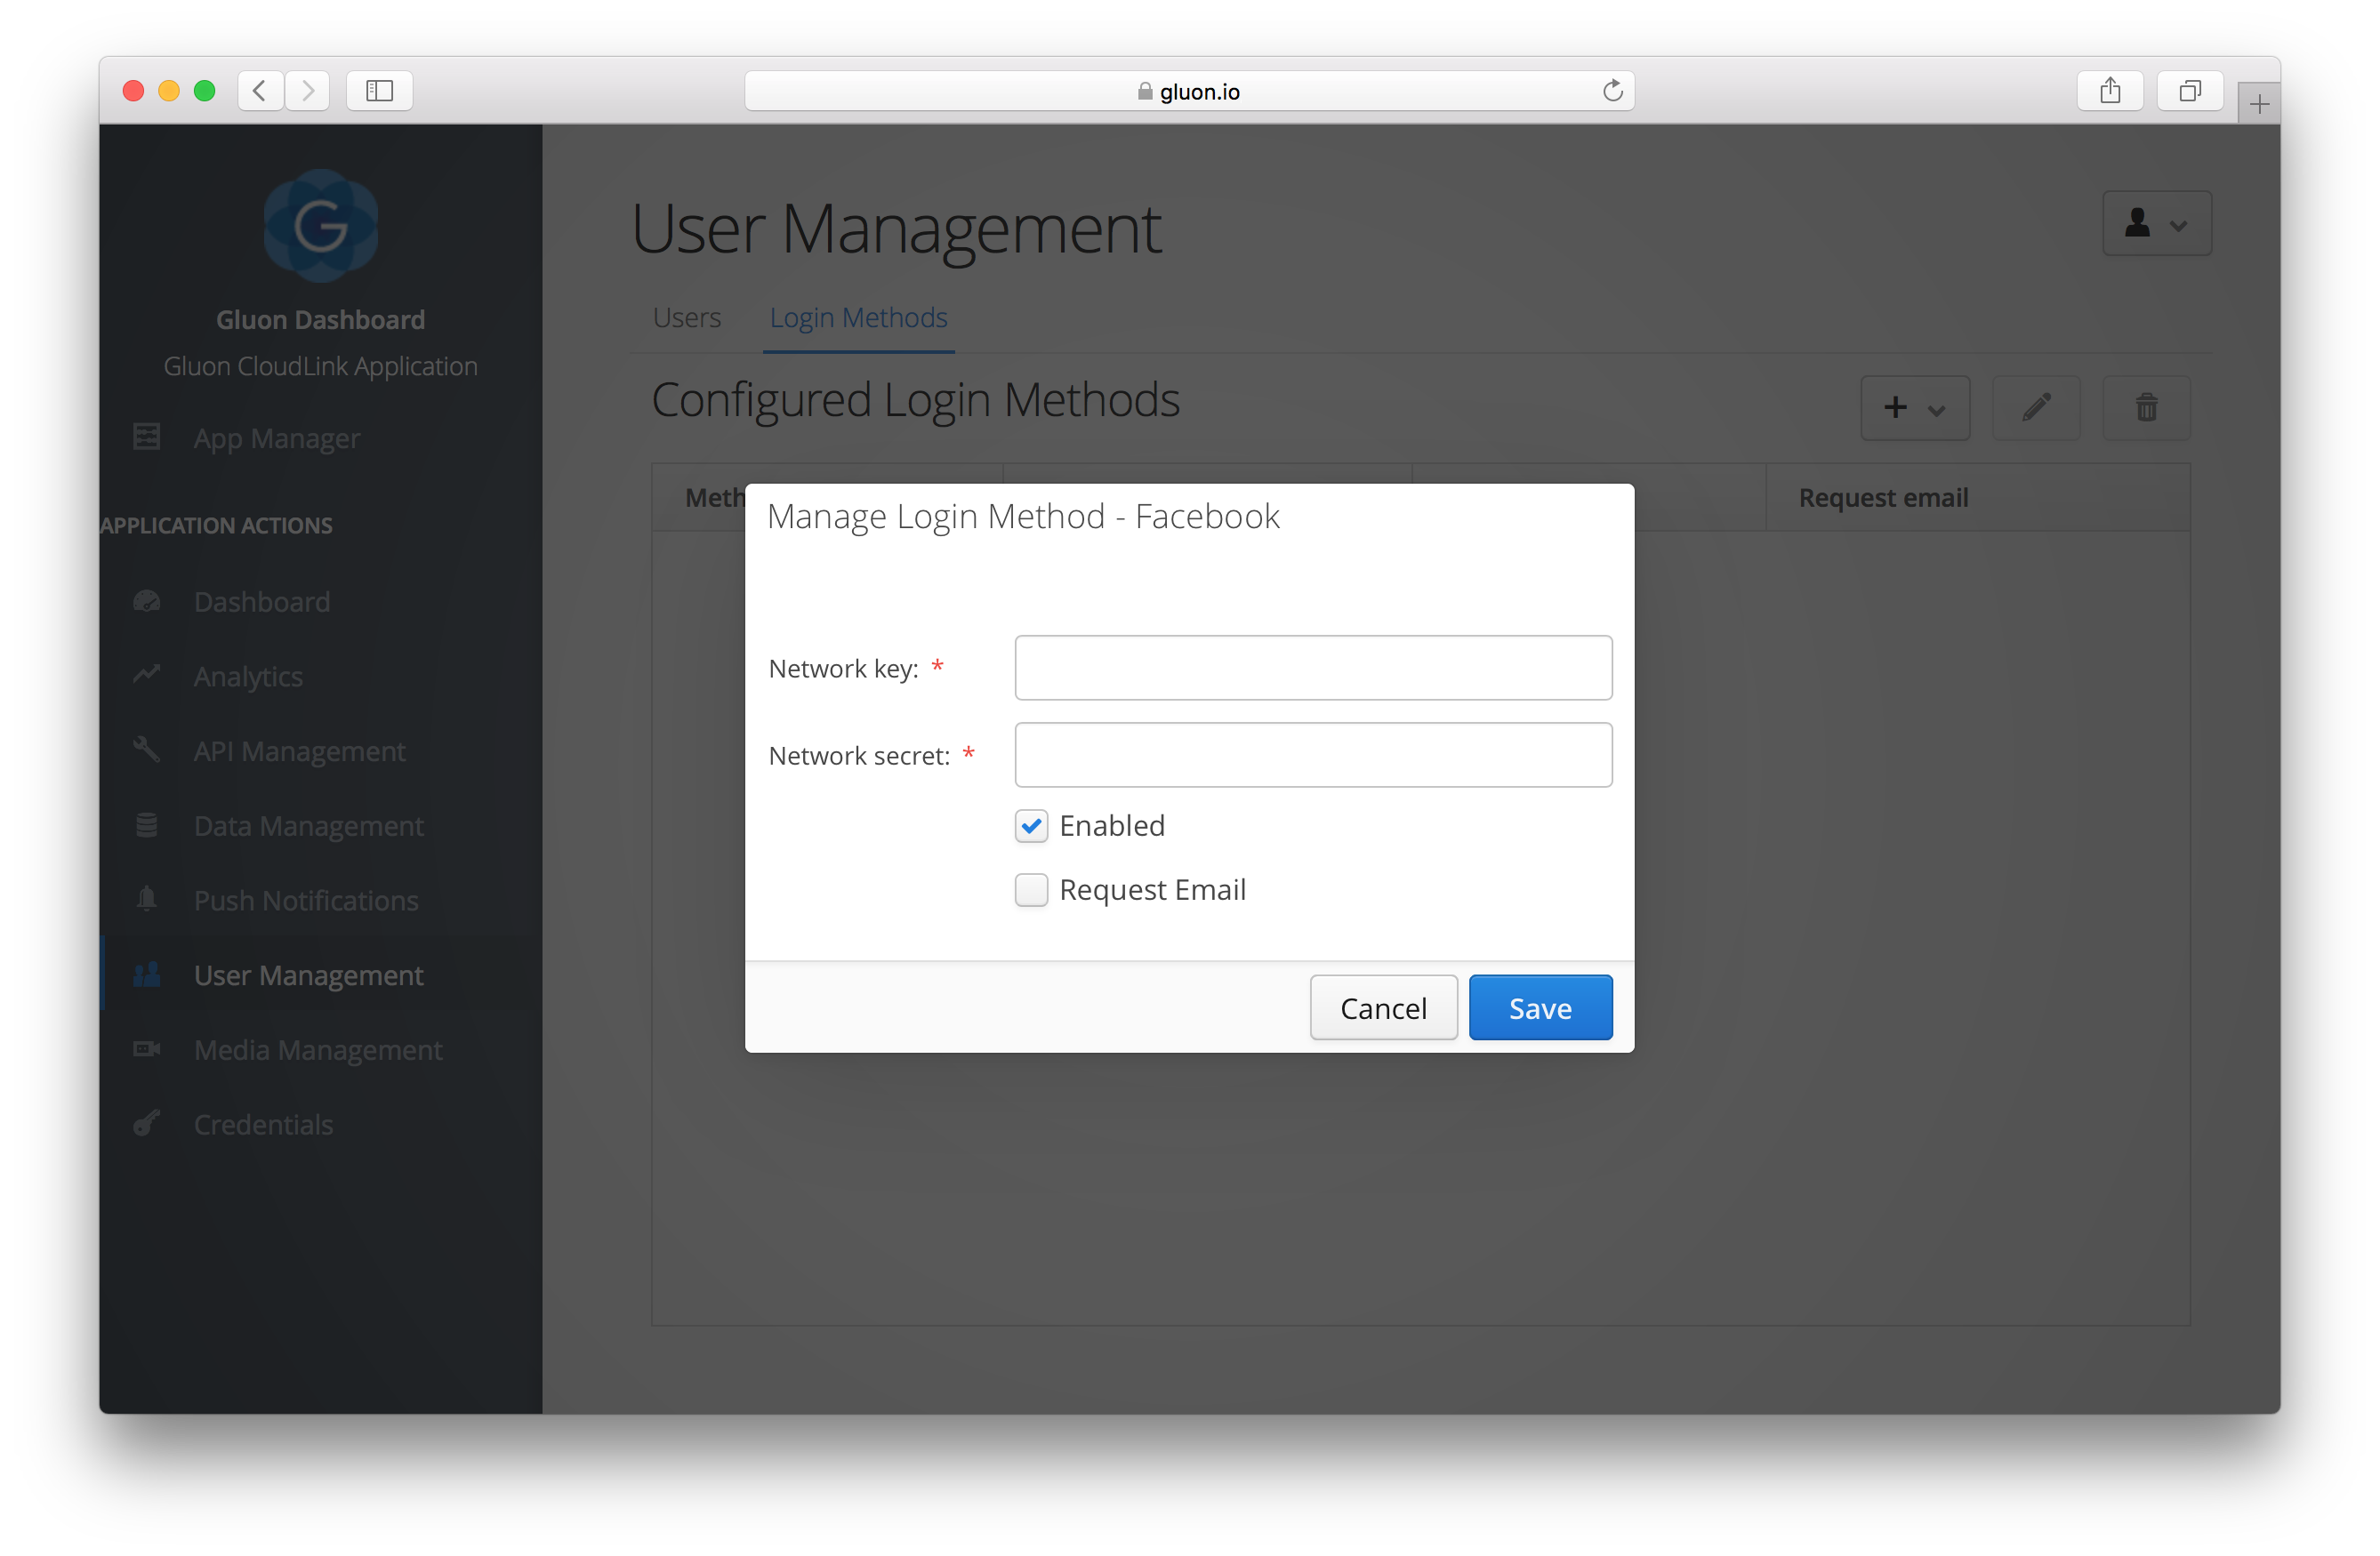
6.1. Enabling Login Methods
Enabling the login methods that should be available for your application can be done from the Gluon Dashboard. Navigate to the User Management link, and select the Login Methods tab. From here you can add and configure one or more login methods.
The login methods for identity providers all need a key and a secret from an application that is created on the respective identity provider. We provide a step-by-step guide to creating and configuring an application for each of the supported identity providers.
6.2. Applying Login Methods
6.2.1. UserClient
The UserClient
class is the access point to the User Management service. It contains various methods for managing the
authentication process. When a new instance is constructed, it will load the Login Methods that are enabled for the
Gluon Mobile application and present them to the user when the authentication process is started.
Initiate authentication
A typical workflow to authenticate a user would be coded as follows:
UserClient userClient = new UserClient();
userClient.authenticate(user -> {
    System.out.println("User authenticated successfully: " + user.getName());
});
When no authenticated user exists yet, the authentication process will be started. This is handled by taking the user
to the implementation of the AuthenticationView. The default AuthenticationView implementation looks like this:
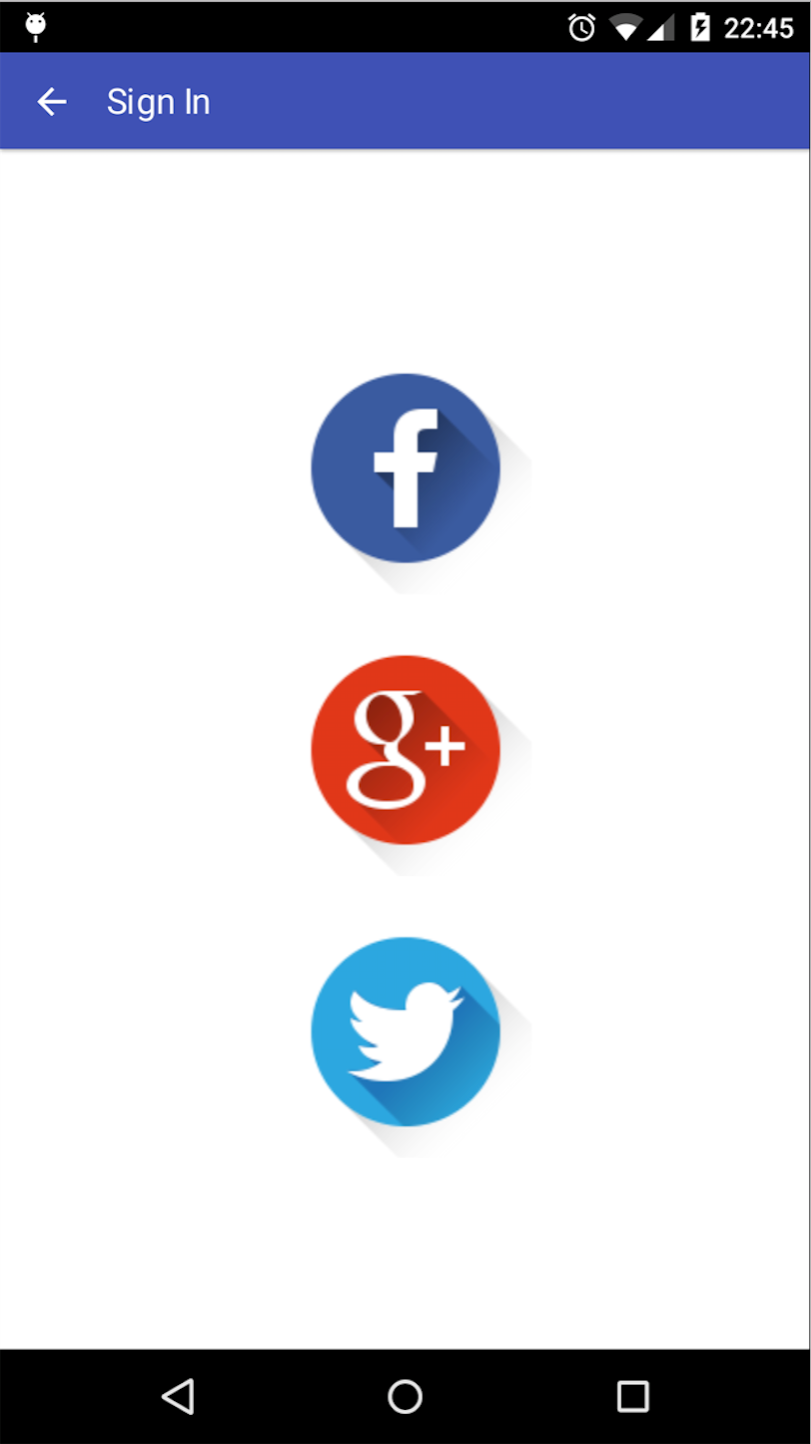
The user can select one of the presented login methods which will start the authentication flow for the selected
login method. When a user was successfully authenticated, or when an authenticated user was already present, the provided consumer in
the authenticate
method will be called, passing in the authenticated user.
Handling failed or aborted authentication
In case the user aborted the authentication process or when an unexpected error occurred, you can use the authenticate variant which takes an extra failure consumer.
userClient.authenticate(user -> System.out.println("User authenticated successfully!"),
    failure -> System.out.println("Authentication failed or aborted: " + failure));
Signing out
Once a user is successfully authenticated, that user will not need to authenticate again the next time the application
is started. To be able to restart the authentication process , you will first need to call the
signOut
method.
6.2.2. User
The authenticated user can be retrieved from the UserClient by calling the getAuthenticatedUser
method. This returns an instance of User
that has the following fields available:
-
key: the unique identifier of the user within the entire application
-
name: the full name of the user
-
nick: an optional nick name for the user
-
picture: an optional URL to the profile picture of the user
-
networkId: the identifier of the user at the identity provider that was used for authentication
6.2.3. Data Authentication
As mentioned in the Data Storage section, you can also use a UserClient to make sure that only
authenticated users have access to data that is loaded by a DataClient. To enable this, you need to pass in an
instance of UserClient when building the DataClient:
UserClient userClient = new UserClient();
DataClient dataClient = DataClientBuilder.create()
        .authenticateWith(userClient)
        .operationMode(OperationMode.CLOUD_FIRST)
        .build();
The first time that DataClient instance is used to access data, the authentication process will be initiated when an authenticated user was not yet present on the provided UserClient instance.
7. Media Management
The Media Management service is a central place to manage media resources that are used inside your mobile application. We distinguish the following different media types:
-
Media: refers to images, video and audio that can be used in the mobile application
-
Resource Bundles: refers to i18n resource bundle property files for translating application copy
7.1. Media
Each media resource is defined by a unique name. The client application will request the media resource by specifying that name. Each media is further made up of one or more media variants. The variant contains the actual media file, together with metadata to define for which platform the media should be made available. That way, it is for instance possible to define a different version of a media resource for Android and iOS.
7.1.1. Uploading Media
From the Gluon Dashboard, selecting the Media Management link will present you with a view that is divided into two grids. The top grid holds the media, while the bottom grid will show the media variants that are linked with the selected media from the top grid.
Add a new media resource by clicking the plus button from the top grid. This will create the media container as well as the first associated media variant. The following fields can be defined in the form dialog:
Media Name
This defines the unique name for the media resource. The client application will use this name to get a reference to the media resource.
Platform
Associates the media variant with a specific platform. When the client application requests a media resource and a specific variant exists that matches the platform where the application is running at, that media variant will be returned. Leave the platform empty to define the fallback resource that will be returned when no variant was found for a specific platform and/or platform version.
Platform Version
You can further specialize the media variant by defining a matching platform version. This media resource will only be returned when both the platform and the version of the platform where the application is running on match with the specified values.
Media File
This is the ultimate resource file that is linked with the media variant. It’s also this file that is returned to the client application in the form of an InputStream.
7.1.2. Loading Media Resources on the Mobile Client
The MediaClient
is the class that you need to load media resources on the mobile client application. You only
need to know the name of the media resource to load and call one of the two available functions:
The following code snippet shows an example of how to show a media resource into a Glisten View:
public void initialize() {
    MediaClient mediaClient = new MediaClient();
    Image image = mediaClient.loadImage("backgroundImage");

    StackPane pane = new StackPane();
    pane.getChildren().add(image);

    setCenter(pane);
}
7.2. Resource Bundles
Resource Bundles are the standard way for providing i18n functionality in Java. Resources bundles are typically provided by one properties file or class for each supported language. These properties files or classes are then shipped together with your application package. With Gluon CloudLink we add the possibility to provide the resource bundles as an internet resource.
The resource bundle consists of a resource file for each supported locale. When adding a new resource bundle, you specify the locale that defines the associated language, country, script, etc. When the client application requests the resource bundle, it also passes down a locale so that Gluon CloudLink can return the resource bundle that matches the given locale.
7.2.1. Uploading Resource Bundles
Resource Bundles can be uploaded from the Gluon Dashboard. Navigate to Media Management and choose the Resource Bundles tab. Click the + button to add a new resource bundle. The resource bundles are grouped by their bundle name. The most common scenario is to create a resource bundle for each view in your mobile application.
Note: it is best practice to always provide a version of the resource bundle with an empty locale. This way, when no matching resource bundle could be found for a given locale, the resource bundle with the empty locale will be used as a fallback.
7.2.2. Loading Resource Bundles on the Mobile Client
We call the method loadResourceBundle
on an instance of MediaClient to load a resource bundle from Gluon CloudLink. You can use the
returned Resource Bundle to load it into your View.
public void initialize() {
    MediaClient mediaClient = new MediaClient();
    ResourceBundle resourceBundle = mediaClient.loadResourceBundle("com.gluonhq.sample.BasicView",
            Locale.getDefault());

    Label label = new Label(resourceBundle.getString("greeting"));

    StackPane pane = new StackPane();
    pane.getChildren().add(label);

    setCenter(pane);
}
8. Usage Analytics
The Usage Analytics service is responsible for gathering statistics on the devices that are running your Gluon Mobile application. That information can then be visualised and analysed from within the Gluon Dashboard web application.
The data that is being gathered contains information about the requests that the Gluon Mobile application makes to the Gluon CloudLink services. It also contains general information about the device itself, like the platform, the model, the version of the application, etc.
8.1. Applying Usage Analytics
8.1.1. UsageClient
To enable usage analytics in your Gluon Mobile application, you will need to call the
enable
method on the UsageClient.
The method can be called at any time, but ideally it should be called as soon as the application is launched.
UsageClient usageClient = new UsageClient();
usageClient.enable();
This will trigger a call to the Gluon CloudLink Usage service that stores the general device information. The trigger will only be sent the first time, so any subsequent calls to the enable method will do nothing.
8.1.2. build.gradle
Don’t forget to add the Charm Down device plugin in the build.gradle file of your Gluon Mobile project.
...
jfxmobile {
downConfig {
version '3.6.0'
plugins 'device', 'display', 'lifecycle', 'statusbar', 'storage'
}
...
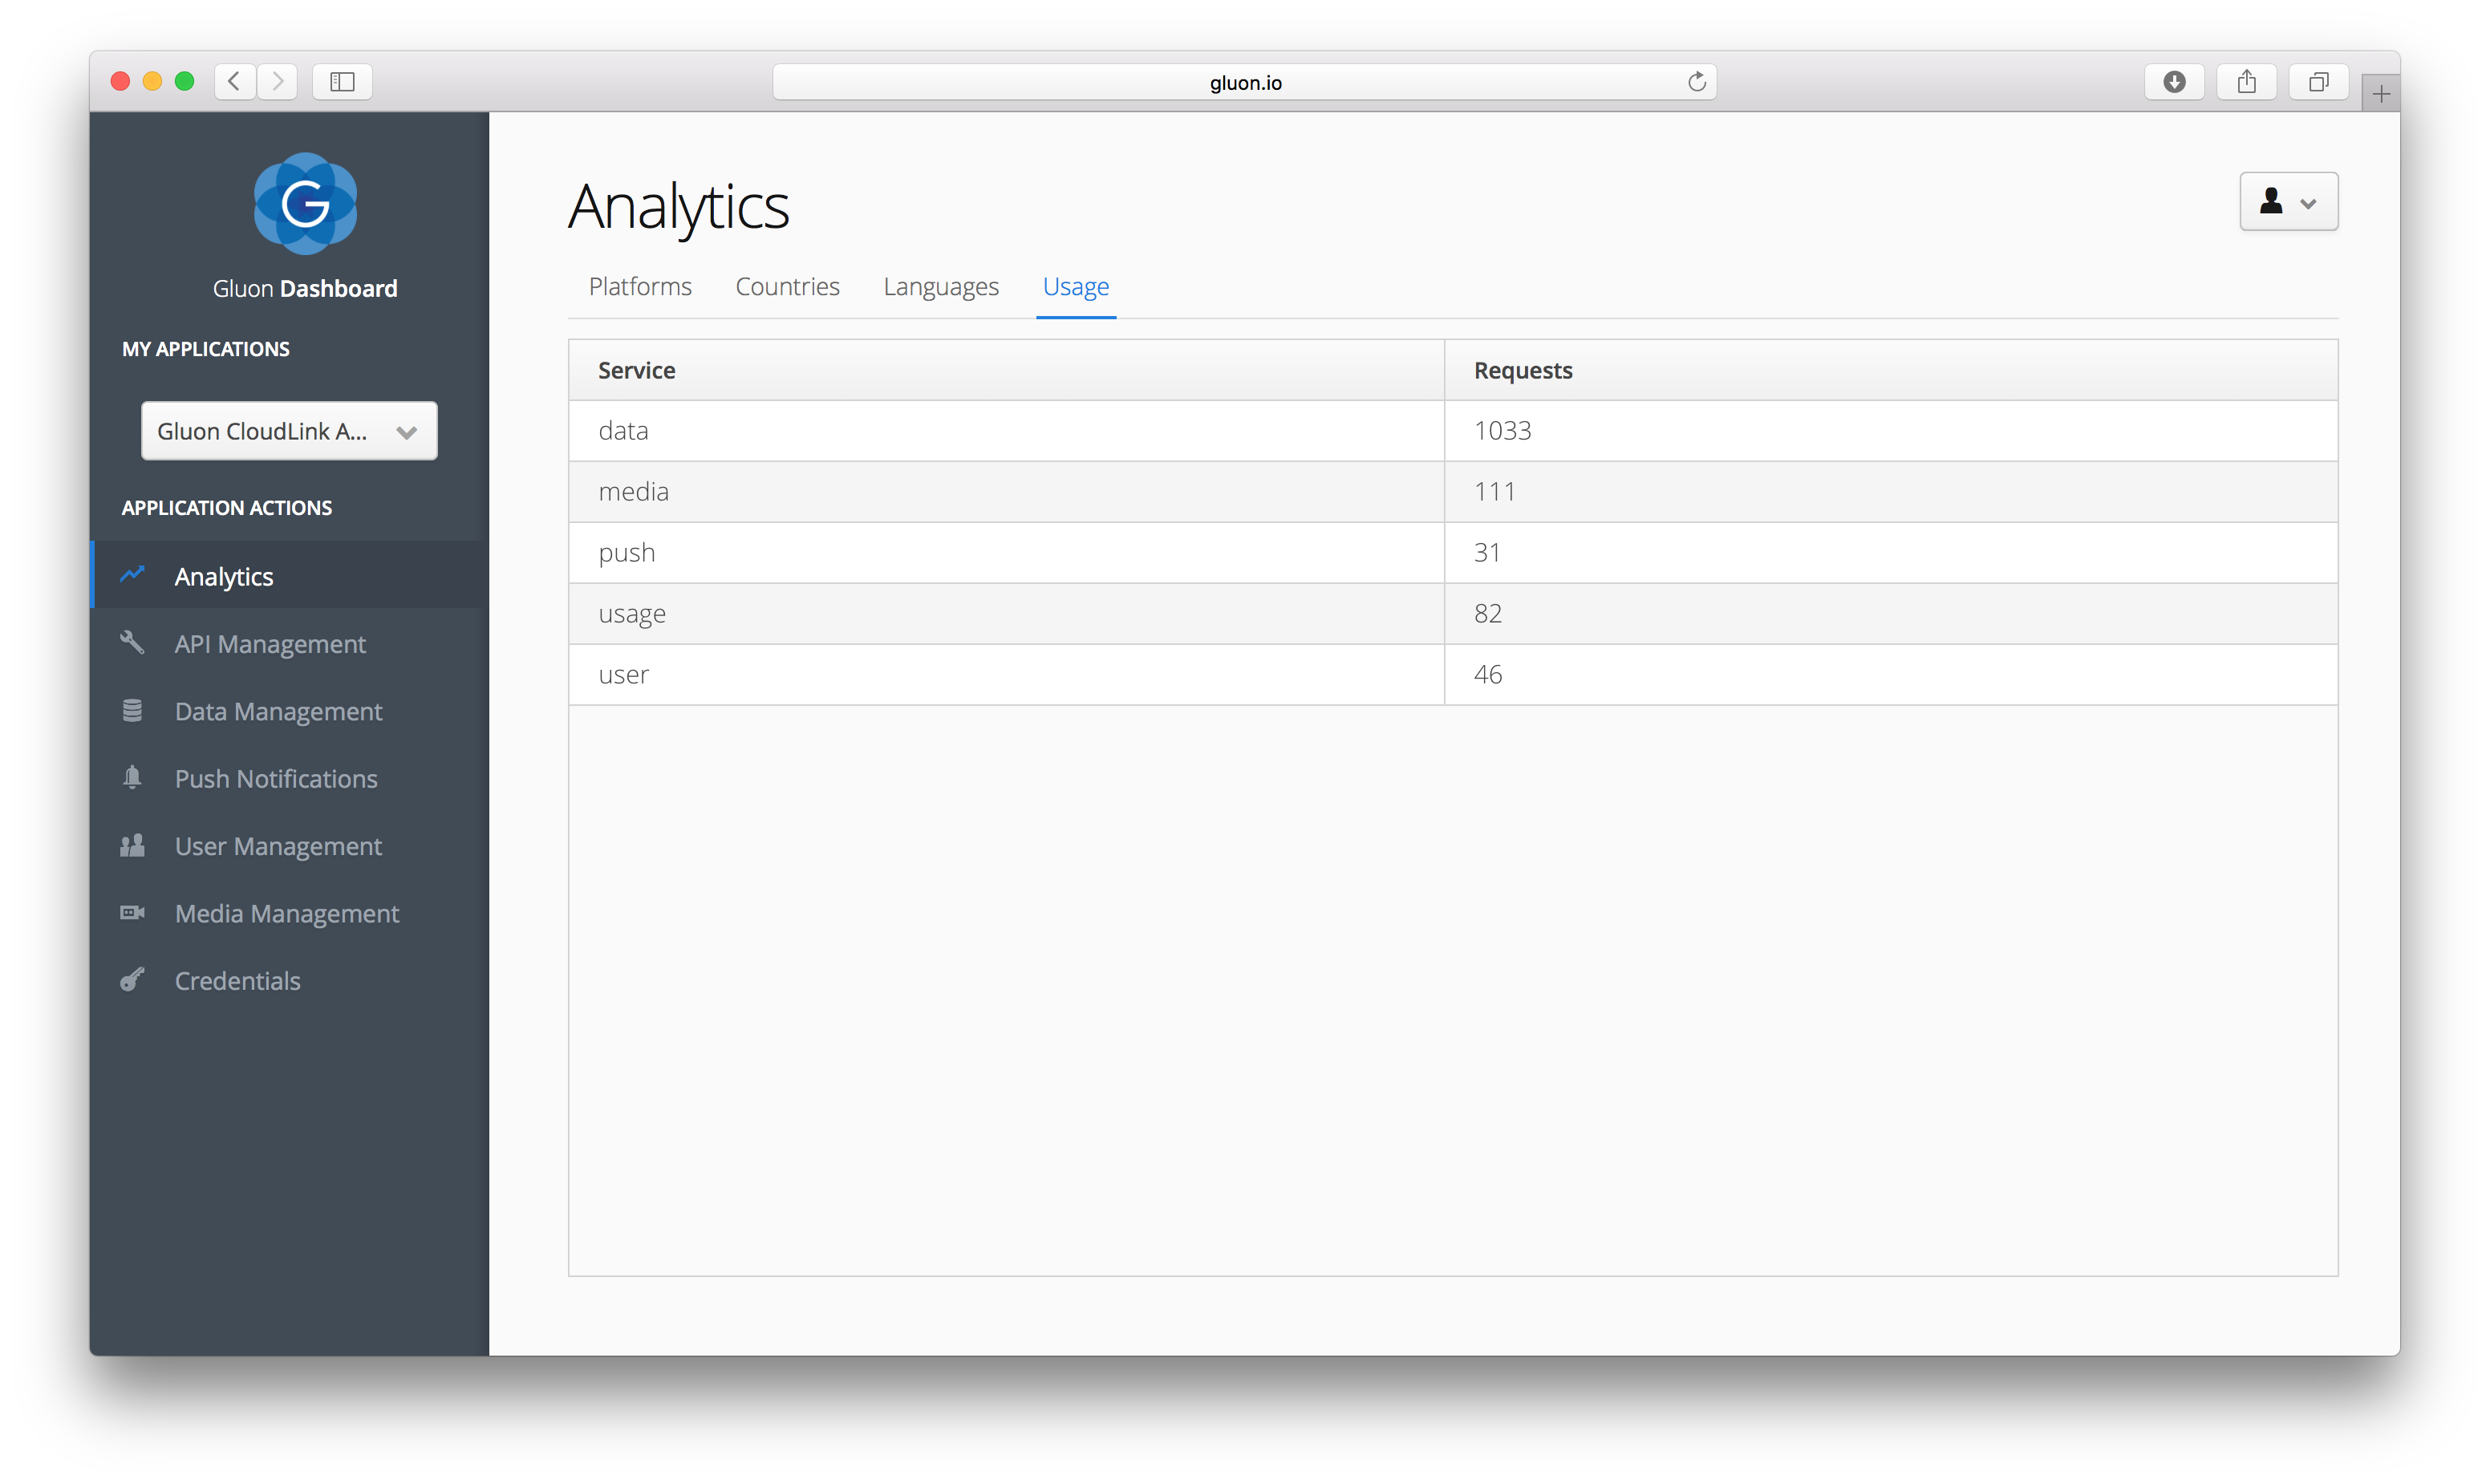
}8.2. Gluon Dashboard
The Gluon Dashboard can be used to inspect the usage information that is being logged by the devices that are running your Gluon Mobile application. When the UsageClient is enabled as shown in the previous section, there is nothing else to configure in the Gluon Dashboard. By default, the data that is shown is gathered from the devices that were active during the past two weeks.
9. Push Notifications
The Push Notifications service enables sending push notifications to the devices that installed your Gluon Mobile application. A push notification is a notification message that can be sent to the device, even when the application is not running. This can be used to unobtrusively notify a user that an application specific event has triggered.
9.1. Enabling Push Notifications
Gluon CloudLink uses Google Cloud Messaging (GCM) for handling push notifications over to Android devices and Apple Push Notification service (APNs) to get push notifications delivered to iOS devices. Both GCM and APNs require credentials for accessing their services.
9.1.1. Google Cloud Messaging
For GCM you will need to enable Google services for your Google application. You will then need both the Server API Key and the Sender ID of the application. The Server API Key is required to allow Gluon CloudLink to deliver push notifications to your Gluon Mobile application on Android devices. The Sender ID is needed inside your Gluon Mobile application when it registers the device to GCM to notify that it wants to receive push notifications.
You can follow a step-by-step guide for configuring GCM in a Google Application.
9.1.2. Apple Push Notification service
For APNs you will need to configure the push notifications capability for your iOS application. You will need the final signing key, exported as a p12 certificate. The certificate is required to allow Gluon CloudLink to communicate with the APNs service to deliver push notifications to your Gluon Mobile application on iOS devices.
You can follow a step-by-step guide for configuring APNs in the Apple Developer Center.
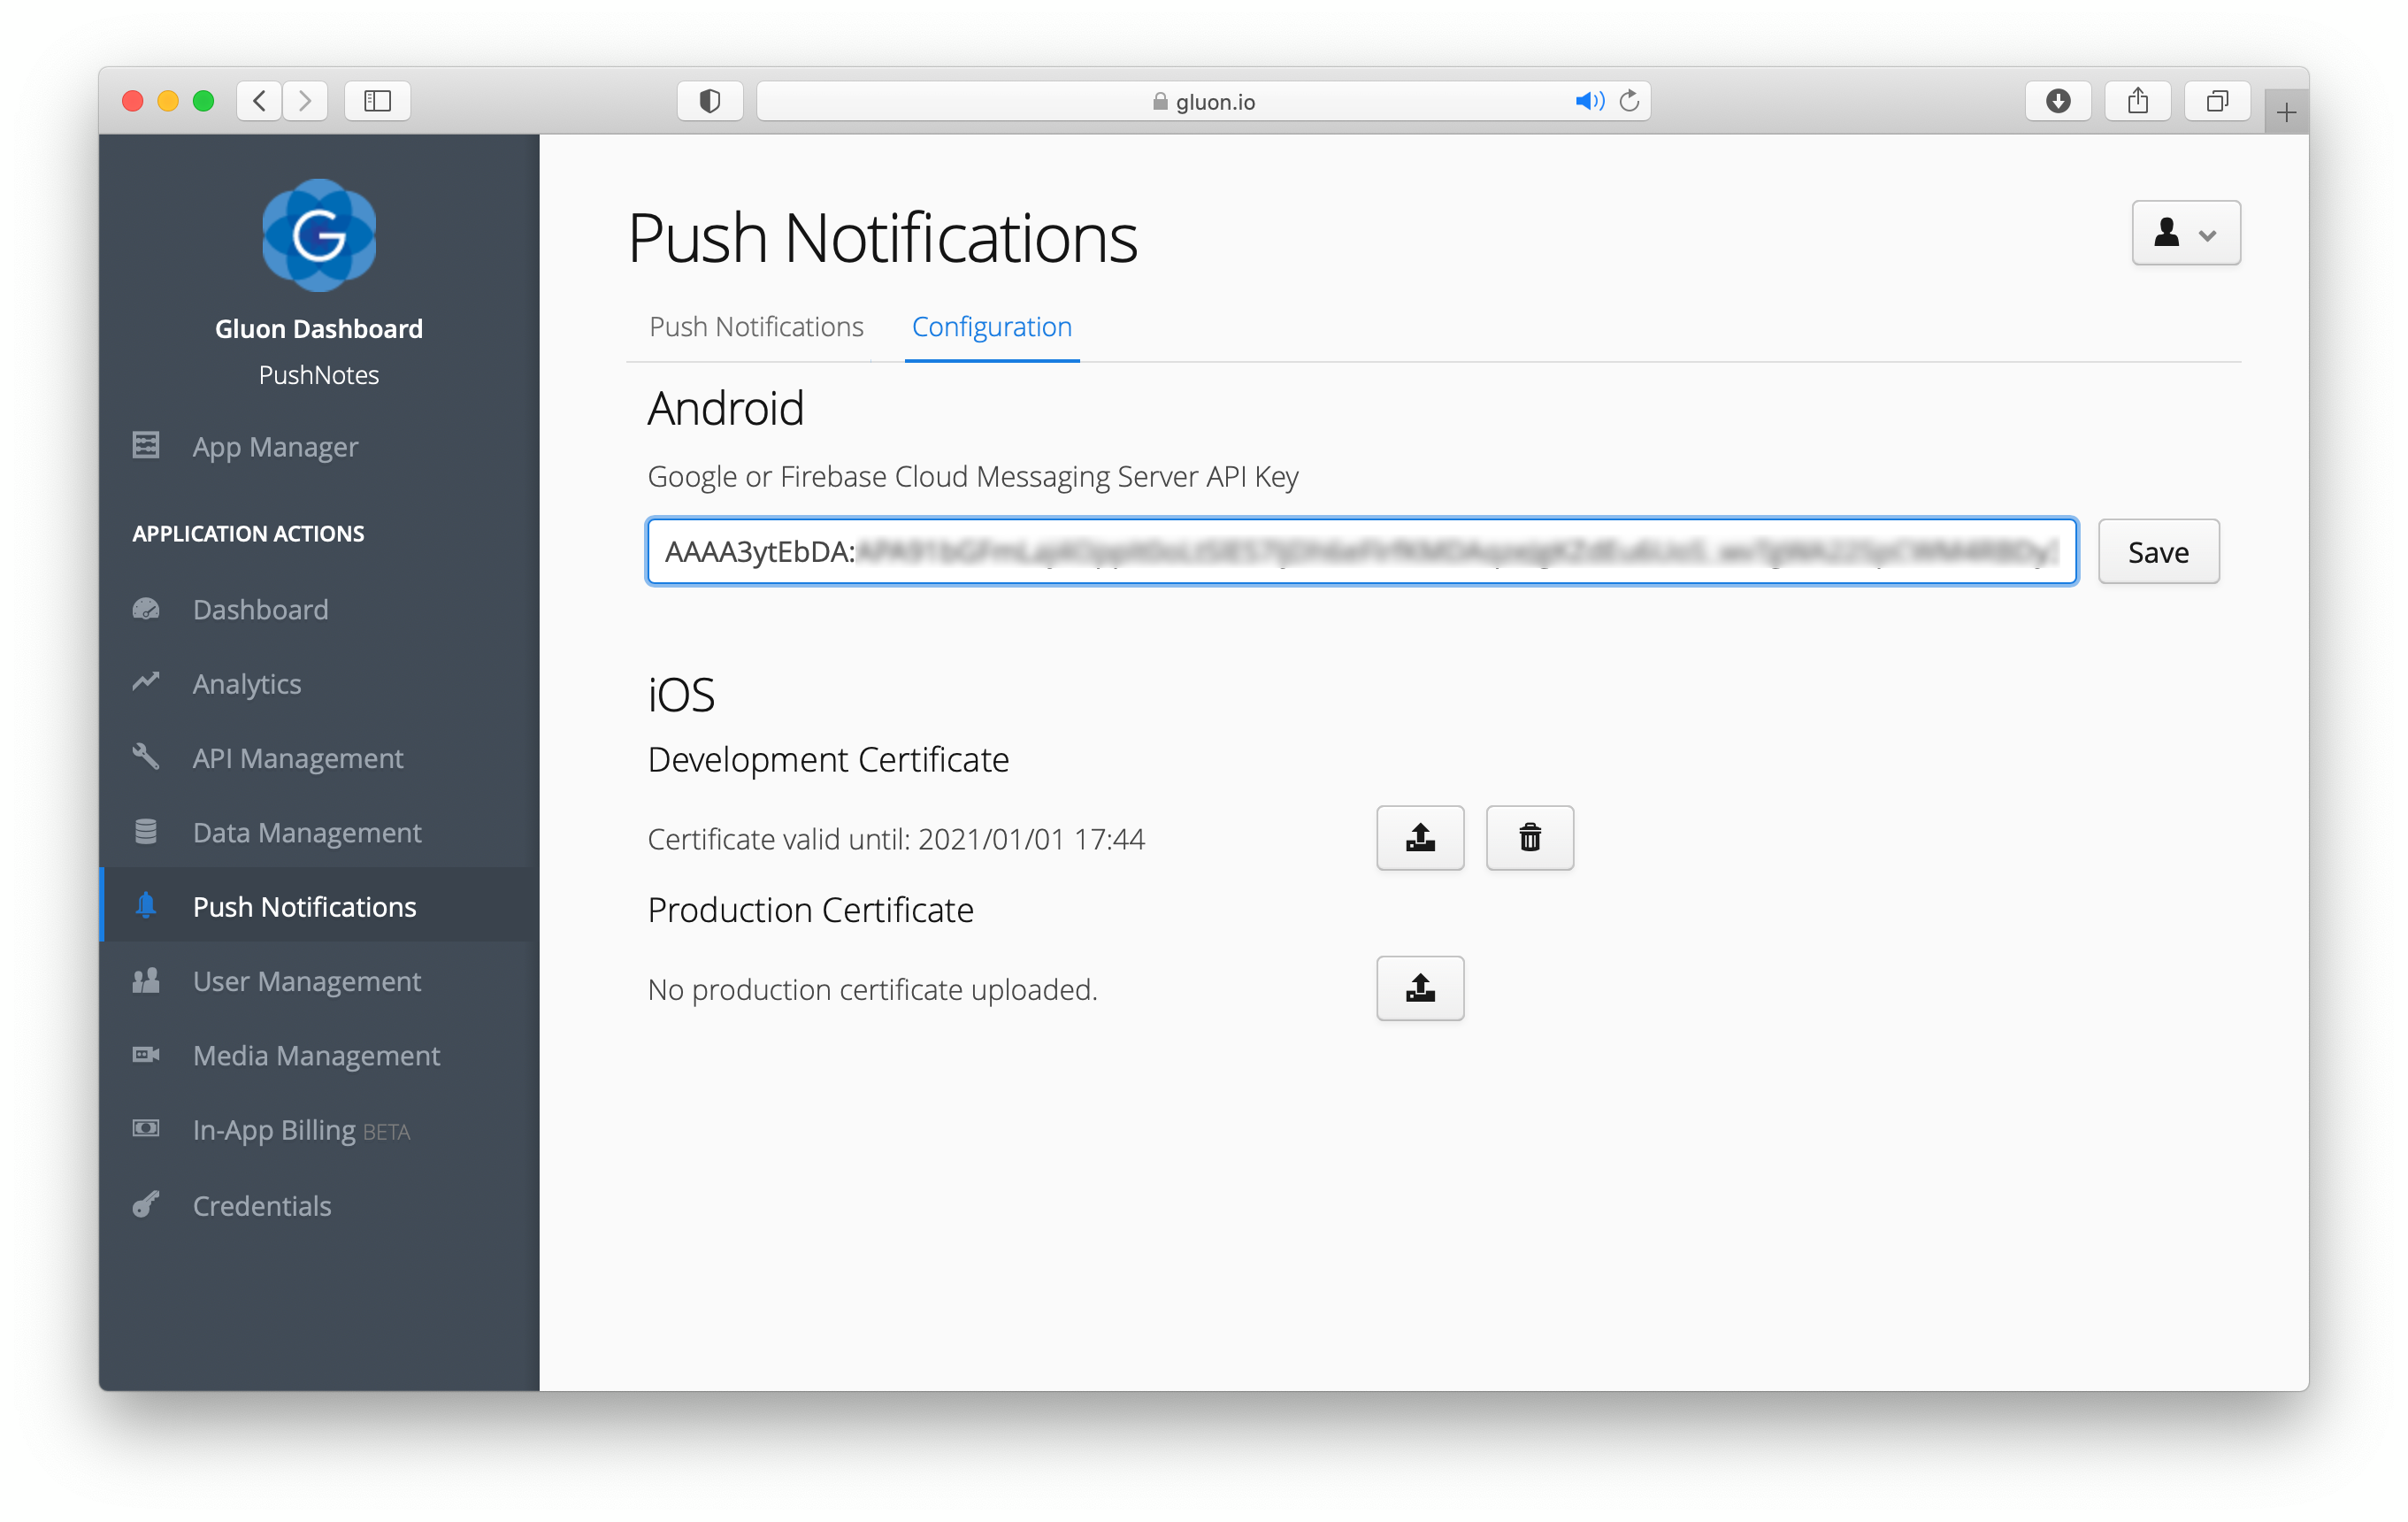
9.1.3. Gluon Dashboard
When you’ve managed to prepare your application for both GCM and APNs, you can configure your Gluon Mobile application in the Gluon Dashboard. Select the Push Notifications link from the menu, go the Configuration tab, where you can enter the GCM Server API key and upload your APNs certificate.
With the proper certificates, the Push Notifications tab can be used to send a push notification. Clicking on the + button will pop up a
dialog from which you can enter the details of the notification.
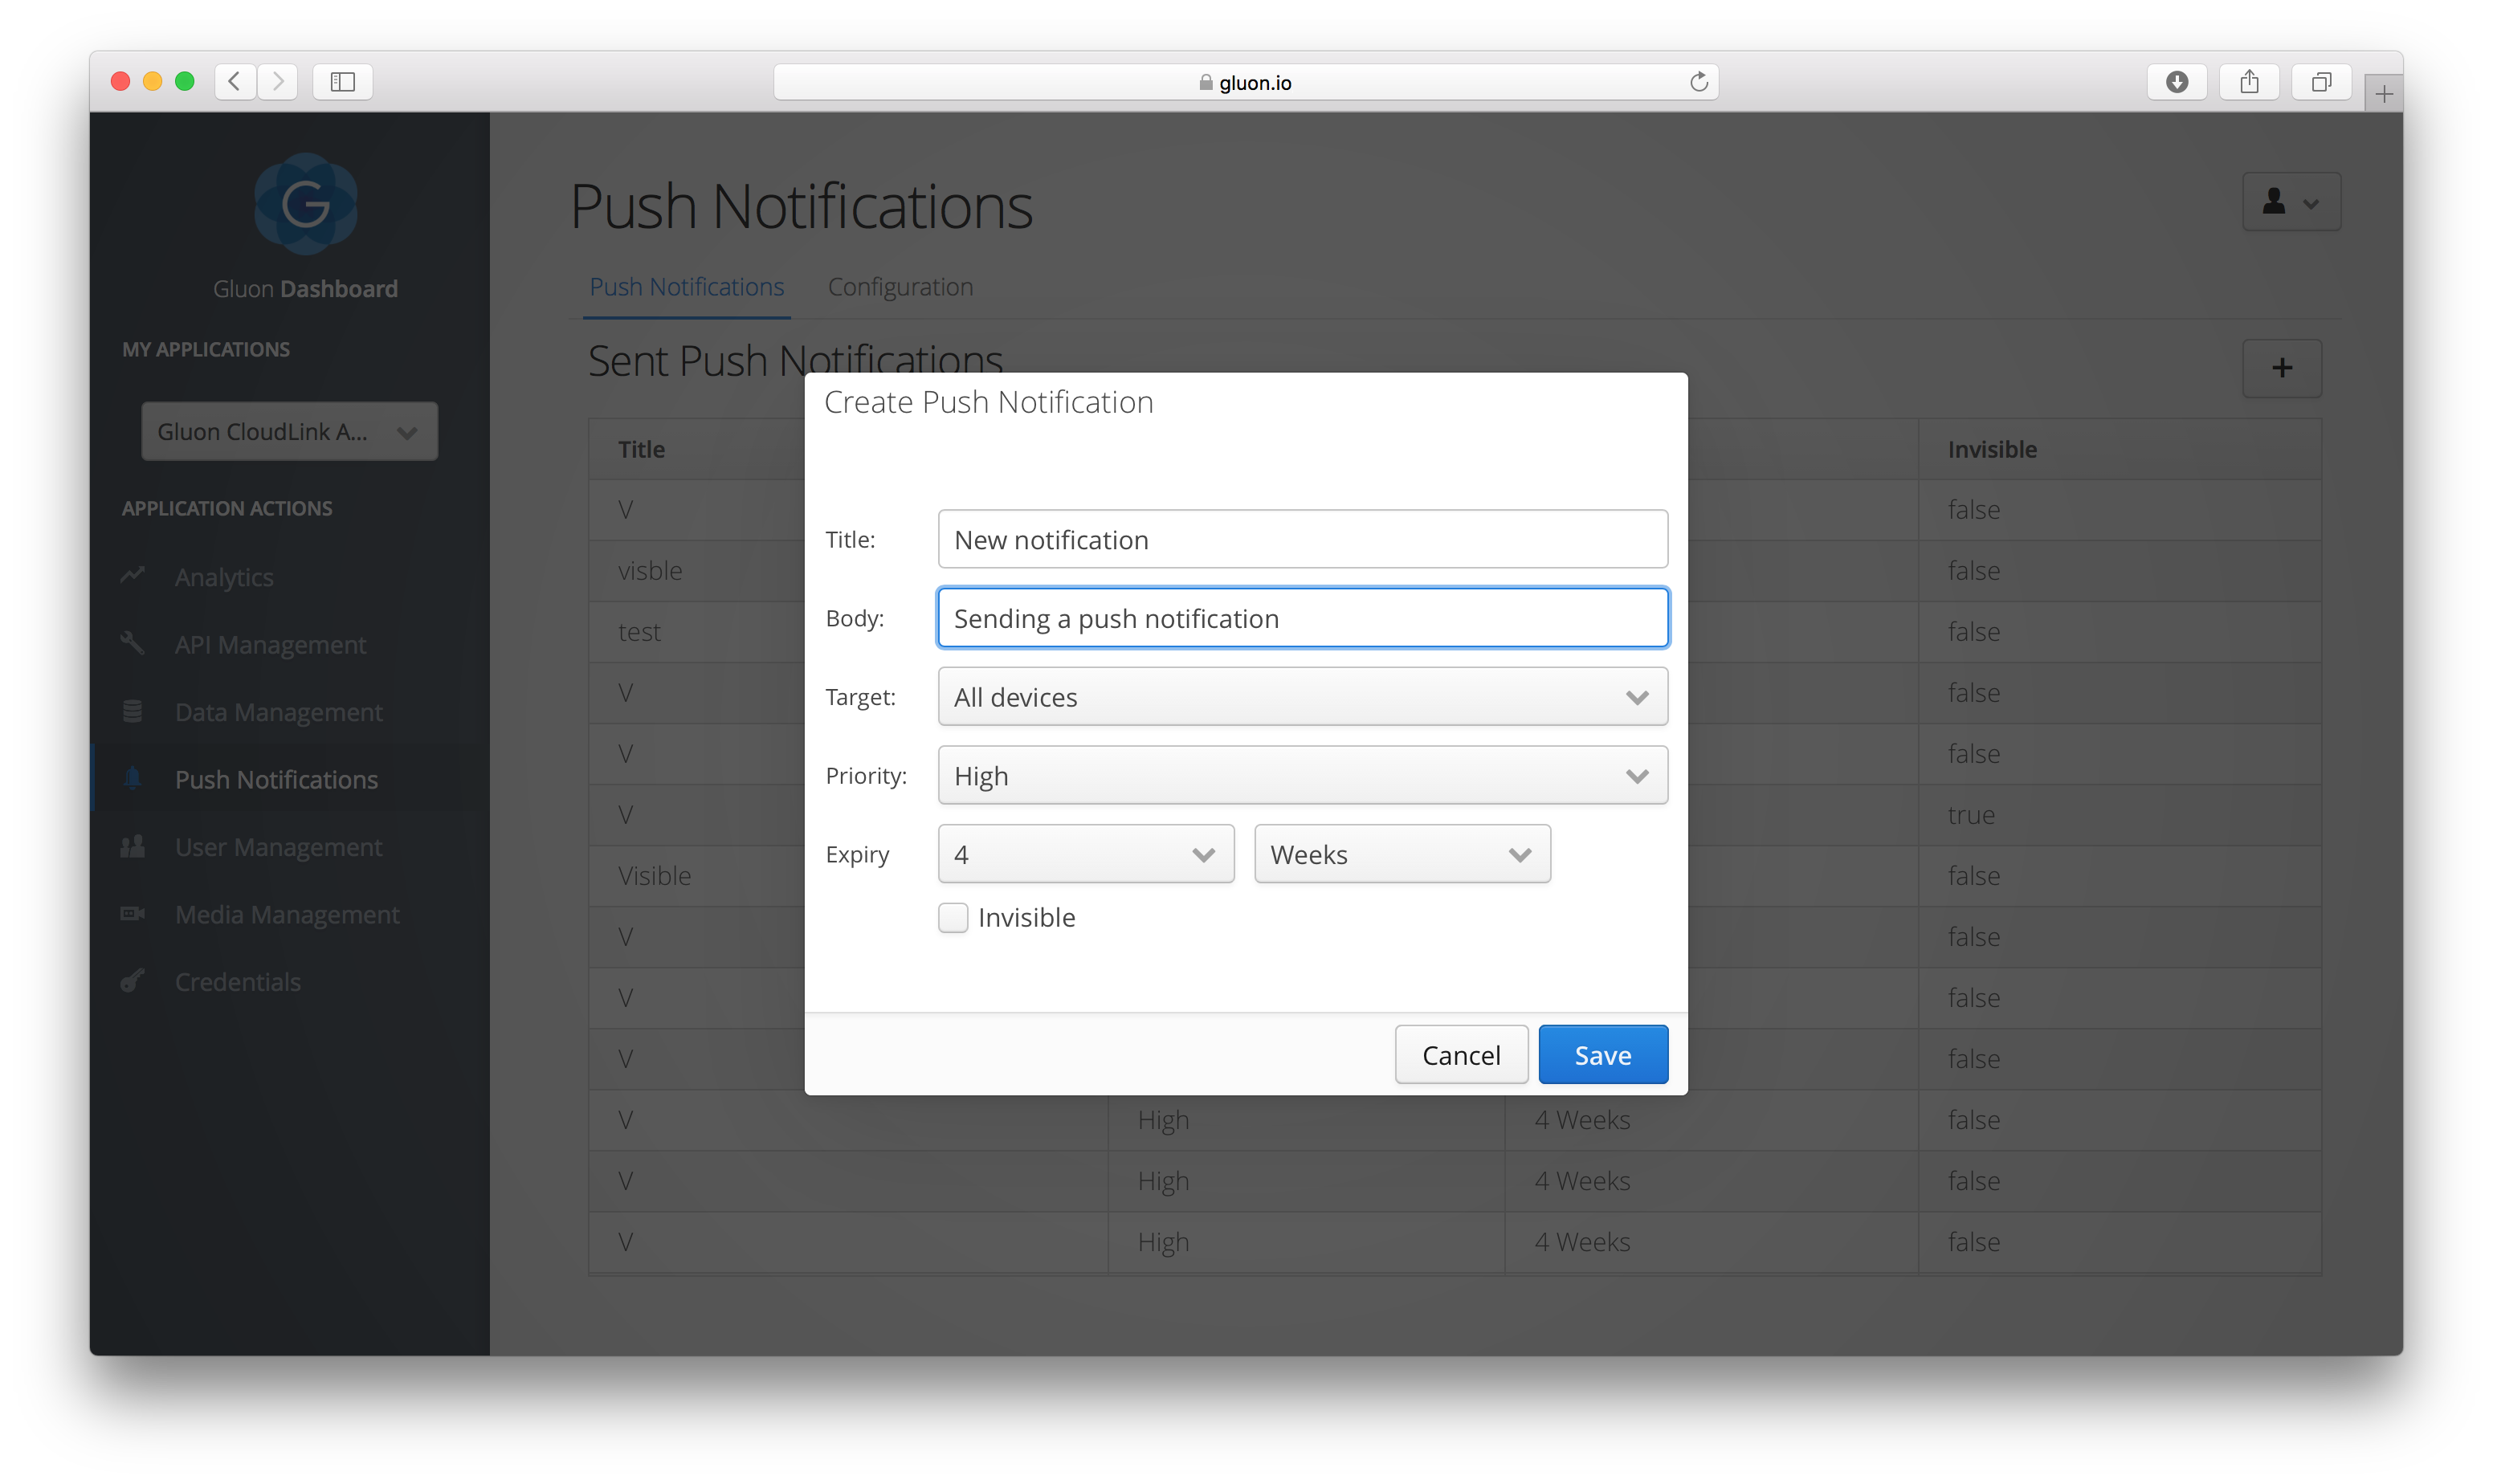
The checkbox labelled invisible can be selected to send silent push notifications to the user, without a visible notification. The Runtime Args service will be able to process it and execute certain action.
9.2. Using Push Notifications from Enterprise
9.2.1. REST endpoint
Send Push Notification
Send a new push notification to the defined target devices.
Form Parameters
| Name | Type | Description | Default |
|---|---|---|---|
body |
string |
the body of the push notification |
|
deliveryDate |
long |
Note: this parameter is currently ignored |
0 |
expirationAmount |
integer |
the amount used in conjunction with the expiration type |
4 |
expirationType |
|
the type of the expiration amount |
|
identifier |
string |
a custom identifier to be sent along with the push notification |
|
invisible |
boolean |
specify |
|
priority |
|
The priority for the push notification. |
|
targetDeviceToken |
string |
The device token to use as the target for the push notification. Only used when the target type is |
|
targetTopic |
string |
The name of the topic to use as the target for the push notification. Only used when the target type is |
|
targetType |
|
The target of the push notification. |
|
title |
string |
the title of the push notification |
Curl sample
curl -X POST "https://cloud.gluonhq.com/3/push/enterprise/notification" \
     -H "Authorization: Gluon YOUR_SERVER_KEY"
     --data "body=Sample%20Body" \
     --data "title=Sample%20Title" \
     --data "expirationType=HOURS" \
     --data "expirationAmount=1" \
     --data "priority=HIGH" \
     --data "invisible=false" \
     --data "targetType=TOPIC" \
     --data "targetTopic=Topic1"
9.2.2. Java Client
CloudLinkConfig config = new CloudLinkConfig(YOUR_SERVER_KEY);
CloudLinkClient client = new CloudLinkClient(config);

PushNotification pushNotification = new PushNotification();
pushNotification.setBody("Sample Body");
pushNotification.setTitle("Sample Title");
pushNotification.setExpirationType(PushNotification.ExpirationType.HOURS);
pushNotification.setExpirationAmount(1);
pushNotification.setPriority(PushNotification.Priority.HIGH);
pushNotification.getTarget().setType(PushNotificationTarget.Type.TOPIC);
pushNotification.getTarget().setTopic("Topic1");
client.sendPushNotification(pushNotification);
9.3. Applying Push Notifications in Mobile Client
9.3.1. PushClient
To activate push notifications on your Gluon Mobile application, you will need a reference to the
PushClient
and call the enable
method. The method takes one parameter, which is the Sender ID of the GCM application from Google. iOS doesn’t need any
specific identifiers because identification will be done by specifying a correctly configured Apple provisioning profile.
PushClient pushClient = new PushClient();
pushClient.enable("123456789012"); // enable push notifications
This will trigger a message on an iOS device asking the user to confirm that push notifications are allowed for the application. On Android, if the user has not yet installed or activated Google Play services, a message will be shown to ask for permission to install and/or activate Google Play services on the device.
9.3.2. build.gradle
Don’t forget to add the Charm Down device, push-notifications and runtime-args plugins in the build.gradle file of your Gluon Mobile project.
...
jfxmobile {
    downConfig {
        version '3.6.0'
        plugins 'device', 'display', 'lifecycle', 'push-notifications', 'runtime-args', 'statusbar', 'storage'
    }
    ...
}
9.3.3. Android configuration
For Android, we need to update the Android Manifest configuration file to add the required permissions and register the services for handling push notifications.
Permissions
The following permissions must be configured for the application to be able to receive notifications from GCM:
    <uses-permission android:name="android.permission.INTERNET"/>
    <uses-permission android:name="android.permission.WAKE_LOCK"/>
    <uses-permission android:name="com.google.android.c2dm.permission.RECEIVE" />
    <uses-permission android:name="YOUR_PACKAGE_NAME.permission.C2D_MESSAGE" />
    <permission android:name="YOUR_PACKAGE_NAME.permission.C2D_MESSAGE" android:protectionLevel="signature" />
Change YOUR_PACKAGE_NAME above to the package name that you defined for your application at the top of the Android Manifest.
The WAKE_LOCK permission is optional and is used to prevent the processor from going to sleep while listening for incoming messages from GCM.
Receivers, services and activity
Add the receiver, services and activity listed below inside the application section of the Android Manifest. Again, replace
YOUR_PACKAGE_NAME in the receiver category to the package name of your application.
<receiver android:name="com.google.android.gms.gcm.GcmReceiver"
          android:exported="true"
          android:permission="com.google.android.c2dm.permission.SEND">
    <intent-filter>
        <action android:name="com.google.android.c2dm.intent.RECEIVE" />
        <category android:name="YOUR_PACKAGE_NAME" />
    </intent-filter>
</receiver>

<service android:name="com.gluonhq.impl.charm.down.plugins.android.PushGcmListenerService"
         android:exported="false">
    <intent-filter>
        <action android:name="com.google.android.c2dm.intent.RECEIVE" />
    </intent-filter>
</service>

<service android:name="com.gluonhq.impl.charm.down.plugins.android.PushInstanceIDListenerService"
         android:exported="false">
    <intent-filter>
        <action android:name="com.google.android.gms.iid.InstanceID" />
    </intent-filter>
</service>

<service android:name="com.gluonhq.impl.charm.down.plugins.android.RegistrationIntentService"
         android:exported="false" />

<activity android:name="com.gluonhq.impl.charm.down.plugins.android.PushNotificationActivity"
                android:parentActivityName="javafxports.android.FXActivity">
    <meta-data android:name="android.support.PARENT_ACTIVITY"
                       android:value="javafxports.android.FXActivity"/>
</activity>
<meta-data android:name="com.google.android.gms.version" android:value="9452000"/>
Update launch mode
The main activity declaration should have the android:launchMode attribute set to singleTop. This ensures that the
same activity is being used when a push notification is delivered to the device when the application is running in the foreground.
...
<activity android:name="javafxports.android.FXActivity"
          android:label="PushNotes"
          android:launchMode="singleTop"
          android:screenOrientation="portrait"
          android:configChanges="screenSize">
...
9.3.4. iOS configuration
First make sure to configure your app so it can use Push notifications in the Apple Developer Center. You can follow this step-by-step guide.
Update build.gradle
Change your project’s build.gradle file
-
to make sure it uses the correct provisioning profile for your app:
-
to enable the Push notification entitlement
jfxmobile {
    ios {
        iosSignIdentity = 'iPhone Developer: ...'
        iosProvisioningProfile = 'Push Notes Provisioning Profile'
        apsEnvironment = 'development'
    }
}
As signing identity, use the certificate selected during the provisioning profile generation.
When deploying to your iOS device, the provisioning profile will be downloaded. If this is not the case, you still can install it manually: Open XCode, connect your device, go to Window → Device, and at the bottom left there is a small engine icon, click to see the installed provisioning profiles, and then click on the + button to add this one.
Note that this provisioning profile contains the entitlements that match those installed within the app, required to enable push notifications.
The apsEnvironment property needs to match the match the used environment (development or production)
Build your app
When you’ve configured your build.gradle, all you have to do is building your app as usual. Alternatively, you can skip
changes in build.gradle and provide the necessary option from the command-line:
 ./gradlew \
      -Pjfxmobile.ios.apsEnvironment="production" \
      -Probovm.iosSignIdentity="iPhone Distribution: ..." \
      -Probovm.iosProvisioningProfile="your-provisioning-profile-name" \
      createIpa